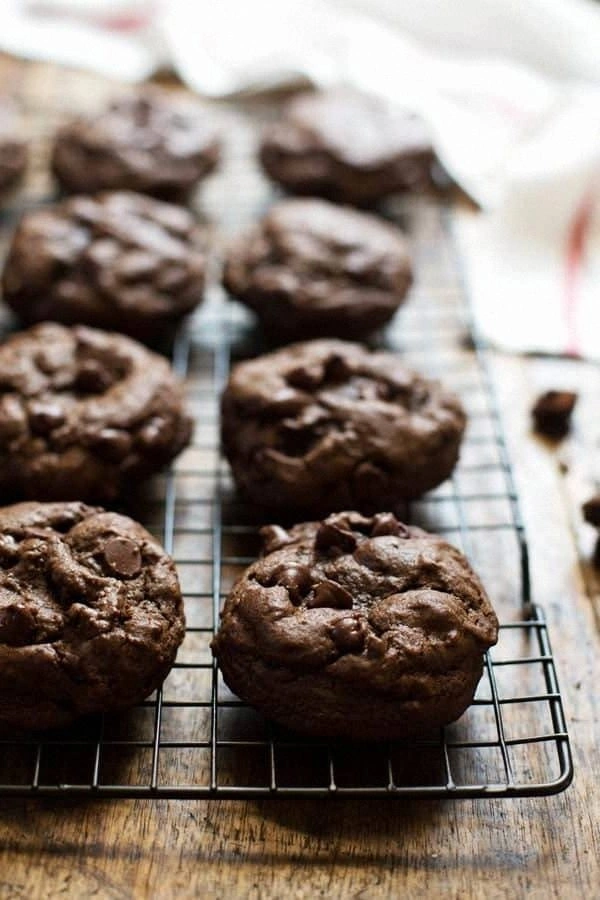
Last weekend, I found myself standing in my kitchen with a half‑empty pantry, a busted mixer, and a craving that felt like a tiny tornado swirling inside my stomach. I had promised a friend I’d bring cookies to a game night, but the only thing I could think of was the bland, dry store‑bought kind that crumbles like old newspaper. I stared at the empty cookie tin, imagined the perfect bite—rich, glossy chocolate that melts on the tongue, a chewy center that refuses to surrender, and a crackly edge that shatters like thin ice—then I dared myself to create something that would make even the most seasoned bakers jealous. The idea struck like lightning: a thick, fudgy double‑chocolate cookie that could stand up to a double espresso and still whisper sweet nothings to a glass of milk.
Picture this: the oven humming, the scent of melted butter and cocoa swirling together like a warm hug, the glossy chocolate chips glistening under the kitchen lights, and the rhythmic sound of a wooden spoon scraping the bowl—each scrape a promise of decadence. My fingertips tingled as I measured the flour, the cocoa powder dark as midnight, and the butter soft enough to melt at the slightest touch. The dough came together, thick and glossy, like a velvety river of chocolate inviting you to dive right in. I could already hear the sighs of approval echoing around the table, the way the first bite would make eyes widen and jaws drop. I’m not exaggerating when I say this cookie could turn a Monday into a celebration.
Most recipes get the texture wrong—either they’re too cakey or they crumble like stale biscuits. This version? It’s the goldilocks of cookies: dense enough to feel indulgent, yet soft enough to melt in your mouth, with pockets of molten chocolate that ooze out when you bite. The secret? A blend of two chocolate types, a splash of espresso to heighten the cocoa depth, and a precise balance of sugars that creates a caramelized crust without sacrificing chew. I’m going to be honest—I ate half the batch before anyone else got a chance, and I’m still not sorry. I dare you to taste this and not go back for seconds; that’s a promise I’m willing to back up with every crumb.
Ready to join me on this chocolate‑laden adventure? Let me walk you through every single step—by the end, you’ll wonder how you ever made any other chocolate cookie. Okay, ready for the game‑changer? This next part? Pure magic. Stay with me here — this is worth it.
What Makes This Version Stand Out
- Intense Flavor: A double‑chocolate blend of dark and milk chips creates a depth that feels like a chocolate truffle masquerading as a cookie.
- Chewy Core: The high ratio of brown sugar to granulated sugar locks in moisture, delivering a fudgy center that never dries out.
- Crisp Edge: A brief high‑heat start forms a caramelized crust that cracks delightfully when you bite.
- Simple Technique: No fancy equipment, just a sturdy whisk, a trusty mixing bowl, and a dash of patience.
- Universal Appeal: Whether you’re a kid with a sweet tooth or a coffee lover, the espresso whisper satisfies every palate.
- Ingredient Quality: Using high‑cocoa‑percentage dark chocolate and real butter makes the flavor sing rather than scream.
- Make‑Ahead Friendly: The dough holds up beautifully in the fridge, letting you prep ahead for any sudden cookie cravings.
- Show‑Stopping Aroma: The moment it hits the oven, the kitchen fills with a scent that practically invites strangers in.
Inside the Ingredient List
The Flavor Base
All‑purpose flour (2 cups) creates the structure. Too much flour and you’ll end up with a biscuit‑like cookie; too little and the dough won’t hold together. Opt for a mid‑range protein flour for the perfect balance between tenderness and strength. If you’re gluten‑sensitive, a 1‑to‑1 swap with a gluten‑free blend works, but expect a slightly different crumb.
Cocoa powder, unsweetened (¾ cup) gives the deep, earthy chocolate backbone. Choose a Dutch‑process cocoa for a smoother, less acidic flavor. Skipping it and relying only on chips will make the cookie taste one‑dimensional, missing that subtle bitterness that elevates the sweet.
Espresso powder (2 tbsp) may sound like a bold move, but it amplifies chocolate without adding coffee flavor. It’s the culinary equivalent of a secret spice—just a pinch and the cocoa sings. If you don’t have espresso powder, a teaspoon of instant coffee works, though the intensity drops a notch.
The Texture Crew
Unsalted butter, softened (1 cup) is the fat that carries flavor and creates that melt‑in‑your‑mouth feel. Use real butter, not margarine; the milk solids add a subtle caramel note when baked. If you’re dairy‑free, replace with a 1‑to‑1 coconut oil, but the cookie will lose some of its buttery richness.
Granulated sugar (1 cup) provides sweetness and contributes to the crisp edges. Sugar crystals caramelize during baking, forming that golden crust we all love. Swapping it for a low‑calorie alternative will affect browning and texture.
Brown sugar, packed (1 cup) adds moisture and a hint of molasses, crucial for the fudgy interior. The humidity from the molasses keeps the cookie soft for days. If you prefer a lighter flavor, reduce to ¾ cup, but expect a firmer bite.
The Unexpected Star
Dark chocolate chips (1 cup) deliver an intense cocoa punch and a glossy finish. Choose at least 60% cacao for that bittersweet edge; lower percentages make the cookie overly sweet. If you’re adventurous, replace a quarter with chopped bittersweet chocolate chunks for extra melty pockets.
Milk chocolate chips (1 cup) balance the darkness with creamy sweetness, creating that double‑chocolate duet. The contrast is like a duet between a baritone and a soprano—each shines on its own but together they create harmony.
Vanilla extract (2 tsp) rounds the flavor, smoothing out the sharp edges of cocoa and espresso. Real vanilla bean paste can be swapped for a richer aroma, but pure extract works perfectly.
The Final Flourish
Eggs, large (2) act as binders, giving the dough elasticity and helping the cookies rise just enough for that plush interior. Over‑beating can incorporate too much air, leading to a cakey texture—mix until just combined.
Baking soda (1 tsp) provides the lift, creating that subtle puff that makes the cookie thick without turning it into a cake. Too much soda leads to a metallic aftertaste; measure carefully.
Salt (1 tsp) is the quiet hero, enhancing all the flavors and cutting through the sweetness. A pinch of flaky sea salt on top before baking adds a delightful crunch and flavor burst.
Everything's prepped? Good. Let's get into the real action...
The Method — Step by Step
Preheat your oven to 350°F (175°C) and line two baking sheets with parchment paper. The heat should be steady, like a reliable friend, because any fluctuation will affect how the edges crisp. As the oven warms, give the butter a quick visual check—soft but not melted, like a ripe avocado. This is the moment of truth: a well‑preheated oven guarantees that the cookies puff up before spreading.
In a large bowl, whisk together the flour, cocoa powder, baking soda, and salt until the mixture resembles fine chocolate dust. Feel the texture between your fingers; it should be uniformly dark and free of lumps. This dry mix ensures even distribution of leavening, preventing any bitter pockets.
Kitchen Hack: Sift the cocoa and flour together for an ultra‑smooth dough that eliminates gritty bits.In a separate, slightly larger bowl, cream the softened butter with both sugars using a hand mixer on medium speed. The mixture should turn pale, fluffy, and emit a sweet, buttery aroma—think of a cloud of caramel waiting to rain. Scrape down the sides frequently; you don’t want any stubborn bits of butter clinging to the bowl.
Beat in the eggs one at a time, followed by the vanilla extract, allowing each addition to fully incorporate before the next. The batter will thicken, and you’ll notice a glossy sheen—this is the base that will hold the chocolate chips in place. If the mixture looks too thick, add a splash of milk (about a tablespoon) to loosen it without compromising structure.
Gradually fold the dry ingredients into the wet mixture, using a spatula and a gentle hand. You’ll see the dough come together, thick and almost sticky—perfect for holding those chocolate morsels.
Watch Out: Over‑mixing at this stage can develop gluten, leading to a tougher cookie. Stop as soon as you no longer see flour streaks.Stir in the dark and milk chocolate chips, plus the espresso powder, ensuring they’re evenly distributed. The dough should look speckled with dark islands, each promising a molten burst. For extra decadence, fold in a handful of chopped chocolate chunks that will create gooey pockets.
Cover the bowl with plastic wrap and chill the dough for at least 30 minutes, preferably an hour. This rest period allows the flour to hydrate and the butter to firm up, preventing excessive spreading. I dare you to skip this and see the difference—trust me, the texture will suffer.
Using a cookie scoop (about 2 tablespoons), drop dough onto the prepared sheets, spacing them 2 inches apart. The dough should sit in hefty mounds, each resembling a small, chocolate‑laden hill. Lightly sprinkle flaky sea salt on top for a subtle crunch that sings against the sweet.
Bake for 12‑14 minutes, watching closely after the 10‑minute mark. The edges will turn a glossy caramel color and begin to pull away from the sides of the dough—this is your cue. The centers will still look slightly underbaked; that’s intentional for that fudgy core. Remove from the oven, let the cookies rest on the sheet for 5 minutes before transferring to a wire rack; they’ll continue to set as they cool.
Serve warm, or let them cool completely for a firmer bite. Picture yourself pulling this out of the oven, the whole kitchen smelling incredible, and a single cookie melting in your mouth like a chocolate dream. That sizzle when it hits the pan? Absolute perfection. And now the fun part—store or devour immediately.
Insider Tricks for Flawless Results
The Temperature Rule Nobody Follows
Never bake cookies straight from a warm kitchen; always let the dough chill. The cooler dough spreads less, preserving the thick, fudgy center. I once tried baking at room temperature and ended up with flat, crispy discs—hardly the experience I promised my friends. A quick 30‑minute chill is the secret handshake of elite bakers.
Why Your Nose Knows Best
When the cookies are ready, the aroma will change from buttery sweet to a deep, roasted chocolate scent. Trust that nose cue more than the timer; if the scent hits that caramelized note, pull them out even a minute early. Overbaking steals the gooey heart, and nobody wants that.
The 5‑Minute Rest That Changes Everything
After removing the cookies from the oven, let them sit on the baking sheet for exactly five minutes. This brief rest lets the residual heat finish cooking the center without drying it out. Skipping this step often results in a cracked top and a less tender crumb.
Salt Sprinkle Finale
A light dusting of flaky sea salt right after baking adds a burst of contrast that lifts the chocolate flavor. It’s like adding a high‑note to a choir—subtle yet transformative. If you’re a salt‑lover, go a touch heavier; just don’t overdo it.
Pan Choice Matters
Dark metal pans absorb heat faster, giving a crispier edge, while light aluminum spreads heat evenly for a more uniform bake. I prefer a dark, non‑stick sheet for that perfect edge‑to‑center contrast. Experiment and note which texture you prefer.
Creative Twists and Variations
This recipe is a playground. Here are some of my favorite ways to switch things up:
White Chocolate & Raspberry
Swap half the dark chocolate chips for white chocolate and fold in dried raspberry pieces. The tangy berries cut through the richness, creating a sophisticated flavor pairing.
Peanut Butter Swirl
Drop a teaspoon of creamy peanut butter onto each dough mound before baking and use a toothpick to swirl it in. The nutty swirl adds a salty‑sweet contrast that’s pure comfort.
Spicy Chili Chocolate
Mix in a pinch of cayenne pepper or a dash of chili powder with the cocoa powder. The heat awakens the chocolate, delivering a surprising kick that lingers pleasantly.
Oatmeal Crunch
Stir in ½ cup of quick‑cooking oats for a chewy texture that adds body without compromising fudginess. It’s a subtle nod to classic oatmeal chocolate cookies.
Vegan Version
Replace butter with coconut oil, use flaxseed “eggs” (1 tbsp ground flax + 3 tbsp water per egg), and choose dairy‑free chocolate chips. The result is still decadently thick, though the flavor shifts slightly toward coconut.
Mint Madness
Add ½ tsp of peppermint extract and a handful of crushed peppermint candies. The fresh mint brightens the deep chocolate, perfect for holiday gatherings.
Storing and Bringing It Back to Life
Fridge Storage
Place cookies in an airtight container with a slice of bread on top; the bread will keep them moist for up to a week. The container should be stored in the fridge if your kitchen is warm, ensuring they stay fresh and chewy.
Freezer Friendly
Lay cookies on a parchment‑lined tray, freeze for two hours, then transfer to a zip‑lock bag. They’ll keep for three months. When you’re ready, bake from frozen for 2‑3 minutes longer; the result is as good as fresh.
Best Reheating Method
Microwave a single cookie for 10‑12 seconds, adding a tiny splash of water to the plate before heating. The steam revives the fudgy interior, making it taste like it just left the oven.