I was standing in my kitchen, staring at a stack of over‑cooked chicken breast tenders that had turned into a sad, dry mess. My friend had dared me to whip up something that could rescue the batch, and I promised her a dish that would make her taste buds do a happy dance. The moment I added a splash of balsamic vinegar to the pan, the kitchen filled with a sweet, tangy aroma that felt like a promise of redemption. The sizzling sound of the chicken hitting the hot oil was the soundtrack to a culinary comeback, and the first bite was a burst of caramelized flavor that felt like a hug from the inside. That experience turned into a mission: to create a version of balsamic chicken so irresistible that even my skeptical friends would beg for seconds. I’ll walk you through every single step, and by the end, you’ll wonder how you ever cooked it any other way.
What Makes This Version Stand Out
- Flavor Depth: The combination of Dijon mustard and honey creates a balanced sweet‑savory base that coats the chicken like a glossy, velvety glaze. The mustard’s subtle heat cuts through the richness of the olive oil, while the honey adds a caramelized sweetness that lingers on the palate.
- Texture Contrast: The quick sear on high heat gives the tenders a crispy edge that shatters like thin ice, while the interior stays moist and juicy, offering a satisfying bite every time.
- Ingredient Simplicity: With only eight ingredients, this recipe is a no‑fuss, pantry‑friendly option that saves you time without sacrificing flavor.
- Versatility: Whether you serve it over pasta, rice, or a fresh green salad, the sauce adapts beautifully, turning any plate into a gourmet experience.
- Crowd‑Pleaser: The sweet‑tangy profile is universally loved, making it perfect for family dinners, date nights, or potlucks where you want to impress.
- Make‑Ahead Potential: The sauce thickens as it cools, so you can prep the chicken ahead of time and reheat it for a quick, flavorful meal later.
- Ingredient Quality: Using high‑quality balsamic vinegar and extra‑virgin olive oil elevates the dish, turning a simple recipe into a culinary statement.
- Balanced Nutrition: With a modest calorie count and a good protein-to-fat ratio, this dish satisfies both taste buds and dietary goals.
Alright, let’s break down exactly what goes into this masterpiece…
Inside the Ingredient List
The Flavor Base
Dijon mustard is the unsung hero that brings a subtle piquancy and acts as an emulsifier, binding the oil and vinegar into a smooth sauce. Honey adds natural sweetness that caramelizes during searing, creating a glossy finish that clings to the chicken. If you skip the honey, the sauce will taste sharp and dry, lacking that comforting sweetness that makes the dish memorable.
The Texture Crew
Extra‑virgin olive oil is the medium that carries the flavors and provides a silky mouthfeel. It also helps the chicken develop a golden crust without sticking. Using a lower‑quality oil could result in a greasy texture and a less refined flavor profile.
The Unexpected Star
Balsamic vinegar is the star that gives the dish its signature tang and a hint of sweetness. A high‑quality aged balsamic will deepen the sauce’s complexity, while a cheap version may taste sharp and artificial. If you prefer a milder taste, you can dilute it with a splash of water or a dash of apple cider vinegar.
The Final Flourish
Garlic cloves provide an aromatic kick that permeates the sauce. They also help tenderize the chicken when cooked slowly. If you omit garlic, the dish will feel flat and less layered. For a smoky twist, try adding a pinch of smoked paprika.
Everything's prepped? Good. Let’s get into the real action…
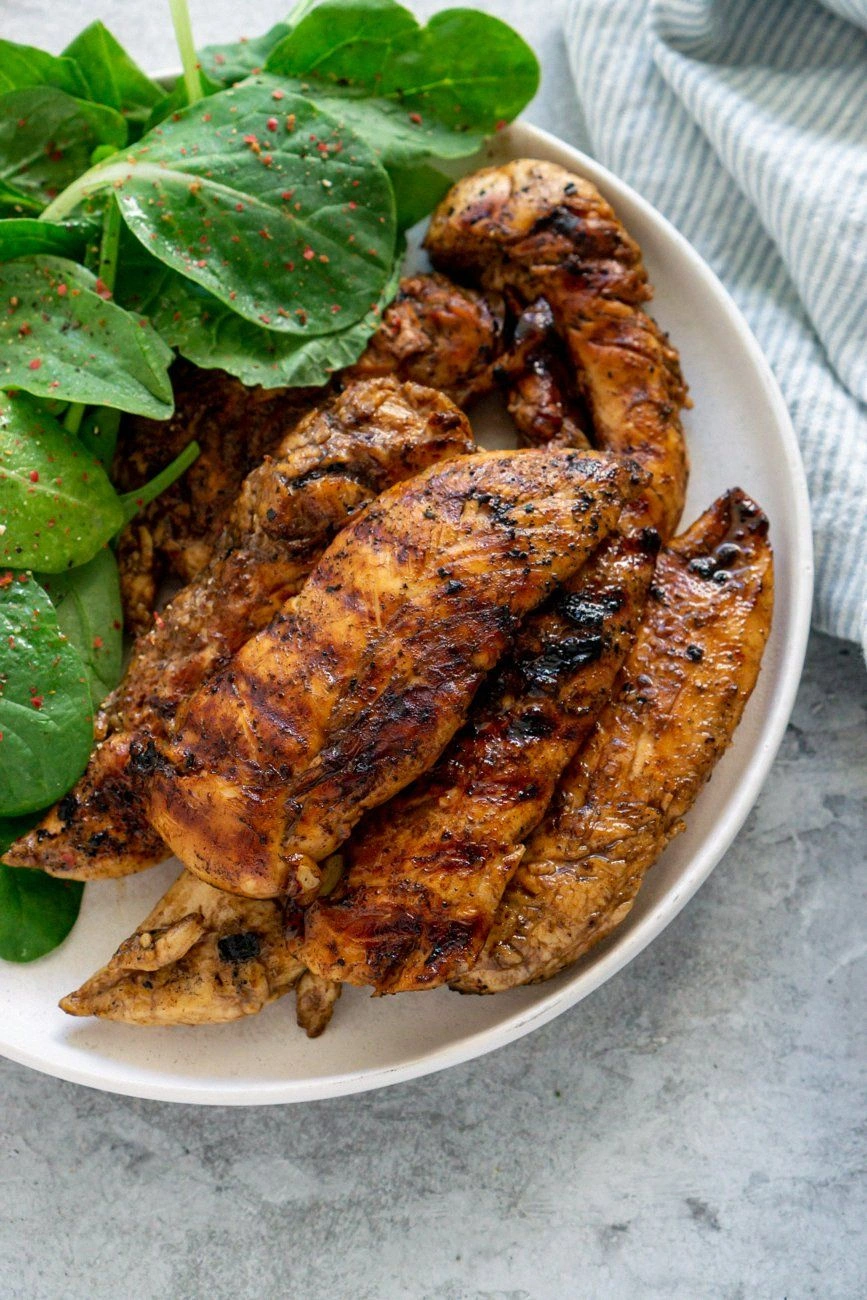
The Method — Step by Step
- First, season the chicken tenders with kosher salt and cracked pepper. The salt helps draw out moisture and creates a savory base, while the pepper adds a subtle heat. Let the seasoned chicken rest for 10 minutes; this allows the flavors to penetrate and prevents a dry surface when searing.
- Heat a large skillet over medium‑high heat and pour in the olive oil. Watch the oil shimmer; when it starts to lightly smoke, it’s ready for the chicken. This step is crucial for a golden crust—don’t rush it.
- Lay the chicken tenders in the hot oil, making sure they’re not crowded. The sizzle is the soundtrack to success. Flip after 3–4 minutes, when the first side turns a deep amber, and let it sear the other side for another 3–4 minutes.
- Remove the chicken from the skillet and set it aside on a plate lined with paper towels. This drains excess oil and keeps the chicken from becoming soggy.
- In the same skillet, reduce the heat to medium and add the minced garlic. Cook for 30 seconds, until fragrant, being careful not to burn it. Garlic burns quickly, and a bitter taste will ruin the sauce.
- Stir in the Dijon mustard, honey, and balsamic vinegar, whisking until the mixture thickens into a glossy glaze. The mustard’s acidity helps emulsify the oil, creating a silky coating that clings to the chicken.
- Return the chicken to the skillet, spooning the sauce over each piece. Let everything simmer together for 2 minutes, allowing the flavors to meld. This is the moment of truth—if the sauce is too thin, it won’t coat the chicken; if it’s too thick, it’ll taste syrupy.
- Serve immediately over your chosen base, such as roasted potatoes or a bed of sautéed spinach. The sauce should still be slightly glossy, offering a burst of flavor with every bite.
That’s it—you did it. But hold on, I’ve got a few more tricks that’ll take this dish to another level…
Insider Tricks for Flawless Results
The Temperature Rule Nobody Follows
Cooking the chicken at the right temperature is key. If the skillet is too hot, the outside will burn before the inside cooks through. Aim for medium‑high heat, and you’ll get that perfect sear without sacrificing juiciness. If you’re using a cast‑iron pan, preheat it for a few minutes to maintain consistent heat.
Why Your Nose Knows Best
Trust the aroma as a guide. When the garlic releases a sweet, nutty scent, the sauce is ready. If you hear a sharp, metallic smell, the vinegar is burning. Smell is the most reliable indicator that the dish is on track.
The 5-Minute Rest That Changes Everything
After cooking, let the chicken rest for five minutes on a wire rack. This allows the juices to redistribute, keeping the meat moist. A friend once skipped this step and ended up with dry, stringy chicken—lesson learned.
The Sauce’s Secret Ingredient
A splash of lemon juice at the end brightens the sauce, cutting through the sweetness and adding a fresh zing. It also helps emulsify the glaze, giving it a silky finish. Don’t skip this step if you want the sauce to shine.
The Perfect Plate Presentation
Arrange the chicken in a circular pattern and drizzle the sauce over it. Sprinkle a few fresh herbs, like thyme or basil, for color and aroma. A well‑presented dish elevates the dining experience and makes it Instagram‑worthy.
Creative Twists and Variations
This recipe is a playground. Here are some of my favorite ways to switch things up:
The Smoky Kick
Add a pinch of smoked paprika to the sauce for a subtle, smoky flavor that pairs beautifully with grilled vegetables. The paprika’s earthy undertone complements the sweet‑tangy glaze, creating a depth of flavor that’s perfect for fall gatherings.
The Mediterranean Flair
Swap the balsamic vinegar for a splash of red wine vinegar and stir in chopped sun‑dried tomatoes. The acidity of the wine vinegar adds brightness, while the tomatoes bring a chewy texture and a burst of umami.
The Citrus Twist
Finish the sauce with a squeeze of fresh orange juice and a sprinkle of orange zest. The citrus notes elevate the dish, giving it a refreshing finish that’s ideal for summer evenings.
The Herb Garden
Fold in a handful of chopped fresh rosemary or thyme during the last minute of cooking. The herbs infuse the sauce with aromatic oils, creating a fragrant, herbaceous layer that complements the sweet glaze.
The Sweet & Spicy Blend
Incorporate a teaspoon of sriracha or a pinch of cayenne pepper to the sauce for a spicy kick. The heat balances the sweetness, making the dish more complex and exciting for adventurous eaters.
Storing and Bringing It Back to Life
Fridge Storage
Cool the chicken completely before refrigerating in an airtight container. Store for up to 3 days. The glaze will thicken slightly, but a quick reheat will restore its glossy sheen. Keep the sauce separate if you prefer a lighter coating.
Freezer Friendly
Freeze the chicken in a single layer on a parchment‑lined tray before transferring to a freezer bag. This prevents sticking and makes portioning easy. The dish stays fresh for up to 2 months. Thaw overnight in the fridge before reheating.
Best Reheating Method
Reheat in a skillet over medium heat, adding a splash of water or chicken broth to create steam. This keeps the chicken moist and restores the sauce’s silky texture. Alternatively, microwave on medium power for 1–2 minutes, stirring halfway through.