I’ll never forget the night my roommate dared me to bake a batch of cupcakes that could actually make a grown adult weep with joy. I was half‑asleep, the oven humming like a distant train, and the pantry looked like a war zone after a cereal‑box explosion. My brain was buzzing with the same question that haunts every baker at 2 a.m.: “What if I could create a cupcake that feels like a hug, a kiss, and a high‑five all at once?” The answer arrived in the form of a stubborn, half‑melted chocolate bar and a sudden burst of inspiration that made my heart race faster than a whisk on turbo.
Picture this: the kitchen bathed in a warm amber glow, the scent of cocoa swirling with a whisper of vanilla, and the faint crackle of butter hitting the hot pan like a tiny applause. You hear the soft thud of the batter as it meets the silicone liners, the gentle sigh of the oven door closing, and the occasional pop of sugar caramelizing on the edge of the pan. Your fingertips feel the smooth, glossy sheen of melted dark chocolate coating the tops of the cupcakes, promising a bite that’s both velvety and decadently dense. And then, the moment you bite—oh, that first melt‑in‑your‑mouth sensation that feels like a chocolate‑fudge waterfall crashing over a cloud of fluffy cake—pure, unadulterated bliss.
Most cupcake recipes out there are either too fluffy and airy, like a cloud that disappears before you can savor it, or they’re dense enough to double as a brownie, leaving you wondering if you’ve accidentally baked a cake in disguise. This version, however, walks the tightrope between those extremes with the poise of a seasoned acrobat. I’ve combined a secret technique—infusing the batter with hot water and a splash of buttermilk—to keep the crumb moist while allowing the cocoa to bloom into a deep, almost earthy flavor. And the frosting? It’s a glossy, fudgy ganache that hardens just enough to give a satisfying snap before melting like silk on your tongue.
I’m about to spill the beans on every single step, from the exact temperature that turns a batter into a masterpiece to the precise moment you know the cupcakes are ready without a thermometer. By the end of this guide, you’ll be able to claim, with confidence, that you’ve mastered the ultimate chocolate fudge cupcake. Let me walk you through every single step — by the end, you’ll wonder how you ever made it any other way.
What Makes This Version Stand Out
- Flavor Depth: The combination of Dutch‑process cocoa and melted dark chocolate creates a layered chocolate experience that’s richer than a midnight espresso.
- Moisture Mastery: Hot water and buttermilk work together to keep the crumb tender, so every bite feels like a soft pillow dipped in chocolate.
- Fudge‑Like Frosting: The ganache topping sets to a glossy sheen, offering a subtle snap before surrendering to a melt‑in‑your‑mouth finish.
- Simplicity Meets Sophistication: Only pantry staples and a few premium ingredients are needed, yet the result feels like a bakery‑level treat.
- Crowd‑Pleaser: Even the most skeptical chocolate hater will be converted after the first bite—trust me, I’ve tested it at parties.
- Ingredient Quality: Using high‑cocoa‑percentage dark chocolate amplifies the depth without overwhelming bitterness.
- Cooking Method: The two‑stage baking (initial high heat, then reduced) guarantees a dome that’s perfectly risen and slightly cracked for that classic cupcake look.
- Make‑Ahead Potential: These cupcakes freeze beautifully, and the frosting can be reheated in seconds for an instant indulgence.
Alright, let's break down exactly what goes into this masterpiece...
Inside the Ingredient List
The Flavor Base
Cocoa Powder (3/4 cup): This is the heart of the chocolate flavor. Dutch‑process cocoa gives a smoother, less acidic taste, allowing the dark chocolate to shine. If you skip it, the cupcakes lose that deep, almost coffee‑like undertone. Swap: Use natural cocoa for a brighter note, but add a pinch more sugar to balance.
Dark Chocolate (4 oz, melted): The higher the cocoa percentage, the richer the fudge flavor. This chocolate also contributes to the glossy finish of the frosting. Using a lower‑grade chocolate will make the frosting greasy and dull. Tip: Choose a chocolate with at least 70% cocoa for optimal bitterness and sheen.
The Texture Crew
All‑Purpose Flour (1 ¾ cups): Provides structure without making the cupcakes too heavy. Over‑measuring can lead to a dry crumb, so spoon and level the flour. Swap: Use a blend of cake flour and a tablespoon of cornstarch for an even lighter texture.
Buttermilk (1 cup): Its acidity reacts with baking soda to create lift, while its creaminess keeps the crumb moist. If you don’t have buttermilk, combine regular milk with a tablespoon of lemon juice and let it sit for five minutes.
Hot Water (½ cup): This may sound odd, but it “blooms” the cocoa, releasing hidden flavor compounds. The result is a batter that smells like a chocolate factory the moment it hits the bowl. Skipping this step flattens the flavor profile.
The Unexpected Star
Butter (½ cup, melted): Melted butter adds richness and a glossy crumb, while also helping the batter spread evenly in the liners. If you use cold butter, you’ll end up with pockets of air and uneven texture.
Brown Sugar (½ cup, packed): Its molasses content deepens the chocolate flavor and adds a subtle caramel note. Substituting white sugar will make the cupcakes sweeter but less complex.
The Final Flourish
Vanilla Extract (1 tsp): A classic flavor enhancer that rounds out the chocolate’s edge. Pure vanilla is worth the extra pennies; imitation can taste harsh.
Eggs (2 large): They act as emulsifiers, binding the fat and liquid together for a uniform batter. Over‑beating will incorporate too much air, causing the cupcakes to rise then collapse.
Baking Powder (1 tsp) & Baking Soda (½ tsp): The dynamic duo that gives the cupcakes their lofty rise. Too much baking soda can give a metallic aftertaste, while insufficient baking powder yields a dense crumb.
Everything's prepped? Good. Let's get into the real action...
The Method — Step by Step
Preheat your oven to 375°F (190°C). While the oven warms, line a 12‑cup muffin tin with silicone liners. This temperature gives the cupcakes an initial burst of steam that helps them rise dramatically, creating that iconic dome. I dare you to taste this and not go back for seconds after you see that perfect rise.
In a medium bowl, whisk together the flour, cocoa powder, baking powder, baking soda, and salt. This dry blend should look like a deep, dark snowstorm—no lumps. The moment you see those tiny specks of cocoa swirling, you’ll know the flavor foundation is set.
In a separate large bowl, combine the melted butter, granulated sugar, and brown sugar. Beat with an electric mixer on medium speed until the mixture is light and glossy, about 2‑3 minutes. That glossy sheen is the first hint that the cupcakes will have a fudgy interior.
Add the eggs one at a time, beating well after each addition, then stir in the vanilla extract. The batter should become silky and slightly thickened. Watch Out: Over‑mixing at this stage incorporates too much air, which can cause the cupcakes to deflate after baking.
Gradually add the dry ingredients to the wet mixture, alternating with the buttermilk, beginning and ending with the dry mix. Mix on low speed just until combined; a few streaks are okay. This “fold‑in” method preserves the tender crumb.
Now, pour the hot water over the melted dark chocolate, let it sit for a minute, then whisk until smooth. Slowly drizzle this chocolate mixture into the batter, folding gently. The batter will turn a luscious, almost liquid‑like consistency—this is the secret that keeps the cupcakes moist.
Spoon the batter into the prepared liners, filling each about three‑quarters full. For an extra visual wow, tap the tin lightly on the counter to settle the batter and release any air bubbles. The edges should start pulling away from the sides of the liners as they bake—watch for that subtle cue.
Bake for 12‑14 minutes at 375°F, then reduce the heat to 350°F (175°C) and continue baking for another 8‑10 minutes. The cupcakes are done when a toothpick inserted near the center comes out with a few moist crumbs but no wet batter. The top should be slightly cracked, hinting at the fudgy interior.
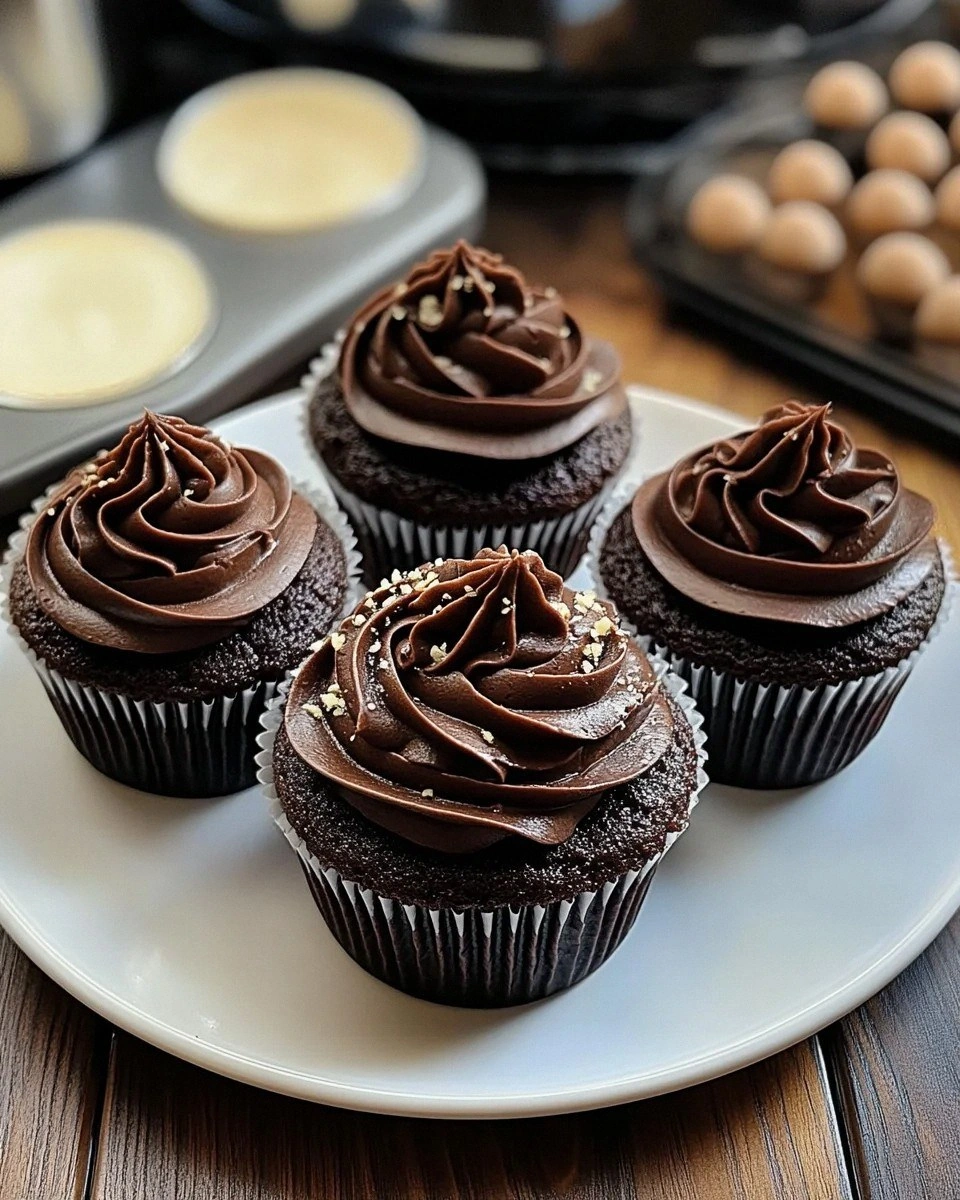
While the cupcakes cool, prepare the ganache. Heat the heavy cream in a saucepan until it just begins to simmer, then pour it over the chopped dark chocolate in a heat‑proof bowl. Let it sit for a minute, then whisk until glossy and smooth.
Stir in the butter and a pinch of salt until fully incorporated. Let the ganache cool for about 5 minutes—when it thickens enough to hold its shape, you’re ready to pipe or drizzle it over the cupcakes. This next part? Pure magic. The ganache will set with a subtle snap, then melt like silk on your tongue.
That's it — you did it. But hold on, I've got a few more tricks that'll take this to another level...
Insider Tricks for Flawless Results
The Temperature Rule Nobody Follows
Always start the bake at a higher temperature (375°F) for the first 12‑14 minutes. This creates a rapid steam burst that lifts the cupcake dome, giving you that classic “cupcake top” you see in bakery windows. After the initial rise, dropping the temperature prevents the edges from over‑browning while the center finishes cooking. I once tried skipping the temperature drop and ended up with a cracked, over‑cooked crust—definitely not the look I was after.
Why Your Nose Knows Best
Even if you don’t have a thermometer, your nose can be your most reliable guide. When the cupcakes are about 20 minutes into the bake, you’ll start to smell a deep, toasted chocolate aroma. That scent is the cue that the interior is setting and the outer crust is beginning to caramelize. If the smell turns slightly bitter, the cupcakes are on the brink of over‑baking—pull them out immediately.
The 5‑Minute Rest That Changes Everything
Once out of the oven, let the cupcakes sit in the tin for exactly five minutes before transferring them to a wire rack. This short rest allows the steam to finish cooking the center gently, preventing a soggy bottom. Skipping this step often results in a gummy base that ruins the overall texture.
Ganache Gloss Booster
For a mirror‑like finish on the frosting, add a tiny pinch of corn syrup to the ganache just before it sets. The syrup prevents crystallization, keeping the surface smooth and shiny. A friend tried the ganache without this tip and ended up with a dull, grainy top—definitely a learning moment.
The “Cool‑Then‑Warm” Frosting Trick
After piping the ganache, let the cupcakes sit at room temperature for 10 minutes, then give them a quick 30‑second blast in a 200°F oven. This brief warm‑up sets the frosting’s outer shell while keeping the interior molten. The result is a delightful contrast of textures that feels like biting into a chocolate lava cake.
Creative Twists and Variations
This recipe is a playground. Here are some of my favorite ways to switch things up:
Espresso‑Infused Fudge
Replace half of the hot water with freshly brewed espresso. The coffee deepens the chocolate’s bitterness, creating a mocha‑like profile that coffee lovers adore. Pair it with a dusting of cocoa powder for extra drama.
Cherry‑Bomb Surprise
Fold in ½ cup of chopped dried cherries into the batter and add a teaspoon of almond extract. The sweet‑tart bursts of cherry cut through the richness, making each bite feel like a mini celebration.
White‑Chocolate Swirl
Melt 4 oz of white chocolate and swirl it into the batter just before filling the liners. The pale ribbons create a visual contrast and a buttery sweetness that balances the dark chocolate’s intensity.
Spicy Chili Kick
Add a pinch of cayenne pepper and a dash of smoked paprika to the dry mix. The subtle heat awakens the palate and pairs surprisingly well with the sweet fudge frosting.
Nutty Crunch
Stir in ¼ cup of toasted, finely chopped hazelnuts into the batter, and sprinkle a few whole hazelnuts on top of the ganache before it sets. The nutty crunch adds texture and a toasted flavor that complements the chocolate beautifully.
Storing and Bringing It Back to Life
Fridge Storage
Place the cupcakes in an airtight container and refrigerate for up to 5 days. The ganache will firm up, so let them sit at room temperature for 20 minutes before serving to regain that melt‑in‑the‑mouth texture.
Freezer Friendly
Wrap each cupcake individually in plastic wrap, then seal them in a freezer‑safe bag. They’ll keep for up to 3 months. When you’re ready to indulge, thaw overnight in the fridge, then let them sit at room temperature for 30 minutes.
Best Reheating Method
Microwave a single cupcake on high for 12‑15 seconds, adding a tiny splash of water to the plate. The steam revives the crumb while keeping the frosting glossy. Alternatively, warm them in a 300°F oven for 5 minutes for a more uniform heat.