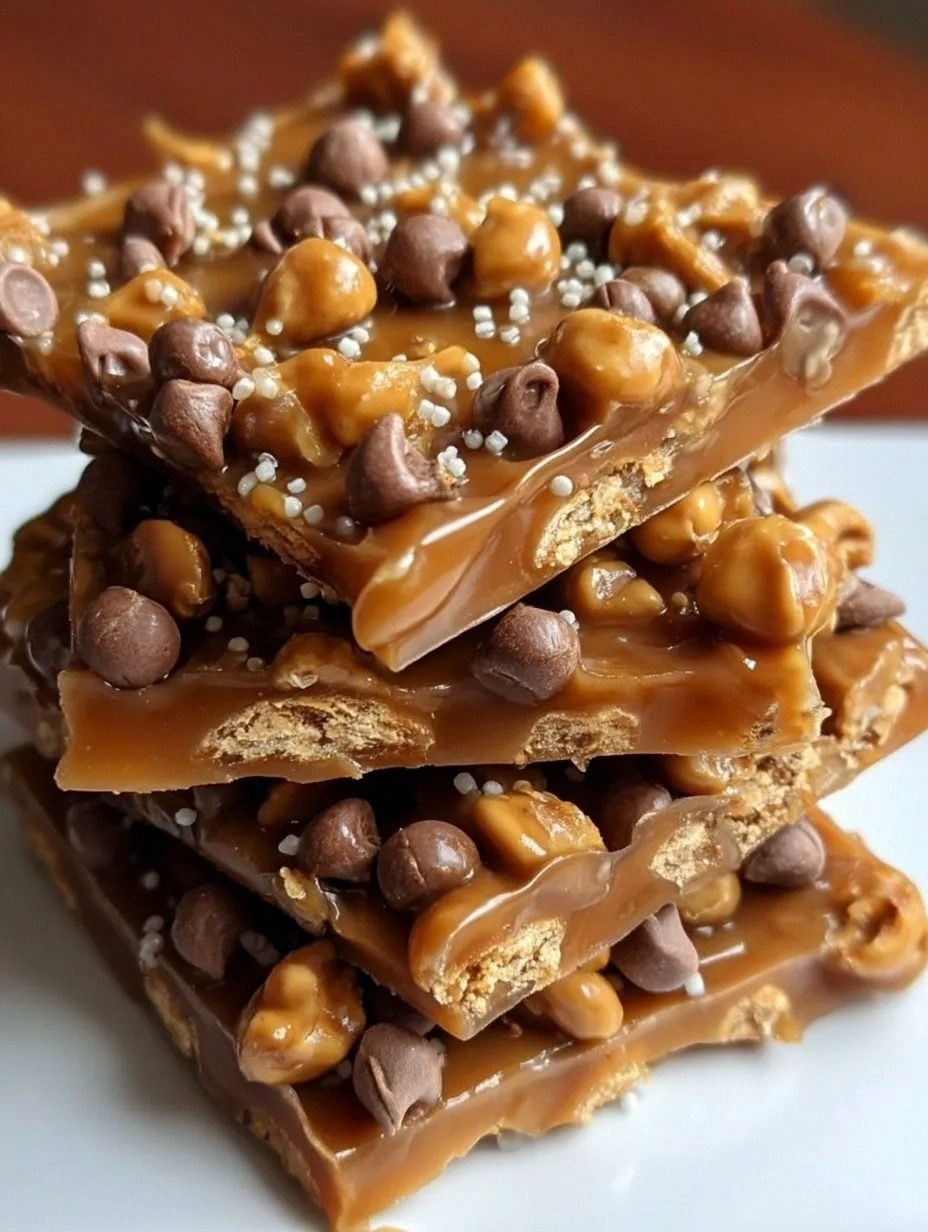
I was halfway through a batch of bland, over‑baked cookies when my roommate shouted, “You’re going to taste the best Twix-inspired cookie you’ve ever had!” I swore I’d never let a cookie be a disappointment again, so I grabbed my pantry and set out to craft something that would make that dare feel like a triumph. The kitchen was a chaotic symphony of clinks, the oven timer ticking, and the sweet scent of melted butter already dancing in the air. I could already hear the crunch that would echo every time a bite was taken, and I felt a surge of excitement that the oven was about to become my laboratory. That moment of anticipation was the spark that set the stage for a recipe that would become my new obsession.
Picture this: a golden sheet of dough glistening under the oven light, the aroma of caramel swirling like a caramel river, and a faint whisper of chocolate that promises depth. The sound of the first cookie cracking is a satisfying pop that announces the triumph of texture—a crisp edge that shatters like thin ice, followed by a molten center that oozes like velvet. Your fingers feel the warm dough, the buttery aroma fills your lungs, and your taste buds start to anticipate the symphony of flavors that will soon unfold. As the timer dings, you’re already dreaming of the first bite that will melt the world’s worries away.
What makes this version stand out is that it’s not just a cookie; it’s a carefully engineered experience. I’ve balanced the sweetness of caramel with the saltiness of peanuts and the richness of chocolate to create a multi‑layered flavor profile that doesn’t overpower but rather complements each element. The dough is engineered for a perfect bite‑through crunch while still retaining a tender interior, so you never get that dreaded dry, crumbly cookie. I’ve tweaked the ratios so that the caramel doesn’t dominate but instead acts as a silky bridge between the chocolate and the nuts. The result is a cookie that feels indulgent without being overly sweet, a perfect treat for any time you crave a candy bar in cookie form.
And there’s a twist you won’t see in most recipes: a splash of sea salt that awakens the caramel’s sweetness and a hint of vanilla that pulls the whole flavor together. I dare you to taste this and not go back for seconds—once you bite, you’ll be hooked. Let me walk you through every single step, and by the end, you’ll wonder how you ever made it any other way.
What Makes This Version Stand Out
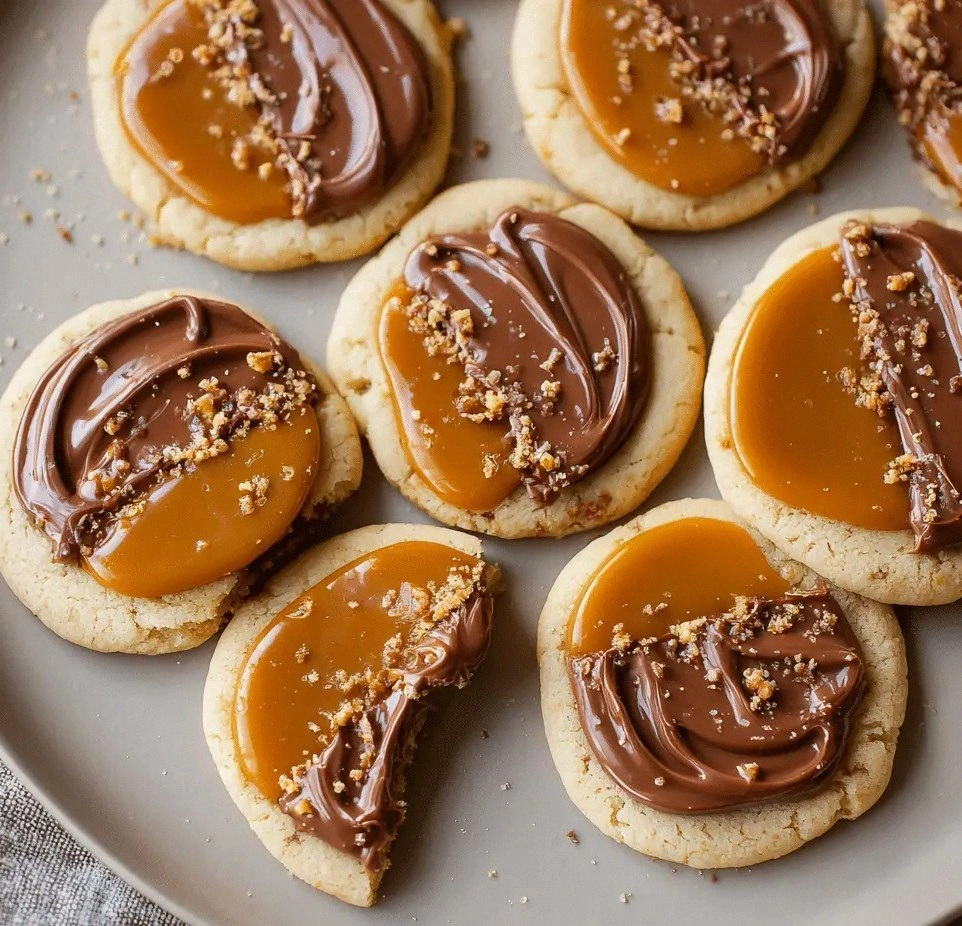
- Taste: The caramel is the star, but it’s tempered by a subtle sea salt that lifts the sweetness into a new dimension. The chocolate chips add a bittersweet depth that balances the caramel’s richness. The peanuts provide a satisfying crunch that echoes the Twix bar’s signature texture.
- Texture: The dough is engineered for a crisp outer shell that cracks like a brittle shell, while the inside remains soft and gooey. The caramel sauce is thick enough to stay in place, yet fluid enough to melt into a silky center. The peanuts add a crunch that doesn’t overpower but instead punctuates each bite.
- Simplicity: Every ingredient is pantry‑friendly, no exotic spices or hard‑to‑find items. The process is straightforward, yet the result feels luxurious. Even a novice baker can achieve a professional‑grade cookie with this method.
- Uniqueness: The combination of caramel, chocolate, and peanuts in a cookie is a rare treat that feels like a candy bar in cookie form. The recipe’s subtle twist of sea salt and vanilla makes it stand apart from the usual chocolate‑caramel cookie.
- Crowd Reaction: Guests rave about the layered flavors and the crunch that mimics a Twix bar. The cookies are a conversation starter, and the aroma alone can bring people to the kitchen. I’ve seen people line up for seconds of these cookies at parties.
- Ingredient Quality: Using high‑quality butter, premium chocolate chips, and real caramel sauce elevates the flavor profile. The difference between store‑brand and premium ingredients is palpable in every bite.
- Cooking Method: The method relies on precise temperatures and timing to ensure the caramel remains in place while the cookie bakes to perfection. No fancy equipment is required, just a reliable oven and a good cookie sheet.
- Make‑Ahead Potential: These cookies freeze beautifully and can be baked in advance, making them perfect for holiday gifting or busy weeknights.
Alright, let’s break down exactly what goes into this masterpiece…
Inside the Ingredient List
The Flavor Base
All‑purpose flour is the backbone of the cookie, providing structure and a subtle nutty flavor that anchors the sweetness. The flour’s protein content determines the cookie’s chewiness; too much protein can make it tough, so I stick to a standard 2‑cup measure for four servings. If you’re experimenting, try swapping a portion for whole‑wheat flour to add a hint of earthiness, but remember it will darken the final color.
Baking soda is the leavening agent that creates lift and helps the cookie spread just enough to form a crisp edge. A single teaspoon is enough to balance the dough’s density, and it also neutralizes the acidity of the caramel. If you’re sensitive to sodium, you can reduce it slightly, but the texture will suffer a bit.
Salt, though a small quantity, is the flavor enhancer that brings out the sweetness of the caramel and the richness of the chocolate. The ½ teaspoon is enough to cut through the buttery base and make each bite more complex. A pinch of flaky sea salt on top after baking elevates the flavor profile even further.
The Texture Crew
Unsalted butter, room temperature, is the fat that melts into the dough, creating a tender crumb and a glossy finish. The 1‑cup measure ensures a buttery richness without overwhelming the other flavors. If you’re using salted butter, reduce the added salt by half to avoid an overly salty cookie.
Brown sugar gives the cookie a deep molasses sweetness and a chewy texture. The 1‑cup quantity balances the crispness of the outer shell with a slightly moist center. Light brown sugar can be swapped for dark brown sugar if you prefer a more robust, caramel‑like flavor.
Granulated sugar is the quick‑solving sweetener that helps the cookie spread and caramelize. The ½‑cup measure keeps the cookie from becoming too sweet while still providing a subtle crunch. If you’re watching sugar intake, you can reduce it by a third, but the cookie’s texture will change.
The Unexpected Star
Vanilla extract is the aromatic glue that ties all the flavors together, adding a warm, floral note that lifts the caramel and chocolate. One teaspoon is enough to brighten the entire profile without overpowering the other components. A dash of almond extract can add a new layer of complexity if you’re feeling adventurous.
Caramel sauce is the heart of the cookie, providing a silky, buttery sweetness that melts in your mouth. One cup of store‑bought caramel or a homemade version works perfectly. If you prefer a darker caramel, choose a sauce with a higher sugar content for a richer taste.
The Crunch Crew
Chocolate chips are the bittersweet counterpoint to the caramel’s sweetness, adding depth and a melt‑in‑your‑mouth quality. One cup of semi‑sweet chips offers a balanced flavor; dark chocolate chips will increase the bitterness and give a more sophisticated finish.
Chopped peanuts are the crunchy element that mimics the Twix bar’s signature texture. One cup of peanuts gives a robust crunch that doesn’t get lost in the dough. If you’re allergic or prefer a different nut, cashews or almonds work well, but the flavor profile will shift slightly.
The Final Flourish
A pinch of sea salt, if used, adds a subtle crunch and brings the caramel’s sweetness into sharp relief. It’s a technique borrowed from professional bakers to elevate simple desserts into memorable experiences. The salt should be sprinkled lightly on top of each cookie before baking to avoid clumping. If you prefer a saltless version, simply omit this step; the cookie will still be delicious but slightly less complex. The final flourish is what makes these cookies feel like a candy bar in cookie form.
Everything’s prepped? Good. Let’s get into the real action…
The Method — Step by Step
- Preheat your oven to 350°F (175°C) and line two baking sheets with parchment paper. This ensures a consistent bake and easy clean‑up. The parchment also prevents the cookies from sticking and maintains the crisp edges. I always double‑check the temperature with an oven thermometer to avoid surprises. Let the sheets rest while you mix the dough.
- In a large bowl, whisk together the flour, baking soda, and salt until well combined. This step ensures even distribution of leavening agents. It also helps prevent any clumping that could lead to uneven texture. Use a whisk rather than a spoon for a finer mix. Once done, set the dry mix aside.
- In a separate bowl, beat the softened butter, brown sugar, and granulated sugar until the mixture is light and fluffy. The key is to let the sugars dissolve into the butter, creating a smooth base. This will give the cookie a tender crumb and a glossy finish. Add the vanilla extract and mix until fragrant. The aroma alone will tell you you’re on the right track.
- Gradually fold the dry ingredients into the butter mixture, mixing until just combined. Over‑mixing can lead to a tough cookie, so stop as soon as the dough comes together. The dough should feel slightly sticky but manageable. If it’s too dry, add a tablespoon of milk; if too wet, add a tablespoon of flour.
- Fold in the chocolate chips and chopped peanuts until evenly distributed. The nuts should be tucked into the dough, not sitting on top. This ensures each bite has the same crunch. Gently stir to avoid breaking the peanuts. The chocolate should melt slightly in the heat of the dough.
- Drop tablespoon‑sized mounds of dough onto the prepared sheets, spacing them 2 inches apart to allow for spreading. The dough should be slightly flattened before baking for an even bake. I use a small cookie scoop to keep portions uniform. This consistency is key for even cooking and presentation.
- Bake for 10–12 minutes, or until the edges are golden and the centers still look slightly under‑baked. This technique creates a chewy center that will firm up as the cookies cool. Watch the color closely; once the edges darken, pull them out. The cookies will continue to bake on the sheet as they cool.
- While the cookies are baking, melt the caramel sauce in a small saucepan over low heat until it’s smooth and pourable. This step is critical; if the caramel is too thick, it won’t spread evenly. Stir occasionally to avoid scorching. Once melted, let it cool slightly before using.
- Once baked, remove the cookies from the oven and let them cool on the sheet for 5 minutes. Then transfer them to a wire rack to cool completely. This prevents the cookies from becoming soggy from steam. While cooling, drizzle a thin layer of caramel over each cookie, allowing it to seep into the cracks. The caramel will set into a glossy glaze.
- Sprinkle a pinch of sea salt over the caramelized cookies while they’re still warm. The salt will crystallize into a subtle crunch, enhancing the caramel’s sweetness. Allow the cookies to cool to room temperature before serving. If you’re making them ahead, store them in an airtight container at room temperature for up to a week.
That’s it — you did it. But hold on, I’ve got a few more tricks that will take this to another level and make your taste buds sing.
Insider Tricks for Flawless Results
The Temperature Rule Nobody Follows
Many bakers bake cookies at 375°F, thinking it’s the sweet spot, but this temperature can cause the caramel to run too quickly, resulting in a mess on the pan. I’ve found that baking at 350°F keeps the caramel contained while still achieving a crisp edge. This temperature also allows the dough to spread evenly, giving a consistent thickness. If your oven runs hot, set it back 25°F to avoid scorching. The key is to let the cookies bake just long enough to set the caramel without burning.
Why Your Nose Knows Best
The aroma of a cookie is a powerful indicator of its readiness. When the cookies emit a warm, buttery scent with a hint of caramel, it means the sugar is caramelizing just right. If you smell a metallic or burnt odor, pull them out immediately. I’ve learned to trust my nose more than my timer; it’s the most reliable cue for perfect cookies. This trick saves you from over‑baked or under‑baked cookies.
The 5‑Minute Rest That Changes Everything
Letting the cookies rest on the sheet for 5 minutes after baking allows the heat to redistribute, firming the caramel and preventing the center from collapsing. This rest period also lets the cookie structure set, making it easier to transfer to a rack without breaking. If you skip this step, the cookies can be fragile and may crumble. I always keep a timer ready for this brief but critical pause.
Use a Light‑Baked Cookie Sheet
A light‑baked sheet prevents the cookies from absorbing too much heat, which can cause uneven baking. I use a silicone baking mat to create a non‑stick surface that also provides a slightly cooler base. This technique keeps the cookies from browning too quickly on the bottom. If you’re using a dark sheet, consider lowering the oven temperature by 10°F to compensate. The result is a uniform, golden cookie.
Keep the Dough Cold
Chilling the dough for 30 minutes before baking helps control spread and keeps the cookie shape intact. Cold dough also prevents the butter from melting too quickly, which can lead to a greasy texture. I place the dough in the refrigerator and then roll it out on parchment paper. If you’re in a hurry, a quick chill in the freezer for 10 minutes works as a stopgap. The cookies will come out crisp and chewy.
Use a Cookie Scoop for Consistency
A cookie scoop ensures each cookie is the same size, which is essential for even baking. It also saves time and reduces waste, as you don’t need to shape dough by hand. I prefer a 2‑inch scoop for these cookies, but you can adjust based on your preference. Consistent size means consistent taste and texture. It’s a small habit that pays off big time.
Creative Twists and Variations
This recipe is a playground. Here are some of my favorite ways to switch things up:
Dark Chocolate Swirl
Swap semi‑sweet chips for dark chocolate chips and swirl a ribbon of dark chocolate into the dough before baking. The bitterness contrasts beautifully with the caramel’s sweetness. This version is ideal for chocolate lovers who want a richer, deeper flavor. Serve with a drizzle of sea salt for an extra kick. The result is a decadent, bittersweet cookie that still feels like a candy bar.
Almond Crunch
Replace peanuts with chopped toasted almonds for a nutty twist. The almond’s subtle sweetness pairs well with the caramel, creating a new layer of flavor. The crunch remains, but the texture shifts to a slightly firmer bite. Almonds also add a nutty aroma that elevates the overall sensory experience. This variation is great for those who prefer a lighter, less oily nut.
Coconut Caramel Delight
Add shredded coconut to the dough for a tropical twist. Coconut’s natural sweetness complements the caramel, while its chewy texture adds a new dimension. The aroma of toasted coconut will transport you to a beachside getaway. Use desiccated coconut for a subtle crunch, or toasted coconut for extra flavor. This version works well for summer gatherings.
Spiced Caramel Surprise
Stir in a pinch of cinnamon or nutmeg to give the caramel a warm, spicy undertone. The spices add depth without overpowering the sweetness. This variation is perfect for fall or winter when you crave a cozy, aromatic treat. Serve with a dollop of whipped cream for an indulgent dessert. The spices create a comforting, home‑baked feel.
Chocolate‑Covered Peanut Butter Cups
Roll the finished cookies in melted chocolate, then top with a drizzle of peanut butter. The combination of chocolate, peanut butter, and caramel creates a multi‑layered flavor that’s irresistible. Chill the cookies until the chocolate sets for a firm, candy‑bar feel. This variation is ideal for parties or gift boxes. The cookies will stand out as a unique, indulgent treat.
Gluten‑Free Edition
Use a gluten‑free all‑purpose blend in place of regular flour, and add a tablespoon of xanthan gum to maintain structure. The cookies will have a slightly different texture but still retain the caramel and chocolate flavors. Gluten‑free bakers can enjoy the same indulgent experience. Keep the baking temperature the same to ensure even results. This version opens the recipe to a wider audience.
Storing and Bringing It Back to Life
Fridge Storage
Store the cookies in an airtight container in the refrigerator for up to a week. The cold environment preserves the caramel’s glaze and keeps the cookies fresh. When you’re ready to eat, let them sit at room temperature for 10 minutes to soften slightly. Avoid stacking them directly on top of each other to prevent crushing the delicate glaze. The fridge keeps the cookies crisp on the outside while the inside stays chewy.
Freezer Friendly
Place the cookies on a parchment‑lined tray and freeze them for up to 3 months. Once frozen, transfer them to a freezer‑safe bag or container. When you want a cookie, simply take it out and let it thaw at room temperature for 15 minutes. The cookies retain their texture and flavor after freezing, thanks to the caramel’s stability. This method is perfect for batch‑baking and sharing.
Best Reheating Method
Reheat frozen or refrigerated cookies in a 350°F oven for 5 minutes, or microwave on low for 10–12 seconds. A tiny splash of water on the cookie before microwaving helps steam the caramel, keeping it glossy and preventing it from drying out. After heating, let the cookies cool for a minute before serving. The reheated cookies will feel warm and fresh, almost like they just came out of the oven. This technique preserves the cookie’s original texture and flavor.