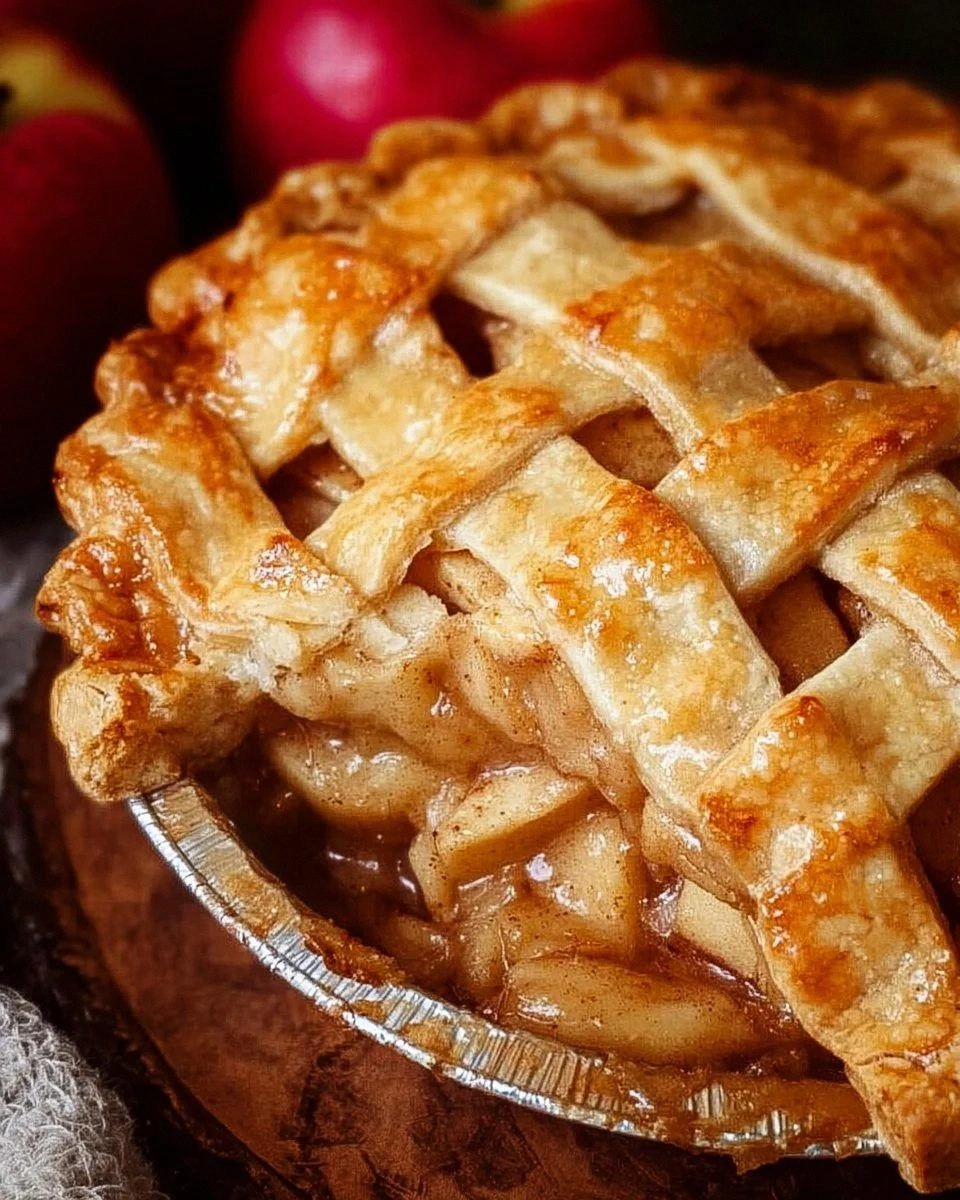
Picture this: a rainy Saturday afternoon, the kind that makes you want to curl up with something warm and comforting, but your pantry is looking like a barren desert. I was staring at a lone apple, wondering if I should just bite it raw or throw it away, when a friend dared me to bake an apple pie that would make even the most stubborn non‑dessert lover beg for seconds. I accepted the challenge, but the first attempt was a disaster—flat crust, soggy filling, and a kitchen that smelled like burnt sugar for hours. That flop sparked a relentless quest for the perfect balance of flaky dough, caramelized apples, and just the right hint of spice.
The moment I finally nailed it, the kitchen transformed into a theater of aromas: the sweet perfume of apples mingling with buttery crust, the faint whisper of cinnamon that seemed to curl around every breath, and the subtle crackle of the crust as it turned golden. My taste buds did a little happy dance, and I could swear the oven door itself let out a sigh of satisfaction. It was the kind of experience that makes you want to shout from the rooftop, “This is hands down the best version you'll ever make at home!” I dared you to taste this and not go back for seconds—because honestly, I ate half the batch before anyone else got a slice.
What sets this apple pie apart? Most recipes get the crust wrong, turning it either too tough or too soggy, and they treat the filling like a bland afterthought. Here, the crust is a buttery, flaky masterpiece thanks to a cold‑but‑controlled water technique that keeps the butter in perfect little pockets. The filling is a symphony of sweet and tart, using a strategic mix of Granny Smith and Honeycrisp apples that hold their shape while releasing just enough juice to create a glossy, caramel‑kissed sauce. And there’s a surprise ingredient—lemon juice—that brightens the whole thing like a spotlight on stage.
Now, let’s walk through every single step—by the end, you’ll wonder how you ever made it any other way. Okay, ready for the game‑changer? This next part? Pure magic. Stay with me here — this is worth it.
What Makes This Version Stand Out
- Taste: The perfect marriage of sweet apples, buttery crust, and a hint of citrus makes each bite unforgettable.
- Texture: Flaky, melt‑in‑your‑mouth crust contrasted with a filling that’s both tender and slightly crisp on the edges.
- Simplicity: No fancy gadgets, just a handful of pantry staples and a few mindful techniques.
- Uniqueness: The lemon juice and nutmeg add depth that most apple pies simply lack.
- Crowd Reaction: Guests will declare it “the best homemade apple pie” and beg for the recipe—again and again.
- Ingredient Quality: Using a blend of apples guarantees balanced sweetness and acidity.
- Cooking Method: The blind‑bake step ensures the crust stays crisp, never soggy.
- Make‑Ahead Potential: Assemble the pie a day ahead, refrigerate, then bake when you’re ready for that fresh‑out‑of‑the‑oven aroma.
Alright, let's break down exactly what goes into this masterpiece...
Inside the Ingredient List
The Flavor Base
All‑purpose flour is the backbone of both crust and filling; it provides structure without overwhelming the delicate apple flavor. If you substitute with whole‑wheat flour, expect a denser, nuttier crust that can compete with the apples rather than complement them. A good rule of thumb: stick to the 2 ½ cups for the crust and 2 tablespoons for the filling to keep the balance just right.
The Texture Crew
Unsalted butter, chilled and diced, is the secret to that melt‑in‑your‑mouth crumb. The cold butter creates steam pockets as it bakes, turning the dough into a flaky wonderland. If you’re out of butter, you can use a 50/50 mix of butter and shortening, but you’ll lose some of that rich, buttery flavor that makes this pie unforgettable.
The Unexpected Star
Lemon juice might seem like a tiny footnote, but that single tablespoon cuts through the sweetness and brightens the entire filling. It’s the culinary equivalent of adding a splash of champagne to a simple cocktail—suddenly everything feels more festive. If you’re out of fresh lemon, a teaspoon of lemon zest will still give you that zing without adding extra liquid.
The Final Flourish
Ground cinnamon and a pinch of nutmeg create that classic warm spice profile we all associate with apple pie, but the key is not to overdo it. Too much cinnamon can mask the apple’s natural flavor, while nutmeg adds an earthy undertone that deepens the overall taste. If you love spice, feel free to add a dash of allspice or ginger for an extra kick.
Everything's prepped? Good. Let's get into the real action...
The Method — Step by Step
First, gather all your dry ingredients for the crust: 2 ½ cups flour, 1 tsp salt, and 1 tbsp sugar. Whisk them together in a large bowl until evenly combined. This step ensures the salt and sugar are evenly distributed, preventing any salty pockets in the dough. Power transition: Okay, ready for the game‑changer?
Cut the chilled butter into the flour mixture using a pastry cutter or your fingertips. You want the butter to remain in small, pea‑sized chunks—think tiny islands of cold gold. The texture should resemble coarse crumbs with a few larger butter pieces.
Kitchen Hack: If the dough looks too dry, sprinkle a tablespoon of ice water at a time and mix until it just comes together.Gradually add ice water—6 to 8 tbsp—mixing gently with a fork until the dough begins to clump. The key is to add water slowly; you don’t want a sticky mess, just enough moisture for the dough to hold together when pressed. Form the dough into two discs, wrap each in plastic wrap, and refrigerate for at least 30 minutes. This chilling period lets the gluten relax and the butter solidify, which is crucial for a flaky crust.
While the dough chills, prepare the filling. Peel, core, and slice 6‑8 cups of apples (a 50/50 mix of Granny Smith and Honeycrisp works best). Toss the slices with ¾ cup sugar, 2 tbsp flour, 1 tsp cinnamon, ¼ tsp nutmeg, 1 tbsp lemon juice, and a pinch of salt. The flour will thicken the juices as the apples bake, while the lemon juice prevents browning and adds brightness. Let the mixture sit for 10 minutes; this allows the flavors to meld and the apples to release some of their natural juices.
Preheat your oven to 425°F (220°C). Roll out one disc of dough on a lightly floured surface to fit a 9‑inch pie plate, leaving a slight overhang. Gently lay the crust into the pan, pressing it down to avoid air pockets. Trim any excess dough, leaving about a 1‑inch overhang for the top crust.
Pour the apple filling into the crust, spreading it evenly. Dot the surface with small pieces of butter (about 1 tbsp) to add richness and help the top crust brown.
Watch Out: Avoid over‑filling; too much liquid can make the crust soggy.Roll out the second dough disc, then place it over the filling. Trim excess dough, then crimp the edges using your fingers or a fork for a decorative seal. Cut a few slits in the top crust to allow steam to escape—this prevents the filling from bubbling over.
Brush the top crust with a light egg wash (optional) for a golden sheen. Place the pie on a baking sheet to catch any drips, then bake at 425°F for 15 minutes. After 15 minutes, lower the temperature to 350°F (175°C) and continue baking for another 30‑35 minutes, or until the crust is deep golden and the filling is bubbling through the vents. The edges should start pulling away from the pan, a visual cue that the crust is perfectly baked.
Remove the pie from the oven and let it rest on a wire rack for at least 20 minutes before slicing. This rest period allows the filling to set, so you won’t end up with a runny mess on your plate. That sizzle when it hits the pan? Absolute perfection.
Serve warm, perhaps with a scoop of vanilla ice cream or a dollop of freshly whipped cream. Picture yourself pulling this out of the oven, the whole kitchen smelling incredible, and the first bite melting like a sweet, buttery dream. I dare you to taste this and not go back for seconds—because you will.
That's it — you did it. But hold on, I've got a few more tricks that'll take this to another level...
Insider Tricks for Flawless Results
The Temperature Rule Nobody Follows
Start the bake at a scorching 425°F to set the crust’s structure, then drop to 350°F to finish cooking the filling evenly. This two‑stage temperature swing creates a crust that’s both crisp on the outside and tender on the inside. I once tried baking at a steady 375°F and ended up with a soggy bottom—lesson learned.
Why Your Nose Knows Best
Before you even open the oven, trust your sense of smell. When the crust begins to smell nutty and the apples emit a caramel aroma, you’re nearing perfection. If the scent turns overly smoky, the pie is probably done and you should pull it out immediately.
The 5‑Minute Rest That Changes Everything
Letting the pie rest for five minutes after baking lets the juices redistribute, preventing a watery slice. This short pause also makes the crust easier to cut, as the filling firms up slightly. Skipping this step is the fastest way to a soggy plate.
Butter Dotting Secrets
Instead of scattering butter randomly, dot it in a spiral pattern from the center outward. This technique ensures even melting and a glossy finish on the filling. A friend tried skipping the butter entirely once—let’s just say the pie tasted like cardboard.
Egg Wash for Shine
A quick brush of beaten egg mixed with a splash of milk gives the crust a beautiful, glossy finish. If you prefer a matte look, skip the wash, but you’ll lose that restaurant‑quality sheen. The egg wash also helps seal the edges, reducing the chance of leaks.
Creative Twists and Variations
This recipe is a playground. Here are some of my favorite ways to switch things up:
Caramel Apple Explosion
Swirl in ¼ cup of caramel sauce into the apple mixture before baking. The caramel adds a deep, buttery sweetness that pairs perfectly with the tart apples. Ideal for those who love a gooey center.
Nutty Crunch
Fold in ½ cup of toasted chopped walnuts or pecans into the filling. The nuts add texture and a subtle earthiness that elevates the pie from simple to sophisticated. Great for autumn gatherings.
Spiced Rum Infusion
Add a tablespoon of dark spiced rum to the apple mixture for a boozy twist. The rum deepens the flavor profile and adds a warm, festive note—perfect for holiday celebrations.
Cheddar Crust
Mix ½ cup of sharp cheddar cheese into the crust dough. The salty cheese creates a surprising contrast with the sweet filling, reminiscent of classic apple‑cheddar pairings. A bold move for adventurous eaters.
Gluten‑Free Version
Replace all‑purpose flour with a 1:1 gluten‑free flour blend, and add a tablespoon of xanthan gum to maintain structure. The texture will be slightly different but still delicious, allowing those with gluten sensitivities to enjoy the pie.
Vegan Adaptation
Swap butter for a solid coconut oil and use a flax‑egg (1 tbsp ground flaxseed + 3 tbsp water) for the egg wash. The result is a fully plant‑based pie that still boasts a flaky crust and luscious filling.
Storing and Bringing It Back to Life
Fridge Storage
Cover the cooled pie loosely with foil or plastic wrap and store it in the refrigerator for up to four days. The crust will retain its crispness if you reheat it properly.
Freezer Friendly
Wrap the pie tightly in a double layer of freezer‑grade foil, then place it in a zip‑top bag. It will keep for up to three months. When ready to bake, thaw overnight in the fridge, then bake as directed.
Best Reheating Method
Preheat the oven to 350°F (175°C). Place the slice on a baking sheet, add a tiny splash of water (about a teaspoon) to the edge, and cover loosely with foil. Heat for 10‑12 minutes until the crust regains its crunch and the filling is warm. The water creates steam that revives the filling without drying it out.