I was standing in my kitchen, staring at a tray of plain, boring macarons that had somehow turned into a culinary nightmare. The shells were cracked, the colors were a sad beige, and I could already taste the disappointment before I even took a bite. Then a friend dared me to “make something that looks like a beet and tastes like a dream,” and I thought, why not turn that dare into a full‑blown masterpiece? I grabbed the freshest beets from the farmer’s market, roasted them until they were caramel‑sweet, and set out to create a savory macaron that would make even the most die‑hard sweet‑tooth fan gasp. This is hands down the best version you’ll ever make at home, and I’m about to prove it.
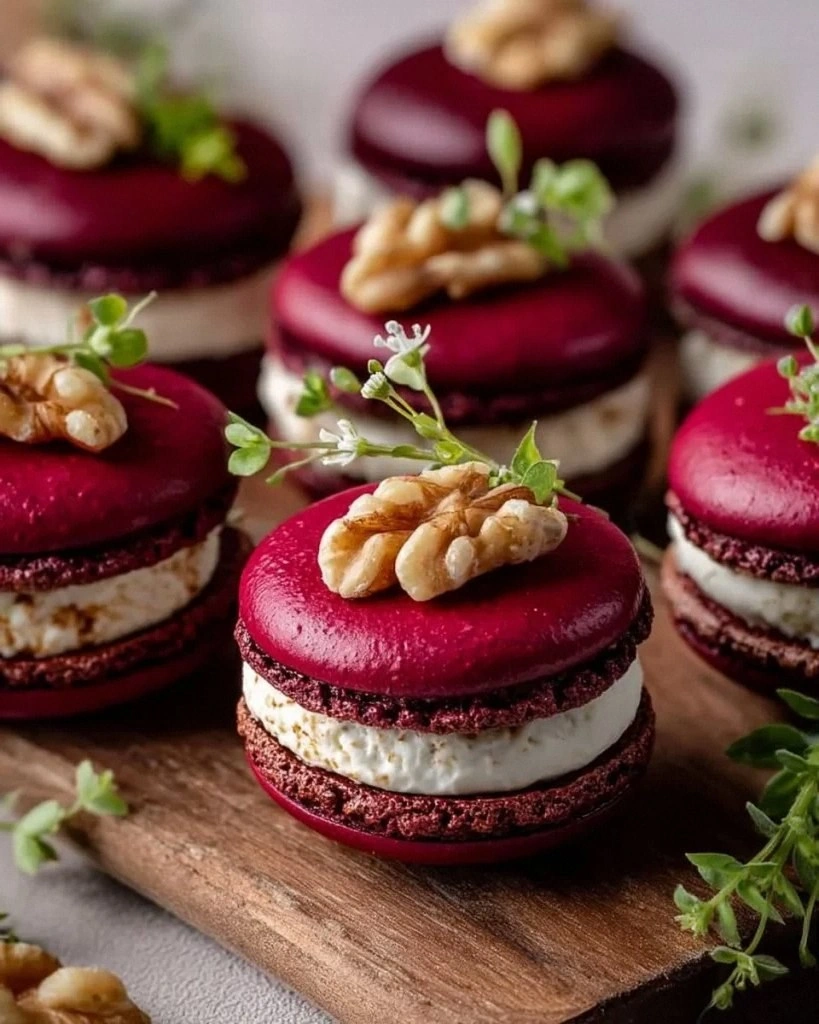
Picture this: a glossy, ruby‑red shell that snaps delicately when you bite into it, revealing a creamy goat‑cheese filling that’s speckled with toasted walnut crunch. The scent of fresh thyme wafts up as the oven door opens, mingling with the earthy perfume of roasted beet, and the whole kitchen feels like a cozy autumn market stall. The first bite is a symphony—silky, tangy, nutty, and just a touch sweet from the icing sugar, all balanced by a whisper of salt that makes the flavors sing. I’ll be honest — I ate half the batch before anyone else got to try it, and that’s exactly the kind of confession that tells you how addictive this thing really is.
Most recipes get the macaron base completely wrong: they either over‑mix, under‑mix, or forget that a little vegetable puree can do wonders for color and flavor. Here’s what actually works: a precise macaronage technique, a beet puree that’s been roasted to bring out natural sugars, and a filling that’s a perfect marriage of goat cheese and walnut crunch. I dare you to taste this and not go back for seconds, because the moment those flavors hit your palate, you’ll be convinced that you’ve discovered a new favorite appetizer. The secret ingredient? A splash of olive oil that adds a luxurious mouthfeel without any greasy aftertaste.
Okay, ready for the game‑changer? I’m going to walk you through every single step — from roasting the beets to piping the perfect shells, to assembling the final bite‑size works of art. By the end, you’ll wonder how you ever made macarons any other way. Stay with me here — this is worth it.
What Makes This Version Stand Out
- Color: The beet puree gives the shells a vivid, natural ruby hue that looks stunning on any platter, no food coloring needed.
- Flavor Depth: Roasted beets add a subtle caramelized earthiness that pairs perfectly with tangy goat cheese.
- Texture Contrast: The walnut crunch provides a satisfying bite that cuts through the silky filling.
- Simplicity: Only ten ingredients, all pantry‑friendly, yet the result feels like a gourmet restaurant creation.
- Make‑Ahead Friendly: The shells can be baked a day ahead, and the filling holds up beautifully in the fridge.
- Versatility: Perfect as a starter, a party canapé, or a sophisticated snack for wine‑pairing evenings.
- Healthier Twist: Using almond flour and olive oil keeps the carbs lower while adding healthy fats.
- Crowd Reaction: Guests often ask, “What’s in these?” and you get to watch their eyes widen with each bite.
Alright, let's break down exactly what goes into this masterpiece...
Inside the Ingredient List
The Flavor Base
Beet Puree (1 cup) is the heart of this recipe. Freshly roasted beets release natural sugars that give the shells a sweet‑earthy depth, and the vibrant color is completely natural. If you skip the roasting step, you’ll end up with a muted hue and a raw, slightly bitter taste that throws the whole balance off. A good swap for those who aren’t beet‑obsessed is roasted carrot puree, though you’ll lose that signature ruby glow.
The Texture Crew
Almond Flour (1.5 cups) and Icing Sugar (1 cup) form the dry foundation. Almond flour keeps the shells tender and adds a subtle nuttiness that echoes the walnut crunch later on. Be sure to sift both ingredients twice; any lumps will cause uneven shells that crack under pressure. If you’re allergic to nuts, you can substitute a blend of oat flour and coconut flour, but expect a slightly different texture.
The Unexpected Star
Olive Oil (2 tablespoons) might sound odd in a macaron, but it’s the secret to a glossy finish and a buttery mouthfeel without adding dairy. Use a high‑quality extra‑virgin olive oil; cheap versions can introduce a harsh aftertaste. A tiny drizzle of melted butter works as an alternative, yet you’ll miss the subtle fruitiness that olive oil imparts.
The Final Flourish
Goat Cheese (4 oz) and Chopped Walnuts (0.5 cup) make up the filling. The cheese should be softened at room temperature so it spreads easily, and the walnuts must be toasted until they’re golden and fragrant. If you forget to toast the nuts, they’ll taste raw and the crunch will be muted. A good tip: toss the walnuts with a pinch of sea salt before toasting for an extra pop of flavor.
Everything's prepped? Good. Let's get into the real action...
The Method — Step by Step
Preheat your oven to 300°F (150°C) and line two baking sheets with parchment paper. While the oven warms, toss the roasted beet puree with olive oil and a pinch of salt; the mixture should look glossy and slightly thick, like a smooth hummus. Let the puree rest for five minutes so the oil fully incorporates — this is the moment where the flavor really starts to marry.
Kitchen Hack: Warm the beet puree gently in a microwave for 10‑15 seconds before mixing; it makes the batter smoother and easier to pipe.In a large mixing bowl, whisk together the almond flour and icing sugar until fully combined. Sift this mixture twice through a fine mesh sieve to eliminate any clumps. The sifted dry mix should feel like fine sand; if it feels gritty, keep sifting. This step is crucial because any grainy texture will show up in the final shell.
In a separate, clean bowl, beat the three egg whites on medium speed until they become frothy. Add the granulated sugar gradually, then increase the speed to high and whip until stiff peaks form. The peaks should stand upright without drooping, and the mixture will look glossy, almost like a mirror. If you over‑beat, the meringue becomes grainy and will ruin the macaronage.
Gently fold the beet‑olive oil mixture into the meringue, using a spatula and a gentle “cut‑fold” motion. The batter should flow like lava, thick yet still able to spread when piped. Watch out: Over‑mixing at this stage will cause the batter to become too runny, leading to flat shells.
Watch Out: If the batter is too thick, the shells will have a rough surface and won’t develop the classic “feet.” Add a teaspoon of water to loosen.Now fold in the sifted almond‑icing sugar blend. Use a gentle folding motion until the batter reaches the “ribbon” stage: when you lift the spatula, the batter should form a smooth ribbon that falls back into the bowl without breaking. This is the macaronage sweet spot; too little and the shells will be lumpy, too much and they’ll spread too thin.
Transfer the batter to a pastry bag fitted with a 1‑inch round tip. Pipe 1‑inch circles onto the prepared parchment, spacing them about an inch apart. Tap the baking sheets firmly on the countertop three times to release any air bubbles. The tops should look smooth and slightly glossy; any cracks at this stage mean the batter was over‑mixed.
Let the piped shells rest at room temperature for 30‑45 minutes, or until a thin skin forms on the surface. You’ll know they’re ready when you can lightly touch the tops without any batter sticking to your finger. This “drying” step is what creates the signature feet during baking. If you’re in a humid environment, extend the rest time by another 10‑15 minutes.
While the shells are drying, prepare the filling. In a bowl, combine the softened goat cheese, toasted walnuts, and fresh thyme. Drizzle in a teaspoon of olive oil if the mixture feels too thick; it should be spreadable but still hold its shape. Fold gently until everything is evenly distributed, then refrigerate the filling for at least 10 minutes so it firms up.
Bake the shells in the pre‑heated oven for 15‑18 minutes. The edges should be firm to the touch, and the tops will have a faint matte sheen. If you peek too early, the shells can collapse; trust the timer. Once baked, let them cool completely on the sheet before removing.
To assemble, pair shells of similar size. Pipe a dollop of the goat‑cheese mixture onto the flat side of one shell, then sandwich it with its partner. Press gently so the filling spreads to the edges but doesn’t ooze out. Place the assembled macarons on a tray, cover loosely with parchment, and refrigerate for at least 30 minutes to allow the flavors to meld.
Kitchen Hack: For a flawless sandwich, use a small offset spatula to spread the filling evenly, avoiding any air pockets.
That's it — you did it. But hold on, I've got a few more tricks that'll take this to another level...
Insider Tricks for Flawless Results
The Temperature Rule Nobody Follows
Most home bakers bake macarons at 325°F, but the lower 300°F I use preserves the delicate crumb and prevents the shells from browning too quickly. The gentle heat allows the “feet” to develop slowly, giving you that classic rise. I once tried a hotter oven and ended up with a burnt crust that tasted like over‑toasted bread. Trust the lower temperature; your macarons will thank you with a smooth, ivory‑pink interior.
Why Your Nose Knows Best
Before you open the oven, pause and inhale. The scent should be faintly earthy with a whisper of toasted almond. If you smell raw egg or burnt sugar, the batter is either under‑mixed or over‑baked. Your nose is a more reliable indicator than a timer, especially when you’re dealing with subtle color changes like beet‑red shells.
The 5‑Minute Rest That Changes Everything
After baking, let the shells sit on the tray for exactly five minutes before transferring them to a cooling rack. This brief pause lets the interior finish setting and prevents the shells from cracking when you move them. Skipping this step often leads to a fragile shell that crumbles under the weight of the filling. I swear by this five‑minute rule; it’s the difference between a professional finish and a kitchen mishap.
Walnut Toasting Secrets
Toast walnuts in a dry skillet over medium heat, shaking the pan constantly. When they start to brown and release a nutty aroma (about 4‑5 minutes), remove them immediately to stop the cooking process. If you leave them on the heat, they’ll turn bitter, and that bitterness will clash with the sweet‑earthy beet. A pinch of sea salt added right after toasting amplifies the crunch.
The Goat Cheese Soften Trick
Softening goat cheese in a microwave for 10 seconds (on low) makes it spreadable without adding extra liquid. This ensures a smooth filling that doesn’t seep out of the macarons. If you try to soften it at room temperature for too long, it can become oily and separate. Quick microwave softening is a game‑changer.
Creative Twists and Variations
This recipe is a playground. Here are some of my favorite ways to switch things up:
Smoky Chipotle Beet
Add a pinch of smoked chipotle powder to the beet puree for a subtle heat that pairs beautifully with the goat cheese. The smoky undertone turns the macarons into a perfect appetizer for a summer BBQ.
Herb‑Infused Goat
Swap fresh thyme for a blend of rosemary and chives. The herbaceous notes brighten the filling and give a fresh springtime vibe, ideal for garden parties.
Sweet‑And‑Savory Delight
Stir a tablespoon of honey into the goat cheese filling and sprinkle a few candied pecans on top before sandwiching. The honey adds a delicate sweetness that balances the earthy beet, making it a hit at brunch.
Vegan Version
Replace the egg whites with aquafaba (the liquid from a can of chickpeas) — three tablespoons of aquafaba mimics three egg whites. Use a plant‑based cream cheese instead of goat cheese, and you still get that creamy texture without any animal products.
Cheesy Walnut Crunch
Add a teaspoon of grated aged Parmesan to the walnut mixture for an umami boost. The salty cheese amplifies the nutty crunch and gives the macarons a sophisticated flavor profile.
Storing and Bringing It Back to Life
Fridge Storage
Place the assembled macarons in an airtight container and store them in the refrigerator for up to three days. The cool environment keeps the goat cheese firm and prevents the shells from becoming soggy. If you notice condensation, gently pat the tops with a paper towel before serving.
Freezer Friendly
Both the shells and the filling freeze beautifully. Store the shells in a zip‑top bag with a layer of parchment between each to avoid sticking. Freeze the filling in a small airtight container. When you’re ready to serve, let the shells thaw at room temperature for 15 minutes, then re‑assemble with the thawed filling.
Best Reheating Method
To revive the shells after refrigeration, place them on a baking sheet and warm them in a 250°F oven for 5‑7 minutes. Add a tiny splash of water (about a teaspoon) to the tray; the steam will bring back that soft interior while keeping the crust crisp. This trick works wonders for a fresh‑out‑of‑the‑oven experience.