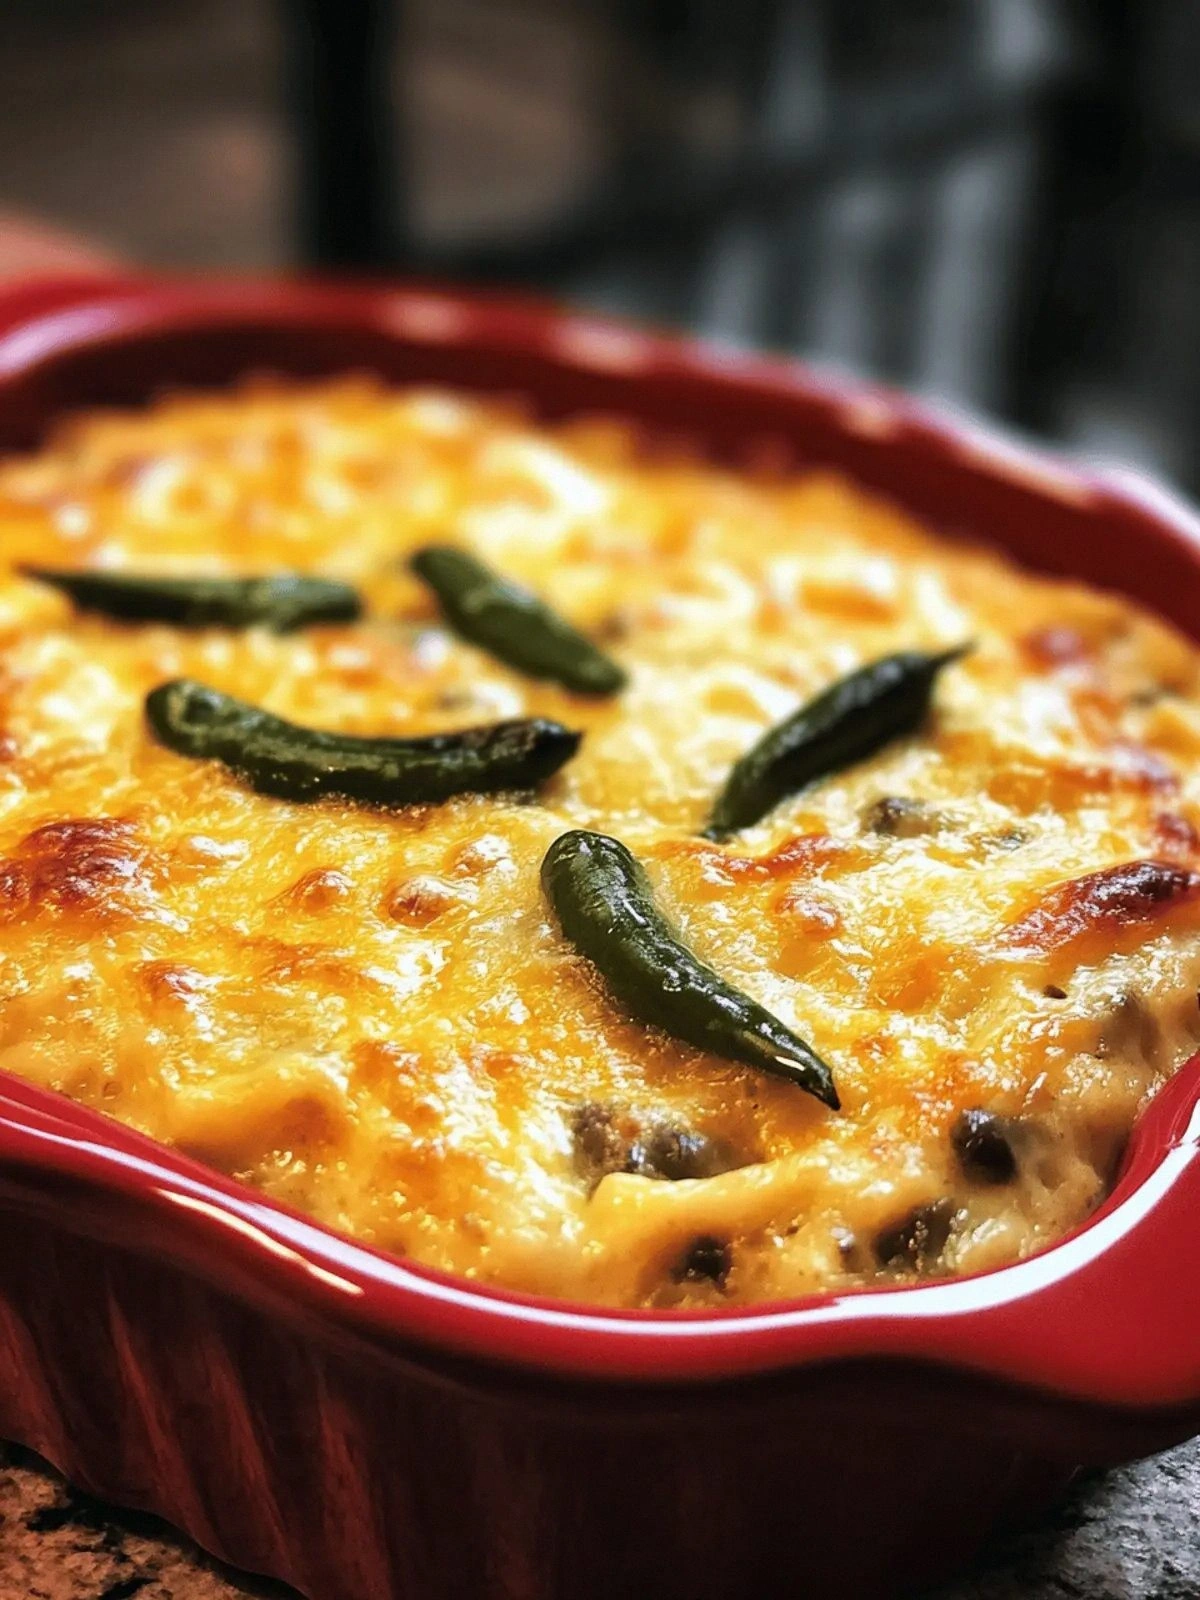
I was in a culinary panic that night—my friend had dared me to turn a handful of leftover roasted green chiles into something that would make her taste buds do a double‑tap. The kitchen was a mess: half a pan of melted cheese, a splash of milk that had turned into a sticky goo, and my own face reflected in the glossy surface of the skillet. I stared at the green chiles, their smoky skins and bright, peppery hearts, and thought, “If I could just coax these into a casserole that feels like a hug, I’d be a legend.” That was the spark that turned a kitchen disaster into a delicious revelation.
Picture this: the oven preheats to 375°F, the air thick with the scent of caramelized onions and melting cheese. The first bite is a molten river of Monterey Jack and sharp cheddar that slides over a bed of creamy eggs, while the roasted chiles add a subtle heat that lingers like a secret. The texture is a paradox—soft, custard‑like interior with a golden, slightly crisp top that crackles when you bite into it. I swear the sizzle when the batter hits the pan is the soundtrack of culinary triumph. If you’re craving something that feels both indulgent and comforting, this is the dish that will make you forget you ever tried to cook something “simple.”
Why does this version stand out? Because I took the classic chile relleno concept and turned it into a casserole that’s easier to assemble, more forgiving, and absolutely crowd‑pleasing. I added a binding flour and baking powder combo that lifts the batter, giving it a light, airy lift that’s perfect for a family dinner. The cheeses I chose—Monterey Jack for its meltability and sharp cheddar for a punch of flavor—create a cheese sauce that coats every bite like velvet. And the secret? A splash of whole milk that keeps the custard silky without making it heavy. I dare you to taste this and not go back for seconds.
By the end of this post, you’ll have a step‑by‑step guide that turns simple ingredients into a melt‑in‑your‑mouth masterpiece. I’ll show you how to roast those chiles to perfection, whisk the custard to the right consistency, and bake it to a golden finish that will have everyone asking for the recipe. Let me walk you through every single step — by the end, you’ll wonder how you ever made it any other way.
What Makes This Version Stand Out
- Flavor: The blend of Monterey Jack and sharp cheddar creates a cheese sauce that’s both creamy and tangy, with the chiles adding a smoky depth that’s unmistakably Mexican.
- Texture: The addition of flour and baking powder gives the casserole a light, custard‑like interior that melts in your mouth, while the top crisps to a golden finish.
- Ease: No advanced techniques required—just roast, whisk, assemble, bake. Even a beginner can pull this off.
- Versatility: It can be served as a main, a side, or a party appetizer. Add a dollop of sour cream or a sprinkle of fresh cilantro and it’s transformed.
- Crowd‑pleaser: The combination of familiar comfort foods with a spicy twist makes it a guaranteed hit at gatherings.
- Ingredient Quality: Using fresh, high‑quality chiles and cheeses ensures the final flavor is bright, not flat.
- Make‑ahead: Assemble the casserole a day ahead, refrigerate, and bake when you’re ready—great for busy weeknights.
- Visual Appeal: The golden top and vibrant green chiles create a dish that looks as good as it tastes.
Alright, let's break down exactly what goes into this masterpiece…
Inside the Ingredient List
The Flavor Base
The roasted green chiles are the heart of this dish. Their smoky, peppery flavor is the backbone that carries the rich cheese and custard. If you can’t find fresh chiles, a jar of roasted poblano peppers works well—just remember to remove the seeds for a milder bite. Skipping the chiles entirely would strip the casserole of its signature heat and depth, turning it into a plain cheese bake.
The Texture Crew
Eggs and whole milk form the custard that binds everything together. The eggs provide structure; the milk adds creaminess. If you’re looking for a dairy‑free version, try using a blend of coconut milk and a plant‑based protein powder to maintain the custard’s body. The flour and baking powder are the secret lift agents; they give the casserole a light, airy interior that contrasts beautifully with the crisp top.
The Unexpected Star
Monterey Jack cheese is chosen for its superb melting properties. It spreads evenly, creating a silky sauce that coats the chiles and eggs. Sharp cheddar adds a sharp contrast of flavor that cuts through the richness. Swapping the cheddar for a smoked gouda will give the dish a deeper, smoky undertone. If you prefer a sharper bite, a pepper jack can add a subtle kick.
The Final Flourish
A pinch of baking powder and a dash of salt and pepper elevate the entire flavor profile. The baking powder not only lightens the batter but also helps the casserole rise slightly, creating a pleasing structure. Salt balances the heat of the chiles, while black pepper adds a subtle aromatic warmth. If you’re watching sodium, use a low‑sodium cheese or reduce the salt by half.
Everything’s prepped? Good. Let’s get into the real action…
The Method — Step by Step
- Roast the Chiles: Preheat your oven to 400°F. Place the green chiles on a baking sheet and roast for 15 minutes until the skins blister. Transfer them to a bowl, cover tightly with plastic wrap, and let steam for 10 minutes. This makes peeling the skins effortless and keeps the interior moist. I always keep the skins on until the last moment; they add a subtle bitterness that balances the sweetness of the cheese.
- Prep the Casserole Dish: Lightly grease a 9x13-inch baking dish with cooking spray or a thin layer of butter. If you like a crisp top, sprinkle a tiny amount of flour over the bottom to help absorb excess moisture.
- Blend the Chiles: Remove the skins and seeds from the roasted chiles. Place the flesh in a blender or food processor and pulse until you get a smooth puree. If the mixture is too thick, add a splash of milk to reach a pourable consistency. The puree should be silky and free of lumps.
- Whisk the Custard: In a large bowl, beat the eggs with the whole milk until fully integrated. Add the flour and baking powder, whisking until smooth. Season with salt and pepper. This creates a thick, silky batter that will set nicely in the oven.
- Combine Chiles and Custard: Gently fold the chile puree into the custard, being careful not to overmix. The mixture should be glossy and slightly thick. If it’s too runny, add a teaspoon of flour; if too thick, a splash more milk. The goal is a silky, pourable consistency.
- Add the Cheese: Stir in the Monterey Jack and sharp cheddar until fully melted and evenly distributed. The cheese should coat the mixture like a velvet blanket. The heat of the batter will melt the cheese, creating a gooey, golden top as it bakes.
- Pour into the Dish: Transfer the mixture to the prepared baking dish, smoothing the top with a spatula. If you like a slightly crispy edge, sprinkle a thin layer of additional cheese on top before baking.
- Bake: Place the dish in the preheated oven and bake for 25–30 minutes, or until the top is golden brown and the center is set. The edges should pull away from the pan, indicating doneness. The aroma should be a warm, comforting blend of cheese and roasted peppers.
- Rest and Serve: Let the casserole rest for 5 minutes after removing it from the oven. This allows the custard to set further, making it easier to cut clean slices. Slice, plate, and serve immediately, perhaps with a dollop of sour cream and a sprinkle of fresh cilantro for that extra zing.
That’s it — you did it. But hold on, I've got a few more tricks that'll take this to another level…
Insider Tricks for Flawless Results
The Temperature Rule Nobody Follows
Many cooks bake at a high temperature to get a golden crust, but the key to a perfect custard is a steady 350°F. A lower temperature ensures the center cooks slowly and evenly, preventing a rubbery texture. I’ve found that preheating the oven for at least 10 minutes before baking is essential; an under‑heated oven can cause the custard to set too quickly on the outside while remaining runny inside.
Why Your Nose Knows Best
Before you open the oven door, pause and inhale. The aroma of melted cheese and roasted peppers is your first indicator of doneness. If the scent is heavy and buttery, it’s ready. If it still smells like raw eggs, give it a few more minutes. I’ve learned to trust my nose; it’s a reliable guide that saves me from overbaking.
The 5‑Minute Rest That Changes Everything
After baking, let the casserole sit for exactly five minutes. This short rest lets the custard set, preventing it from sliding off the plate when you cut it. A friend once skipped this step and ended up with a mess of gooey cheese on the cutting board. The five minutes also allow the flavors to meld, giving the dish a more cohesive taste.
Keep the Cheese Moist
If your cheese seems to be drying out before the top is golden, add a tablespoon of whole milk to the batter. This small addition restores moisture and prevents a chalky texture. It’s a quick fix that keeps the casserole luscious.
Make‑Ahead Friendly
You can assemble the casserole a day ahead, cover tightly, and refrigerate. When you’re ready to bake, just let it come to room temperature for 15 minutes before popping it in the oven. This technique is perfect for busy weeknights and ensures a consistent result every time.
Serve with a Fresh Twist
A sprinkle of chopped fresh cilantro and a squeeze of lime juice right before serving adds a bright, citrusy contrast to the rich custard. If you’re serving at a holiday gathering, consider adding a side of avocado slices for a creamy, cooling element that balances the heat.
Creative Twists and Variations
This recipe is a playground. Here are some of my favorite ways to switch things up:
Mexican Street‑Food Style
Swap the Monterey Jack for a blend of pepper jack and mozzarella. Top with a drizzle of chipotle mayo and serve with corn tortillas for a handheld version.
Vegan Version
Use a plant‑based egg substitute, coconut milk, and a vegan cheese blend. The result is a creamy, dairy‑free casserole that still delivers on flavor.
Breakfast Boost
Add diced ham or bacon to the batter for a savory breakfast casserole. Serve with a side of fresh fruit to balance the richness.
Spicy Kick
Incorporate a handful of diced jalapeños or a splash of hot sauce into the chile puree. The extra heat will satisfy anyone who loves a fiery bite.
Cheese‑Heavy Indulgence
Increase the cheddar to 1½ cups and add a tablespoon of grated Parmesan for a more decadent, nutty flavor profile.
Herb‑Infused
Stir in a tablespoon of chopped fresh oregano or thyme before baking. The herbs add a fragrant depth that pairs beautifully with the roasted chiles.
Storing and Bringing It Back to Life
Fridge Storage
Cool the casserole completely, then cover tightly with plastic wrap or foil. Store in the refrigerator for up to 3 days. The custard will firm up slightly, but it remains delicious.
Freezer Friendly
Wrap the cooled casserole in aluminum foil, then place it in a freezer bag. Freeze for up to 2 months. When ready to eat, thaw overnight in the refrigerator.
Best Reheating Method
Preheat your oven to 350°F. Place the casserole on a baking sheet, cover loosely with foil, and heat for 15–20 minutes, or until warmed through. Add a splash of water to the bottom of the dish before reheating to keep the custard moist and prevent it from drying out.