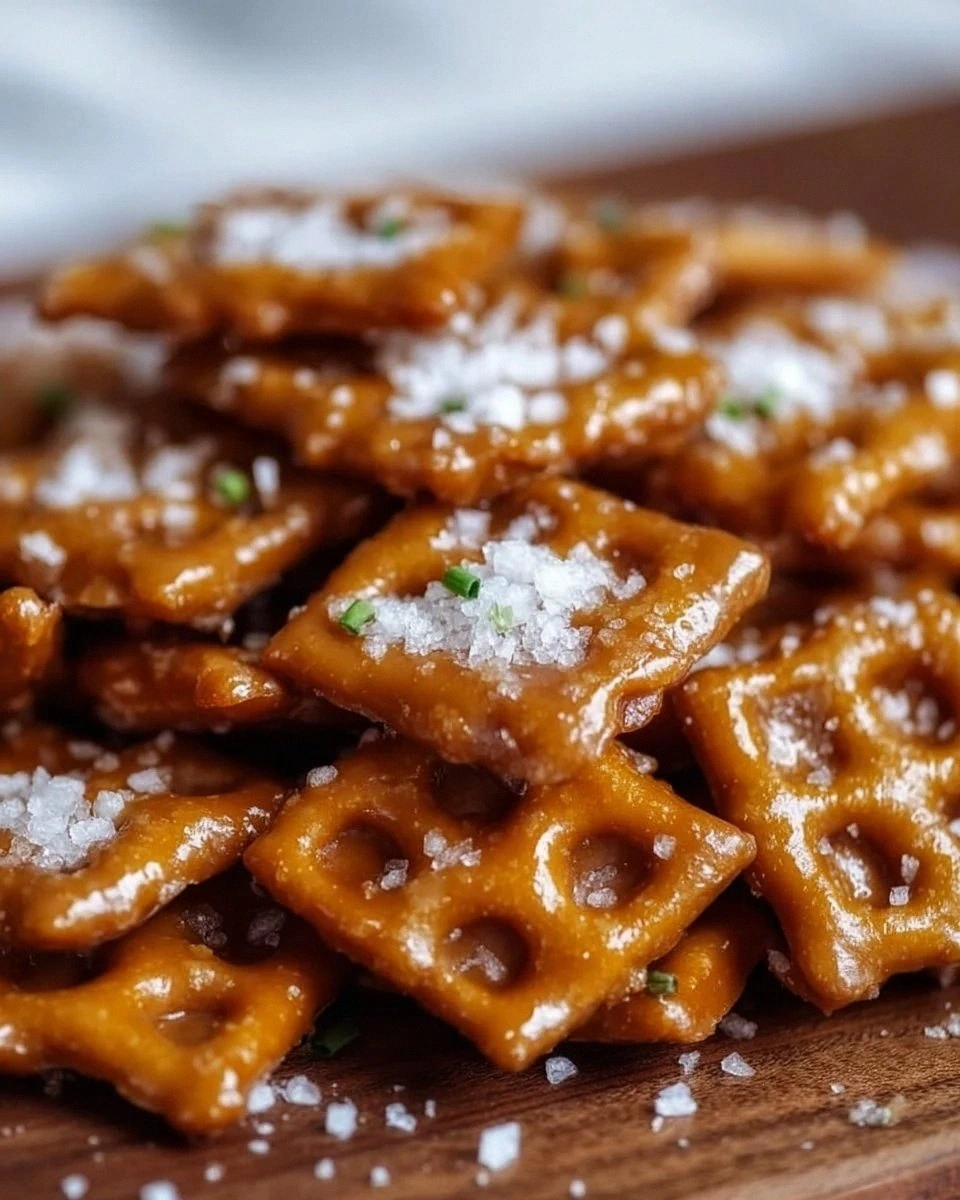
I was standing in my kitchen, staring at a pile of frozen breaded chicken breasts that had been sitting in the freezer for a week, when a sudden craving hit me like a lightning bolt. I wanted something that could be whipped up in minutes, yet felt like a gourmet treat. I tried a few recipes from the internet, but they all fell flat—either the nuggets were soggy or the batter was too dry. Then I remembered my late‑night experiment with Bisquick and honey, which turned out to be a game‑changing revelation. I swear, that first bite was a revelation: a golden, crisp exterior that cracked like brittle ice, revealing a tender, juicy center that oozed a sweet, buttery glaze. It was a moment of pure culinary euphoria.
Picture yourself pulling this batch out of the oven, the kitchen filling with a warm, honeyed aroma that makes even the most skeptical taste buds quiver. The sound of the timer ticking, the gentle pop of the chicken as it finishes crisping, and the sight of golden nuggets glistening like tiny sunbursts on the baking sheet. The texture is a symphony: a crackly crust that gives way to a succulent, melt‑in‑your‑mouth interior. The flavor profile is a balanced duet of sweet and savory, with the honey providing a subtle caramel note that complements the buttery coating. I dare you to taste this and not go back for seconds.
What sets this version apart from every other chicken nugget recipe out there is the secret marriage between Bisquick and honey, a duo that creates a batter that is both fluffy and clingy, allowing the nuggets to hold their shape while delivering a caramelized glaze. Most recipes get this completely wrong, relying on flour or breadcrumbs alone, resulting in a dry, brittle texture. Here, the Bisquick acts as the binder, while the honey adds a glossy finish and a touch of sweetness that lingers on the palate. The butter, simmered with honey, forms a rich sauce that coats the nuggets like velvet, making each bite a luxurious experience.
And the best part? This isn’t just a recipe; it’s a kitchen ritual. The process is straightforward enough for a beginner, yet sophisticated enough to impress a dinner guest. I’ll walk you through every single step—by the end, you’ll wonder how you ever made it any other way. Let’s dive in.
What Makes This Version Stand Out
- Flavor: The honey-Bisquick blend creates a sweet-salty harmony that is both comforting and indulgent. The glaze caramelizes on the surface, giving the nuggets a glossy finish that is impossible to resist.
- Texture: A crisp outer shell that cracks like thin ice, paired with a tender, juicy interior that melts in your mouth. The batter’s airy quality keeps the nuggets from becoming doughy.
- Simplicity: Only six ingredients, all pantry staples, and a single baking sheet. No need for a deep fryer or a fancy sauce mix.
- Uniqueness: The honey-infused butter coating is a twist that sets this recipe apart from the typical fried or baked nuggets.
- Audience Appeal: Kids love the sweet glaze, while adults appreciate the gourmet touch. It’s a crowd‑pleaser that works for family dinners or potlucks.
- Ingredient Quality: Using high‑quality Bisquick and real honey elevates the dish beyond a generic takeout copycat.
- Cooking Method: Baking keeps the calories lower while still delivering a crispy exterior.
- Make‑Ahead Potential: The nuggets can be prepared a day ahead and reheated without losing crunch.
Alright, let’s break down exactly what goes into this masterpiece…
Inside the Ingredient List
The Flavor Base
Honey is the unsung hero that gives this recipe its signature sweetness. It not only sweetens the batter but also promotes caramelization, creating a glossy, caramelized crust that clings to every bite. If you skip honey, the nuggets lose that subtle depth and become a plain, salty snack. For a different twist, try using maple syrup or agave nectar; both will produce a slightly different flavor profile while maintaining the glaze’s integrity. When choosing honey, opt for a darker variety like buckwheat or orange blossom for richer undertones.
The Texture Crew
Butter is the fat that brings everything together. Melted with honey, it creates a smooth sauce that coats the nuggets, adding richness and depth. The butter’s fat content also helps the batter set properly, ensuring a crisp exterior. If you’re watching calories, you can replace half the butter with olive oil, but the flavor will shift slightly toward a more herbal note. Remember, the butter should be melted but not browned; a light golden hue is ideal.
The Unexpected Star
Bisquick is the binding agent that holds the batter together while keeping it airy. Its pre‑mixed blend of flour, baking powder, and salt gives the nuggets a light, fluffy interior. Without Bisquick, the batter would be heavy and clumpy, making it difficult to coat the chicken evenly. If you’re gluten‑free, look for a certified gluten‑free Bisquick; the texture will be similar, though the flavor may be slightly different. The key is to use the exact amount—too much and the batter will be too thick, too little and it won’t bind.
The Final Flourish
The milk and egg work together to create a cohesive batter that clings to each chicken chunk. Milk adds moisture, ensuring the nuggets don’t dry out during baking, while the egg provides structure and helps the batter set. If you’re vegan, replace the egg with a flaxseed “egg” or a commercial egg replacer; the texture will still hold together, but the flavor will be slightly altered. For an extra protein boost, consider adding a tablespoon of Greek yogurt to the batter.
Everything's prepped? Good. Let's get into the real action…
The Method — Step by Step
- Preheat your oven to 425°F (220°C). Line a large baking sheet with parchment paper to prevent sticking. Arrange the frozen chicken chunks on the sheet in a single layer, ensuring they don’t touch each other. This spacing allows the heat to circulate and ensures even crisping.
- In a small saucepan, melt the butter over low heat. Once melted, stir in the honey until the mixture is smooth and glossy. The butter should not brown; it should be a pale golden hue that indicates it’s ready. This step is crucial because the honey needs to dissolve fully into the butter to coat the nuggets evenly.
- In a medium bowl, whisk together the Bisquick, milk, and egg until the batter is smooth. The batter should have a pourable consistency—thin enough to coat the chicken but thick enough to stay on the surface. If the batter is too thin, add a tablespoon of Bisquick; if too thick, add a splash of milk.
- Dip each chicken chunk into the batter, ensuring it’s fully coated. The batter should cling to the chicken, forming a thick shell that will crisp up during baking. Let any excess batter drip off before placing the coated chicken back on the parchment sheet. This prevents clumping and ensures uniform crispness.
- Sprinkle the coated nuggets with a light dusting of salt and pepper. This step is essential for balancing the sweetness of the honey and enhancing the overall flavor profile. A quick pinch of pepper adds a subtle heat that cuts through the richness.
- Drizzle the honey‑butter mixture evenly over the coated nuggets. Use a spoon or a small ladle to ensure each nugget receives a generous coating. The glaze will caramelize as the nuggets bake, creating a golden, glossy finish.
- Bake in the preheated oven for 20–25 minutes, flipping the nuggets halfway through. The internal temperature should reach 165°F (74°C) to ensure the chicken is fully cooked. Watch for the golden crust—when it starts to crack and turn a deep amber, you know they’re done.
- Remove the nuggets from the oven and let them rest on a cooling rack for 5 minutes. Resting allows the juices to redistribute, keeping the nuggets moist and tender. This brief pause also lets the glaze set, giving a crisp finish.
- Serve immediately with your favorite dipping sauce—ranch, honey mustard, or a spicy sriracha mayo. Pair them with a fresh green salad or a side of roasted veggies for a balanced meal. The contrast between the crunchy nuggets and the crisp salad is a match made in culinary heaven.
That's it—you did it. But hold on, I've got a few more tricks that'll take this to another level…
Insider Tricks for Flawless Results
The Temperature Rule Nobody Follows
Many cooks bake at 400°F, but 425°F is the sweet spot for crisping. The higher temperature ensures the outer batter sets quickly, creating a crunchy shell before the interior cooks. If you’re using a convection oven, reduce the temperature by 25°F to avoid over‑browning. I’ve found that the extra 25 minutes at a lower heat results in a more even bake.
Why Your Nose Knows Best
Before you pull the nuggets out of the oven, give them a quick sniff. A sweet, caramelized aroma is the hallmark of a perfectly glazed nugget. If it smells more like raw butter, the honey hasn’t caramelized yet. A faint, slightly burnt scent indicates overbaking—time to pull them out sooner.
The 5-Minute Rest That Changes Everything
Letting the nuggets rest for five minutes after baking is more than just a courtesy. It allows the glaze to set into a crisp shell and the juices to redistribute. Without this rest, the nuggets can become soggy as the glaze softens. I’ve seen people skip this step and end up with a mushy texture that ruins the experience.
Keep the Heat Even
Place the baking sheet on the middle rack for even heat distribution. If you place it too close to the heating element, the nuggets will brown too quickly on the bottom. Conversely, placing it too far can cause uneven cooking. The middle rack is the sweet spot for consistent results.
Use a Cooling Rack
After baking, transfer the nuggets to a cooling rack. This prevents the bottom from becoming soggy from trapped steam. The air circulation keeps the crust crisp and the interior moist. It’s a simple trick that elevates the overall texture.
Serve with a Dip
A dip isn’t just a condiment; it’s an extension of the flavor profile. A homemade honey mustard or a spicy aioli complements the sweet glaze and adds an extra layer of taste. If you’re looking for something low‑calorie, a yogurt‑based dip works wonders, cutting through the richness.
Creative Twists and Variations
This recipe is a playground. Here are some of my favorite ways to switch things up:
Spicy Sriracha Glaze
Swap half the honey for sriracha sauce and add a dash of lime juice. The heat of the sriracha balances the sweetness, creating a bold, tangy flavor that’s perfect for adventurous palates.
Mediterranean Herb Mix
Add dried oregano, thyme, and rosemary to the batter. The herbs infuse the nuggets with a savory, earthy aroma that pairs beautifully with a cucumber‑yogurt dip.
Chocolate Drizzle Finale
After baking, drizzle melted dark chocolate over the nuggets. The chocolate’s bitterness contrasts the sweet glaze, making each bite a decadent treat.
Cheesy Bacon Crunch
Mix shredded cheddar into the batter and sprinkle crumbled bacon on top before baking. The cheese melts into the coating, while the bacon adds a smoky crunch.
Vegan Version
Replace the butter with coconut oil and the egg with a flaxseed “egg.” Use a plant‑based Bisquick alternative. The result is a crispy, vegan nugget that still delivers that sweet‑savory glaze.
Dessert Nugget Surprise
Swap the honey for maple syrup and add a teaspoon of cinnamon to the batter. Serve with a vanilla yogurt dip for a sweet twist that feels like a dessert.
Storing and Bringing It Back to Life
Fridge Storage
Store leftovers in an airtight container in the refrigerator for up to 3 days. The nuggets will stay moist, but they’ll lose some crispness over time. To revive the crunch, place them on a baking sheet and warm in a 350°F oven for 5 minutes.
Freezer Friendly
For longer storage, freeze the baked nuggets on a parchment‑lined tray for 1 hour, then transfer to a freezer bag. They’ll keep for up to 2 months. When ready to eat, bake at 375°F for 15 minutes or microwave for 30 seconds and finish in a skillet to regain crispness.
Best Reheating Method
The best way to reheat is on a skillet over medium heat. Add a splash of water to create steam, cover for 2 minutes, then uncover and cook until the crust is crisp. This method prevents the nuggets from drying out and keeps the glaze intact.