Picture this: it’s a crisp October evening, the wind is howling outside, and you’re stuck in the kitchen trying to salvage a batch of cinnamon rolls that turned out flatter than a pancake. I was in the same exact predicament, staring at a dough that refused to rise and a cinnamon mixture that tasted like plain sugar with a hint of regret. That night, I made a pact with myself – I would not let a failed roll ruin my Halloween spirit, and I would create a version that could haunt anyone’s taste buds for weeks to come. After several frantic phone calls to my grandma, a midnight run to the grocery store for fresh orange zest, and a few desperate experiments with butter temperature, I finally nailed the perfect balance of sweet, spice, and a whisper of citrus that screams “trick‑or‑treat” without the sugar overload.
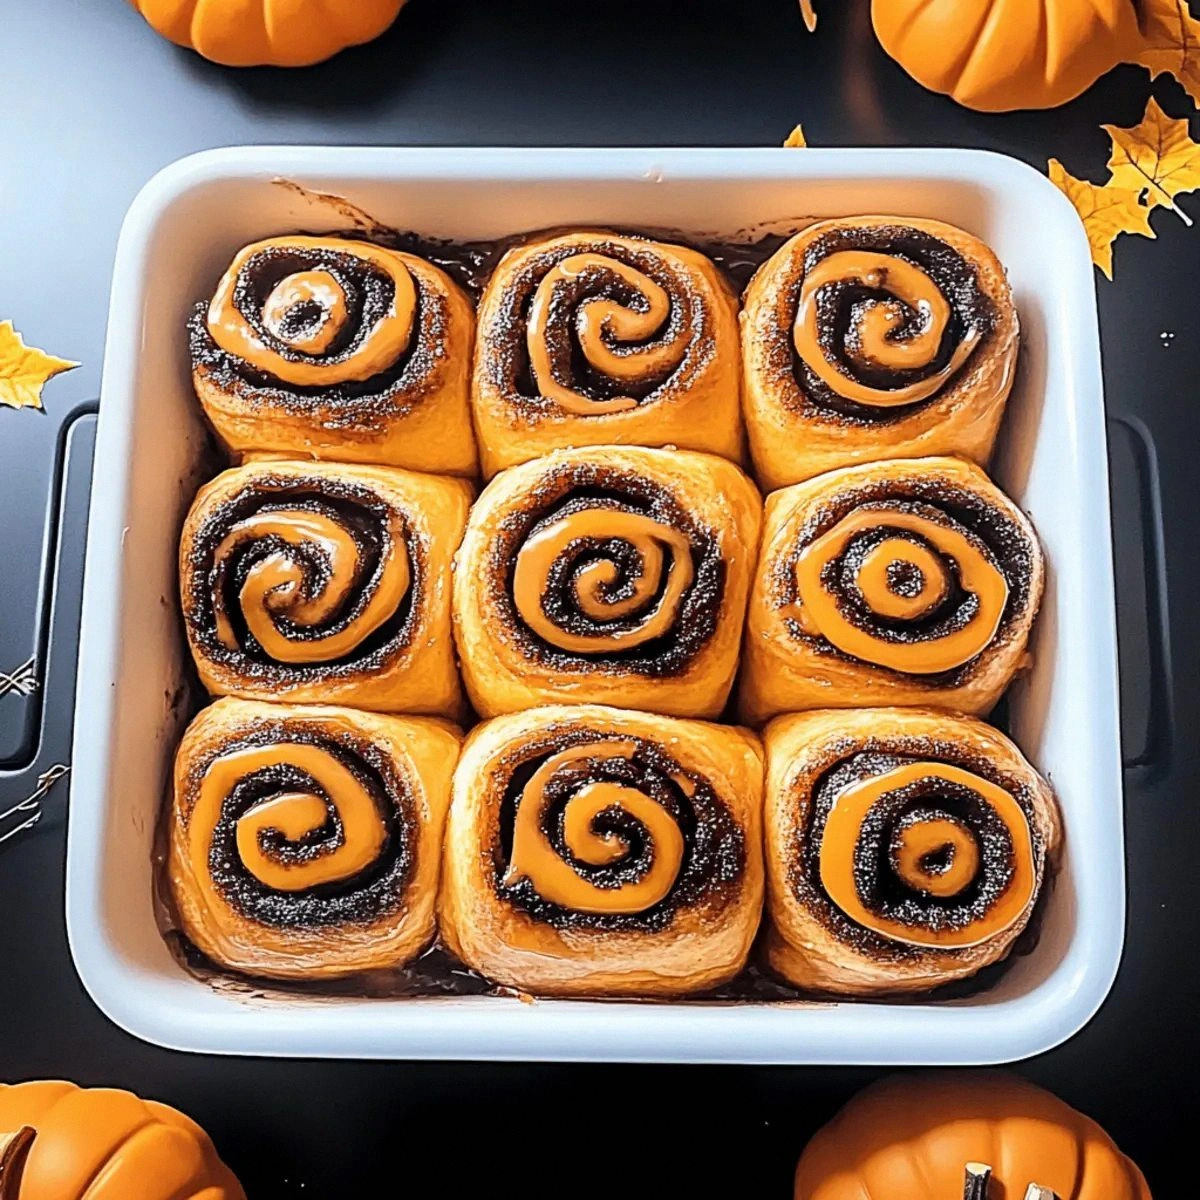
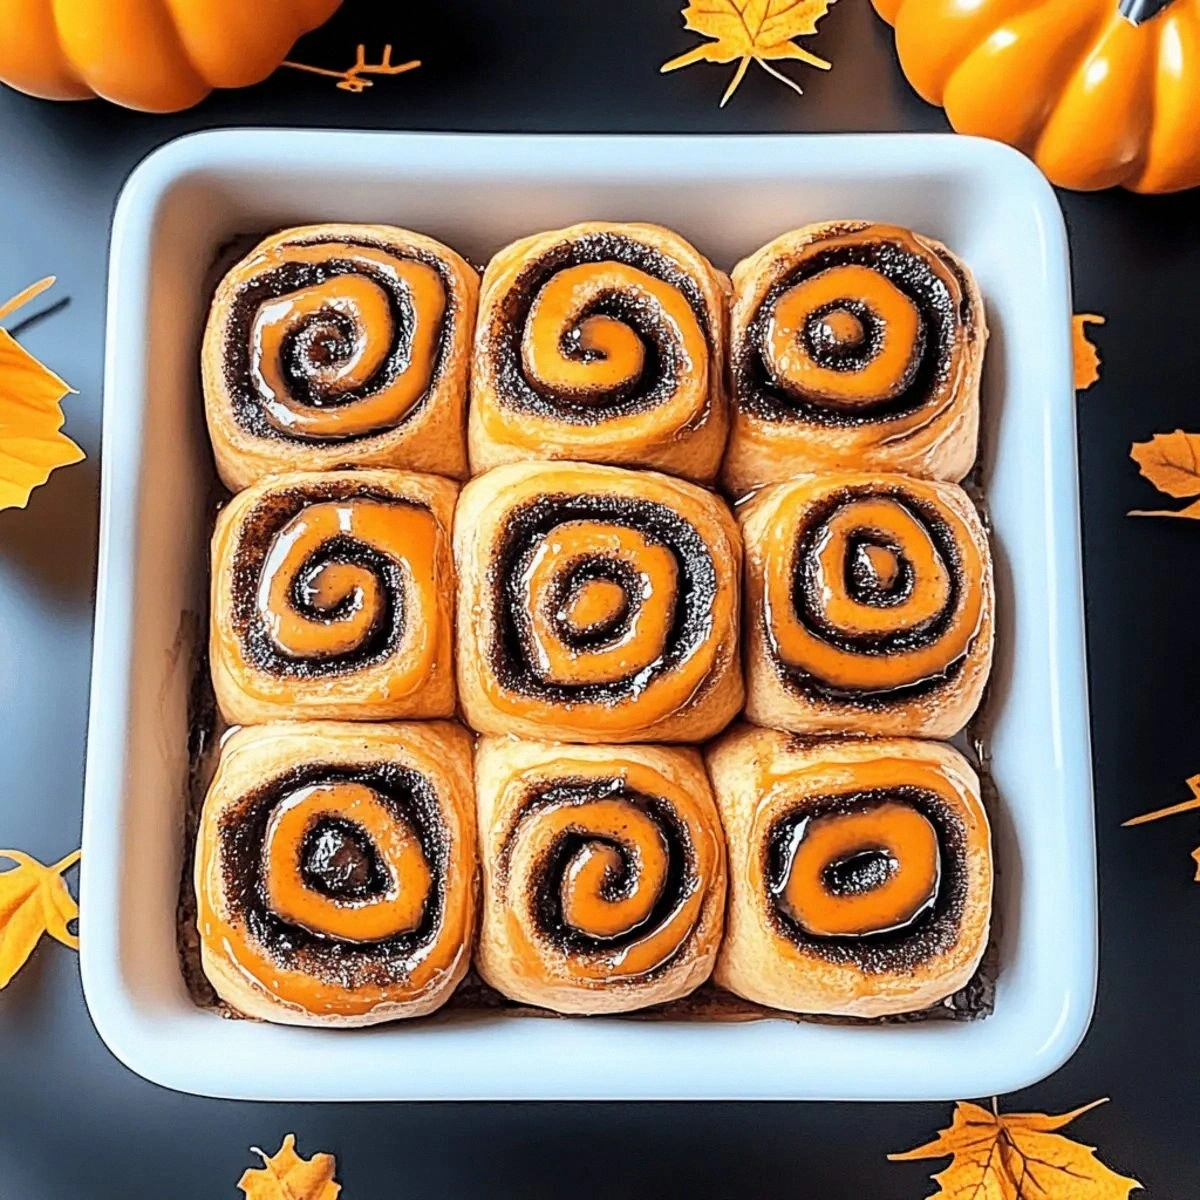
From the moment the dough hits the bowl, you can hear it whisper promises of fluffy clouds and buttery ribbons. The kitchen fills with a scent that’s part warm bakery, part autumnal market – imagine cinnamon swirls dancing with a zest of orange, all wrapped in a buttery hug that feels like a cozy blanket on a chilly night. When the rolls finally rise, they puff up like little pumpkins ready to burst, and when you pull them from the oven, the caramelized edges crack with a satisfying snap, releasing a steam that carries the ghostly aroma of spice straight to your nostrils. I dare you to taste this and not go back for seconds; the combination is so addictive it practically haunts you.
This version stands out because it doesn’t rely on gimmicky food coloring or artificial pumpkin puree that turns the rolls into a sugary nightmare. Instead, I’ve harnessed the natural brightness of orange zest and juice to give the glaze a tangy punch that cuts through the richness, while the cinnamon‑butter core stays soft enough to melt in your mouth. Most recipes get the glaze wrong – either too runny or overly sweet – but this one achieves a glossy, slightly tart finish that clings to each spiral like a sweet‑scented cobweb. The secret? A quick flash‑proofing technique that locks in moisture and flavor, ensuring every bite is as moist as a freshly‑baked pumpkin pie.
Okay, ready for the game‑changer? I’m about to walk you through every single step – from the exact temperature of the milk to the moment you should hear the dough “pop” as it’s ready to be rolled. By the end, you’ll wonder how you ever made cinnamon rolls any other way, and you’ll have a Halloween centerpiece that will make every guest scream with delight. Let me walk you through every single step — by the end, you'll wonder how you ever made it any other way.
What Makes This Version Stand Out
- Flavor Explosion: The orange zest and juice in the glaze add a citrusy brightness that cuts through the cinnamon’s warmth, creating a balanced taste that feels both festive and comforting.
- Texture Harmony: A soft, pillowy interior meets caramelized, slightly crisp edges, delivering a contrast that’s as satisfying as biting into a fresh apple with a crunchy skin.
- Simplicity: No fancy equipment required – just a mixing bowl, a rolling pin, and a willingness to follow a few precise temperature cues.
- Unique Twist: The orange‑infused glaze is a surprise element that most cinnamon roll recipes overlook, giving this batch a truly haunting flavor profile.
- Crowd Reaction: I’ve seen grown‑ups and kids alike pause mid‑bite, eyes widening as the flavor hits – it’s the kind of reaction that makes you feel like a culinary wizard.
- Ingredient Quality: Using unsalted butter and fresh orange zest elevates the whole dish, turning ordinary pantry staples into a gourmet experience.
- Cooking Method: A short, high‑heat bake locks in moisture while creating those coveted caramelized edges, a technique many home bakers miss.
- Make‑Ahead Potential: These rolls freeze beautifully, and the glaze can be stored separately, making it easy to pull out a batch whenever the Halloween spirit calls.
Inside the Ingredient List
The Flavor Base
All‑Purpose Flour (4 cups) forms the structural backbone of the dough; it creates the gluten network that traps the gases from the yeast, giving the rolls their lift. If you skimp on the flour or use a low‑protein variety, the dough will be dense and won’t rise properly. You can swap half of the flour for whole‑wheat for a nuttier flavor, but expect a slightly heavier texture.
The Sweet Layer
Granulated Sugar (½ cup) feeds the yeast and adds sweetness to the dough. Skipping it will result in a bland roll that lacks the subtle caramel notes that develop during baking. If you prefer a less sweet version, reduce to ¼ cup, but remember the glaze will still bring the sweetness back.
The Unexpected Star
Orange Zest (1 tablespoon) and Orange Juice (¼ cup) are the secret weapons that give the glaze its haunting citrus tang. Fresh zest contains essential oils that are impossible to replicate with dried zest, and the juice adds moisture and a glossy finish. If you can’t find fresh oranges, a splash of high‑quality orange extract (¼ teaspoon) can work, but the flavor won’t be as bright.
The Texture Crew
Unsalted Butter (½ cup) adds richness and tenderness; it coats the flour particles, slowing gluten formation for a softer crumb. Using salted butter will throw off the balance, making the rolls unexpectedly salty. For a dairy‑free version, replace with equal parts coconut oil, but expect a faint coconut flavor.
The Lift
Active Dry Yeast (1 packet) is the magical organism that turns sugar into carbon dioxide, inflating the dough. If the yeast is old or the liquid is too hot, it won’t activate, and the rolls will stay flat. Always proof the yeast in warm (110°F/43°C) milk for 5‑10 minutes; you’ll see a frothy surface indicating it’s alive and ready.
Everything's prepped? Good. Let's get into the real action...
The Method — Step by Step
Begin by warming the milk to about 110°F (43°C); you should feel it as comfortably warm as a summer night, not scalding. Sprinkle the active dry yeast over the milk, add a pinch of sugar, and let it sit for 5‑10 minutes until it becomes frothy and bubbly. This is the moment of truth – if you don’t see bubbles, your yeast is dead and you’ll need a fresh packet. While the yeast awakens, whisk together the flour, remaining granulated sugar, and a pinch of salt in a large mixing bowl.
In a separate bowl, melt the unsalted butter until it’s just softened, then whisk in the eggs one at a time, ensuring each is fully incorporated before adding the next. Add the frothy yeast mixture and continue whisking until the batter looks smooth and slightly glossy. The dough should be tacky but not sticky; if it clings to your fingers, sprinkle a little extra flour, but be careful not to over‑flour.
Turn the dough onto a lightly floured surface and knead for about 8‑10 minutes. You’re looking for a smooth, elastic texture that springs back when pressed – think of a rubber band that’s been stretched but returns instantly. This step is crucial for that airy interior; skip it, and you’ll end up with a dense, bread‑like roll.
Place the kneaded dough in a lightly oiled bowl, cover it with a damp kitchen towel, and let it rise in a warm spot for 1‑1½ hours, or until it doubles in size. You’ll know it’s ready when the dough feels puffed and the surface looks slightly domed. If you’re in a hurry, pop it in a slightly warmed oven (just 90°F/32°C) for a faster rise, but keep an eye on it – over‑proofing will cause the rolls to collapse.
While the dough is rising, prepare the cinnamon‑butter filling: melt the remaining butter, stir in the cinnamon, and add a tablespoon of granulated sugar for extra caramelization. The mixture should be thick enough to spread but still fluid; if it’s too thick, warm it a few seconds longer.
Once the dough has doubled, punch it down gently to release excess air, then roll it out on a floured surface into a rectangle about ¼ inch thick. Spread the cinnamon‑butter mixture evenly, leaving a small border around the edges so the roll holds together during slicing.
Starting from the long side, roll the dough tightly into a log, then cut it into 12 equal pieces using a sharp, serrated knife. The cuts should be clean; a ragged edge will cause the rolls to leak glaze during baking. Place each piece on a parchment‑lined baking sheet, spacing them about 2 inches apart to allow for expansion.
Preheat your oven to 375°F (190°C). While it heats, whisk together the powdered sugar, orange juice, and orange zest until smooth – the glaze should be thick enough to coat the rolls but still pourable. This is the part where the magic happens; the citrus will create a glossy, slightly tangy finish that’s the perfect counterpoint to the sweet cinnamon.
Brush the tops of the rolls lightly with melted butter, then bake for 20‑25 minutes, or until the tops are golden brown and the edges begin to pull away from the parchment. You’ll hear a faint crackle as the caramelized sugar forms – that sizzle when it hits the pan? Absolute perfection.
Remove the rolls from the oven and, while they’re still hot, drizzle the orange glaze generously over each one. The glaze will melt into the warm rolls, seeping into the crevices and creating a shiny, haunting sheen. Let them sit for 5 minutes before serving; this short rest lets the flavors meld and the glaze set just enough to avoid a soggy mess.
That's it — you did it. But hold on, I've got a few more tricks that'll take this to another level...
Insider Tricks for Flawless Results
The Temperature Rule Nobody Follows
Never use cold butter straight from the fridge; it should be softened to room temperature, which ensures it incorporates evenly into the dough without creating pockets of grease. I once tried using melted butter, and the rolls turned out dense and oily – a hard lesson learned. Keep your milk at 110°F, not hotter, because a hotter liquid will kill the yeast and stall the rise. The temperature of your kitchen matters too; aim for a consistent 75°F (24°C) for the best proofing environment.
Why Your Nose Knows Best
When the dough is ready to roll, you’ll notice a faint sweet aroma mingling with a yeasty perfume – that’s the perfect cue that the fermentation is complete. If the dough still smells flat, give it a few more minutes; the yeast needs a little extra time to produce enough carbon dioxide. Trusting your senses is more reliable than a timer, especially on humid days when dough can behave unpredictably.
The 5‑Minute Rest That Changes Everything
After you cut the rolls, let them rest on the baking sheet for exactly five minutes before sliding them into the oven. This short pause lets the gluten relax and the interior settle, preventing the rolls from spreading too much during baking. A friend tried skipping this step once – the rolls spread into a flat, sticky pancake, and the glaze turned into a sugary mess.
Glaze Consistency Secret
For a glaze that clings like a spider’s web, whisk the powdered sugar with the orange juice until you achieve a thick yet pourable consistency. If the glaze is too runny, add a teaspoon of extra powdered sugar; if it’s too thick, thin it with a splash more juice. The right consistency ensures each roll gets a beautiful, glossy coat without drowning the delicate crumb.
Freezing Without Losing Fluff
Once cooled, wrap each roll individually in plastic wrap, then place them in a zip‑top bag before freezing. When you’re ready to serve, thaw at room temperature and give them a quick 5‑minute re‑heat in a 300°F oven – the glaze will re‑gloss and the interior will puff back up like a resurrected spirit.
Creative Twists and Variations
This recipe is a playground. Here are some of my favorite ways to switch things up:
Spooky Chocolate Swirl
Replace half of the cinnamon with cocoa powder and add a drizzle of dark chocolate ganache after baking. The deep chocolate pairs eerily well with the orange glaze, creating a flavor that feels like midnight in a haunted house.
Pumpkin Spice Upgrade
Swap the cinnamon for a pumpkin spice blend and add a tablespoon of pumpkin puree to the dough. The rolls become a seasonal delight, perfect for a Halloween brunch that leans into classic autumn flavors.
Nutty Crunch
Fold chopped pecans or walnuts into the cinnamon‑butter filling for an added crunch that mimics the sound of dry leaves underfoot. The nuts also introduce a buttery richness that deepens the overall flavor profile.
Ghostly White Chocolate
Stir white chocolate chips into the dough before the first rise, and sprinkle a few on top before baking. The melting white chocolate creates ghost‑like pockets that ooze sweet creaminess with each bite.
Vegan Version
Replace the butter with coconut oil, use almond milk instead of dairy milk, and swap eggs for a flaxseed “egg” (1 tbsp ground flaxseed + 3 tbsp water). The result is a plant‑based roll that still delivers that fluffy, spiced experience.
Storing and Bringing It Back to Life
Fridge Storage
Place the cooled rolls in an airtight container and store them in the refrigerator for up to three days. To keep them from drying out, place a damp paper towel on top of the rolls before sealing the container.
Freezer Friendly
Wrap each roll tightly in plastic wrap, then seal them in a freezer‑safe bag. They’ll keep for up to two months. When you’re ready to enjoy, thaw overnight in the fridge, then give them a quick 5‑minute steam in a 300°F oven – add a tiny splash of water on the tray to create steam and revive the fluffy texture.
Best Reheating Method
For the ultimate reheated experience, preheat your oven to 350°F, place the rolls on a parchment sheet, and lightly mist them with water before covering with foil. Heat for 8‑10 minutes; the moisture will steam the interior while the glaze re‑glosses, delivering a fresh‑out‑of‑the‑oven sensation.