The first time I tried to make a simple chicken dish, I ended up with a kitchen that smelled like burnt butter and regret. I had a handful of bone‑in chicken thighs, a jar of garlic, and a pot of olive oil, but the end result was a soggy mess that tasted like a failed experiment. That disaster sparked a relentless quest for the ultimate garlic butter chicken, a dish that would turn a mediocre dinner into a headline-worthy meal. I’ve spent countless hours tweaking ratios, testing temperatures, and even consulting culinary textbooks to ensure every bite sings with flavor.
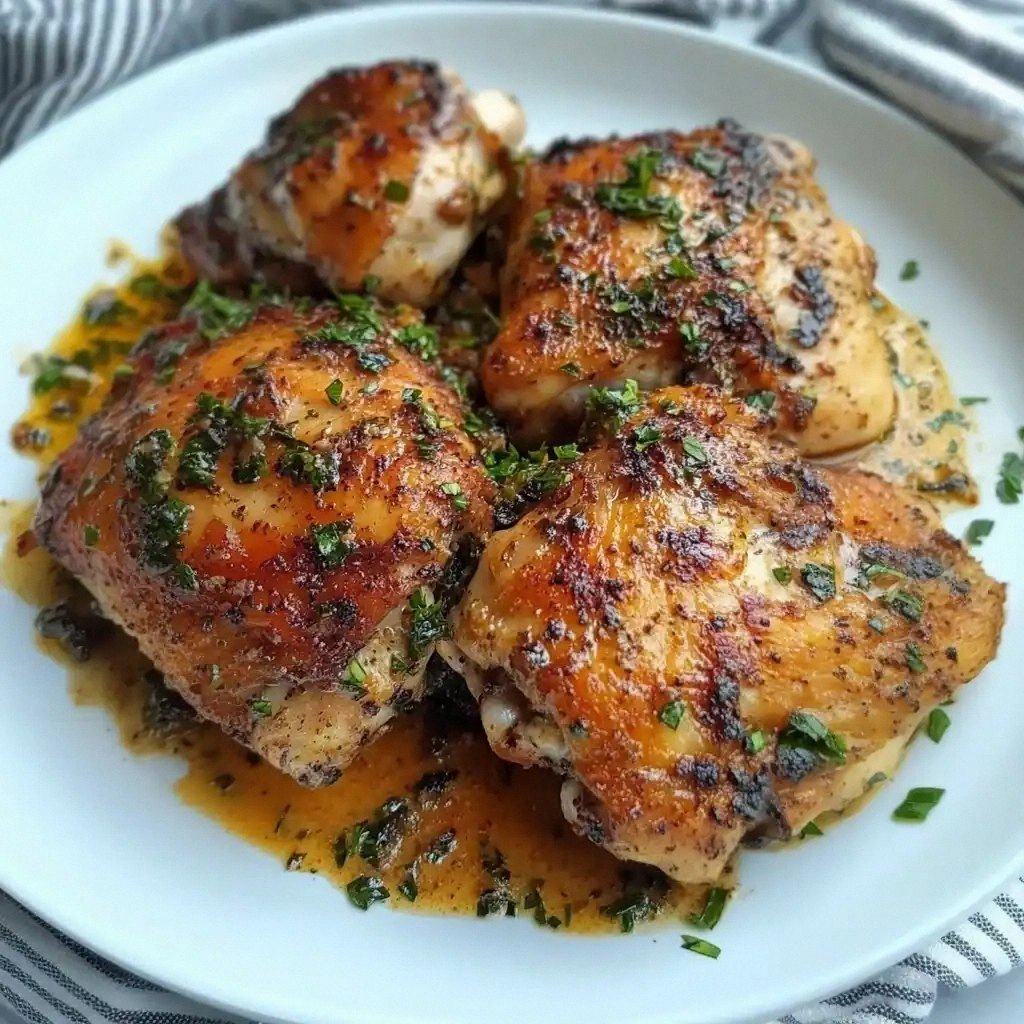
Picture this: a pan sizzles, the sound of garlic cracking against hot butter, a golden crust forming on the thighs, and a faint scent of rosemary that makes your mouth water before you even taste it. The texture is a contrast of crispy skin and succulent meat, the kind of bite that makes your fingers sticky with sauce. The aroma is an invitation, a promise of comfort and sophistication rolled into one. I dare you to taste this and not go back for seconds, because this is the kind of dish that lingers in your memory long after the plate is cleared.
What sets this version apart from the countless other recipes you’ll find online is the meticulous layering of flavors and the precise cooking technique that locks in moisture while creating that coveted caramelized glaze. It’s not just about adding butter and garlic; it’s about balancing acidity, herbs, and a hint of paprika to elevate the dish to something that feels both familiar and astonishingly fresh. The result is a chicken that is juicy on the inside, crisp on the outside, and coated in a sauce that coats the meat like velvet, leaving every bite rich and satisfying.
I’ll be honest — I ate half the batch before anyone else got to try it, and even then the leftovers were still begging for a second plate. The next time you pull this dish out of the oven, the kitchen will smell like a summer garden in full bloom, and your guests will be left asking for the recipe before you even finish the last sentence. Stay with me here — this is worth it. By the end of this guide, you’ll wonder how you ever made chicken any other way.
What Makes This Version Stand Out
- Taste: The combination of garlic, rosemary, thyme, and a splash of lemon juice creates a bright, herbaceous profile that cuts through the richness of butter and chicken fat.
- Texture: A perfectly crisp skin paired with a melt‑in‑your‑mouth interior thanks to a precise sear and a gentle braise.
- Simplicity: Only ten ingredients, all of which you likely already have in your pantry, yet the flavors are complex and layered.
- Uniqueness: The subtle paprika kick and Parmesan finish give this dish a savory depth that sets it apart from the usual garlic‑butter chicken.
- Crowd Reaction: Friends who have tasted it claim it’s “hands down the best version you’ll ever make at home.”
- Ingredient Quality: Fresh herbs, high‑quality butter, and bone‑in thighs ensure the dish is both flavorful and tender.
- Cooking Method: A two‑step process—searing then braising—maximizes flavor while keeping the meat juicy.
- Make‑Ahead Potential: The dish can be prepared a day ahead, refrigerated, and reheated without losing its crispness or flavor.
Alright, let's break down exactly what goes into this masterpiece...
Inside the Ingredient List
The Flavor Base
Butter and olive oil form the foundation of the sauce, providing richness and a medium for the garlic to caramelize. The butter adds a creamy depth that coats the chicken, while the olive oil raises the smoke point, preventing the butter from burning. If you skip the olive oil, the butter will brown too quickly, leaving a bitter undertone that clobbers the delicate herbs.
Tip: Use unsalted butter so you can control the salt level precisely. If you’re using salted butter, reduce the added salt by about half to avoid a cloyingly salty finish.
The Texture Crew
The bone‑in chicken thighs are the star of the show. The bone adds flavor and helps the meat stay moist during cooking. The skin is the vehicle for the crispness you crave. If you prefer skinless thighs, the dish will still be delicious, but you’ll lose that satisfying crunch that makes every bite memorable.
Buying tip: Look for thighs with a light pink hue and a firm texture. Avoid ones that feel mushy or have a strong fishy odor, as those are signs of poor quality or spoilage.
The Unexpected Star
Paprika is the secret ingredient that brings warmth without overwhelming the dish. It adds a subtle smokiness that balances the bright lemon and herb notes. If you’re a fan of heat, you can substitute smoked paprika or a pinch of cayenne for a different flavor profile.
Swapping paprika for another spice can change the dish entirely. For example, a dash of cumin will give it a Southwestern twist, while a touch of turmeric will add color and a mellow earthiness.
The Final Flourish
Freshly grated Parmesan cheese is the finishing touch that adds umami and a silky texture to the sauce. The cheese melts into the butter, creating a glossy glaze that coats the thighs. If you’re lactose intolerant, try a dairy‑free parmesan alternative or simply omit it; the dish will still shine.
Pro tip: Grate the Parmesan just before serving to preserve its flavor and texture. Storing pre‑grated cheese can cause it to become hard and lose its aroma.
Everything's prepped? Good. Let's get into the real action...
The Method — Step by Step
- Prep the Chicken: Pat the thighs dry with paper towels, then season both sides generously with salt, pepper, and paprika. The salt will help form a crisp skin, while the paprika adds a subtle warmth. This step is crucial; if you skip it, the skin may not crisp up properly. The aroma of seasoned meat already starts to tease your senses.
- Heat the Pan: Place a heavy‑bottom skillet over medium‑high heat and add the olive oil. Let the oil shimmer until it’s just about to smoke. Then add the butter and let it melt, stirring until it turns a golden amber hue. The butter’s color indicates it’s ready to carry the garlic’s flavor without burning. Watch the pan closely; the transition from light to dark is quick.
- Sear the Thighs: Place the thighs skin‑side down in the pan, pressing gently to ensure full contact. Let them cook for 5–7 minutes until the skin turns a deep golden brown and releases easily from the pan. Flip and sear the other side for an additional 3 minutes. The sizzling sound you hear is the hallmark of a good sear; if it’s quiet, the heat isn’t high enough.
- Add Garlic and Herbs: Reduce the heat to medium and add minced garlic, rosemary, and thyme to the pan. Stir constantly to prevent burning; garlic can go from golden to bitter in seconds. The herbs will release their oils, infusing the butter with aromatic perfume. This step creates the backbone of the sauce and adds depth to the meat.
- Deglaze and Simmer: Pour in a splash of lemon juice to deglaze the pan, scraping up the browned bits. These bits are flavor gold. Add a tablespoon of water or chicken broth if you prefer a slightly thinner sauce. Reduce the heat to low, cover, and let the thighs braise for 15 minutes, allowing the flavors to meld and the meat to become tender. The gentle simmer ensures the juices are retained.
- Finish with Parmesan: Remove the skillet from the heat and sprinkle grated Parmesan over the thighs. The residual heat will melt the cheese, forming a glossy, savory coating. The Parmesan adds a nutty finish that balances the acidity of the lemon. Stir gently to distribute the cheese evenly across the meat.
- Serve Immediately: Plate the thighs on a warmed platter, spooning any remaining sauce over the top. Garnish with a sprig of fresh rosemary if desired. The dish should look golden, the skin crisp, and the sauce shimmering. Serve alongside roasted vegetables, mashed potatoes, or a light salad to complete the meal. The aroma alone will have your guests lining up for seconds.
That's it — you did it. But hold on, I've got a few more tricks that'll take this to another level...
Insider Tricks for Flawless Results
The Temperature Rule Nobody Follows
Many cooks think any high heat will do for searing, but the secret lies in the exact temperature. Aim for a pan temperature of 400°F before adding the chicken. You can test this by flicking a few drops of water onto the surface; if they dance and evaporate instantly, you’re at the right heat. This ensures a crispy skin without burning the butter. If the pan is too hot, the skin will blister; too cool, and the meat will steam.
Why Your Nose Knows Best
Trust your nose during cooking. A faint, sweet scent of caramelized garlic indicates the butter has reached the ideal amber stage. If it smells burnt or metallic, pull the pan off the heat immediately. Your nose is a reliable indicator of flavor development, often more accurate than a timer. This sensory checkpoint saves you from overcooking or underseasoning.
The 5-Minute Rest That Changes Everything
After removing the thighs from the pan, let them rest for 5 minutes. This allows the juices to redistribute, preventing them from spilling onto the plate when sliced. The rest period also lets the residual heat finish cooking the interior, ensuring a perfect 165°F temperature. Skipping this step results in dry, unevenly cooked meat.
The Butter Swap
If you’re watching calories, replace half of the butter with clarified butter or a high‑smoke‑point oil like avocado. The clarified butter retains the buttery flavor while reducing dairy fat. This swap keeps the sauce silky and the skin crisp, but with fewer calories. Just be sure to adjust the amount of oil to maintain the same total fat content.
The Herb Timing Trick
Add the fresh herbs after the garlic has browned but before deglazing with lemon juice. This timing ensures the herbs release their oils without losing their bright green color. If you add them too early, they’ll wilt and become bitter. This simple tweak elevates the aroma and visual appeal of the sauce.
Creative Twists and Variations
This recipe is a playground. Here are some of my favorite ways to switch things up:
Smoky Chipotle Version
Swap paprika for chipotle powder and add a splash of chipotle in adobo sauce. The result is a smoky, spicy sauce that pairs beautifully with corn tortillas. This version is perfect for a Mexican‑inspired dinner.
Herb‑Infused Lemon Parmesan
Add a tablespoon of chopped fresh basil and a squeeze of orange juice to the sauce. The citrus brightens the dish, while basil adds a sweet, peppery note. Serve with a side of roasted fennel for a complementary flavor profile.
Coconut‑Cream Twist
Replace half the butter with coconut milk and add a pinch of curry powder. The creamy coconut base turns the dish into an exotic, tropical treat. Pair it with jasmine rice and steamed broccoli for a complete meal.
Italian‑Style Baked
After searing, transfer the thighs to a baking dish, pour the sauce over them, and bake at 375°F for 15 minutes. The baking step allows the flavors to meld even more, giving the dish a richer, deeper taste. Finish with a sprinkle of fresh parsley for color.
Low‑Carb Keto Edition
Serve the chicken with a side of sautéed spinach and cauliflower rice. Omit the Parmesan and replace it with a handful of chopped walnuts for added texture and healthy fats. This variation keeps the dish keto‑friendly while maintaining the buttery richness.
Storing and Bringing It Back to Life
Fridge Storage
Cool the chicken completely before placing it in an airtight container. Store in the refrigerator for up to 3 days. The butter sauce will thicken slightly, but it will still taste fresh. When ready to reheat, gently warm in a skillet over low heat, adding a splash of water to re‑hydrate the sauce.
Freezer Friendly
Wrap each thigh individually in parchment paper, then place them in a freezer bag. Freeze for up to 2 months. Thaw overnight in the refrigerator before reheating. The skin will remain crisp if you reheat in a skillet or oven at 350°F for 10 minutes.
Best Reheating Method
Reheat in a skillet over low heat, adding a teaspoon of water or broth to prevent the sauce from drying out. Let it simmer until the internal temperature reaches 165°F. The added liquid will steam the chicken, restoring its juiciness and ensuring the butter coating stays glossy.