I still remember that night when the kitchen turned into a battlefield. I was juggling a pot of simmering sauce, a blinking oven timer, and a handful of chicken breasts that looked like a flock of startled birds. The disaster? I accidentally dropped a lemon into the pot, and the whole dish went from “simple” to “sour‑scented chaos.” But the moment the aroma hit my nose, I realized I had stumbled upon a recipe that could turn any kitchen mishap into a triumph. This is not just another chicken skewers recipe; it’s a flavor explosion that will make your taste buds do the salsa.
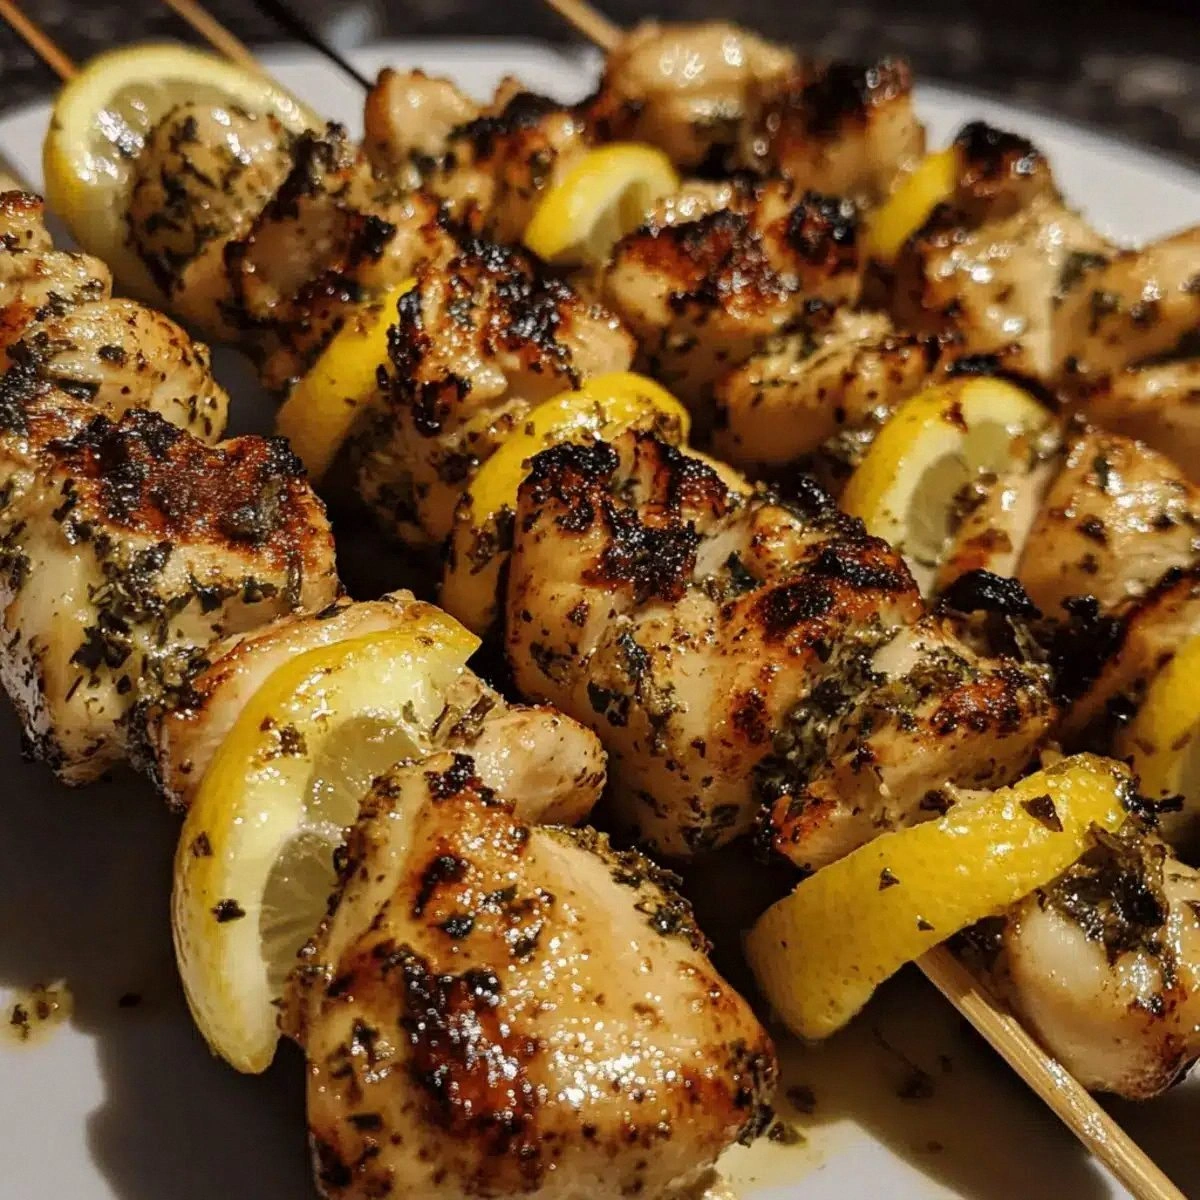
Picture this: the bright yellow of fresh lemons glistening against a backdrop of vibrant green herbs, the metallic clang of skewers being threaded, the sizzling hiss of olive oil meeting raw chicken, and the subtle perfume of garlic roasting to a caramelized amber. The sound of the grill hissing as the skewers glide across the heat, the feel of the juicy meat releasing steam into the air, the anticipation of that first bite that will make your tongue sing. It’s a sensory symphony that I’ve tried to capture in every sentence here, so you can almost taste the citrus tang, feel the crispness of the herbs, and hear the crackle of the grill.
What sets this version apart? It’s the marriage of simplicity and sophistication. I’ve distilled the technique to its purest form: marinate, skewer, grill, serve. No complicated sauces, no fancy equipment, just fresh ingredients that punch through the palate like a well‑aimed arrow. It’s the kind of dish that feels like a secret weapon in your culinary arsenal, a go-to for impressing friends or rescuing a last‑minute dinner. And the best part? It’s so versatile you can swap out herbs, switch to a grill or an oven, and still end up with a masterpiece.
Now, I dare you to taste this and not go back for seconds. I promise you’ll find yourself reaching for more, even though the plate looks full. Picture yourself pulling this out of the oven, the whole kitchen smelling incredible, and knowing that the next time you cook, you’ll be doing it the same way. Let me walk you through every single step—by the end, you’ll wonder how you ever made it any other way.
What Makes This Version Stand Out
- Flavor: The bright citrus cuts through the richness of the chicken, creating a balanced profile that’s both refreshing and satisfying. The herbs add depth without overpowering.
- Texture: The grill marks give a smoky crunch while the interior stays moist and tender, thanks to the marination process that locks in juices.
- Ease: No special equipment required—just a grill or skillet and a few simple ingredients. Even novice cooks can master it.
- Time: From prep to plate, you’re looking at under an hour, making it ideal for weeknight dinners or quick weekend gatherings.
- Presentation: The vibrant color of lemon and herbs makes the dish visually stunning, perfect for Instagram-worthy meals.
- Versatility: Swap herbs, use a different protein, or add a splash of wine to the marination for a whole new twist.
Alright, let's break down exactly what goes into this masterpiece...
Inside the Ingredient List
The Flavor Base
Fresh lemon juice is the star that gives the dish its zesty kick. It also acts as a natural tenderizer, breaking down proteins in the chicken for a juicy bite. If you’re out of lemons, a splash of white wine or even a tablespoon of vinegar can substitute, but the citrus nuance will be missing.
The Texture Crew
Olive oil is more than a cooking medium; it coats the chicken, preventing sticking and creating a subtle sheen. The garlic cloves, minced or finely chopped, release a mellow sweetness that balances the sharpness of the lemon. Remember to keep the garlic in small pieces so it doesn’t burn on the grill.
The Unexpected Star
Fresh herbs—parsley, thyme, or rosemary—are the unsung heroes that add aroma and depth. Their essential oils infuse the chicken, giving it a fragrant finish. If you’re feeling adventurous, add a pinch of dried oregano or a dash of paprika for an extra layer of flavor.
The Final Flourish
Salt and black pepper are the seasoning backbone. They elevate every other component, but be careful not to over‑salt, especially if you’re using pre‑salted chicken. The lemon wedges serve as a garnish, offering a fresh bite of citrus that brightens the plate.
Everything's prepped? Good. Let's get into the real action...
The Method — Step by Step
- Begin by cutting the chicken breasts into uniform 1‑inch cubes. Uniformity ensures even cooking and a consistent flavor profile. Toss the cubes in a large bowl and add the fresh lemon juice, olive oil, minced garlic, and a generous pinch of salt. Mix until every piece is coated in the bright, citrusy mixture.
- Add the fresh herbs—parsley, thyme, or rosemary—into the bowl. Stir gently to distribute the herbs evenly. The herbs will release their oils during cooking, infusing the chicken with a fragrant aroma. Cover the bowl and refrigerate for at least 30 minutes, allowing the flavors to mingle.
- While the chicken marinates, preheat your grill to medium‑high heat. If you’re using a stovetop grill pan, heat it until a drop of water sizzles and evaporates instantly. The goal is a hot surface that sears the chicken quickly without drying it out.
- Thread the marinated chicken onto skewers, spacing each cube about an inch apart. If you’re using wooden skewers, soak them in water for 15 minutes beforehand to prevent burning. This step is crucial for even cooking and a beautiful presentation.
- Place the skewers on the grill, turning every 2–3 minutes. The surface should develop a golden brown crust, while the interior remains moist. Keep an eye on the edges; once they start pulling away from the skewer, it’s a sign they’re ready to flip.
- After about 8 minutes of total grilling time, the chicken should be fully cooked and slightly charred on the outside. Remove from the grill and let it rest for 2 minutes. This resting period allows juices to redistribute, keeping the meat juicy.
- Slice a lemon into wedges and arrange them around the skewers on a serving platter. The wedges add a burst of freshness with each bite, and they’re a great tool for squeezing a final squeeze of citrus over the chicken.
- Serve immediately, accompanied by a light salad or a side of roasted vegetables. The bright flavors of the skewers pair beautifully with earthy greens, creating a balanced meal.
That’s it — you did it. But hold on, I've got a few more tricks that'll take this to another level...
Insider Tricks for Flawless Results
The Temperature Rule Nobody Follows
Most people think any grill heat will do, but the secret is medium‑high heat, roughly 375°F to 400°F. This temperature range ensures a caramelized crust while keeping the inside juicy. If you’re using a grill pan, preheat for at least 5 minutes before placing the skewers. A quick test is to drop a small water droplet; if it sizzles and evaporates instantly, you’re good to go.
Why Your Nose Knows Best
Trust your nose. When the chicken starts to sizzle and the air fills with a buttery, garlicky aroma, it’s a sign that the flavors are blooming. That scent is a cue to flip the skewers. If the aroma feels too sharp, it might be time to reduce the heat slightly to avoid burning.
The 5‑Minute Rest That Changes Everything
Resting the chicken after grilling lets the juices redistribute, preventing them from spilling out when you cut into it. Even a short 5‑minute rest can make the difference between a dry bite and a succulent one. Place the skewers on a wire rack to avoid steaming.
The Garlic Balance
Garlic can go from aromatic to bitter if it burns. Slice the cloves thinly and add them to the marination after the chicken has rested for 15 minutes. This timing keeps the garlic from scorching during the grill session.
The Herb Timing
Fresh herbs release their oils best when added right before grilling. If you add them too early, they can wilt and lose flavor. Toss them with the chicken just a minute before placing the skewers on the grill.
The Lemon Juice Ratio
Too much lemon juice can overpower the chicken, turning it sour. Stick to a 1/4 cup for every pound of chicken. If you’re using a different protein, adjust the ratio accordingly to maintain balance.
Creative Twists and Variations
This recipe is a playground. Here are some of my favorite ways to switch things up:
Mediterranean Medley
Swap the parsley for oregano and add a splash of feta cheese after grilling. The salty tang of feta complements the citrusy chicken, creating a dish reminiscent of a Greek summer night.
Spicy Sriracha Kick
Add a tablespoon of sriracha to the marination for a fiery edge. The heat pairs beautifully with the lemon, producing a flavor profile that’s both bold and refreshing.
Herb‑Infused Yogurt Dip
Serve the skewers with a side of Greek yogurt mixed with chopped dill and a squeeze of lemon. The cool dip balances the smoky grill, making every bite a refreshing contrast.
Asian Twist
Replace the olive oil with sesame oil and add a teaspoon of soy sauce to the marination. Finish with a sprinkle of toasted sesame seeds and a drizzle of honey for an umami‑sweet finish.
Vegetarian Version
Use firm tofu cubes instead of chicken, marinating them the same way. The tofu will absorb the citrusy flavors, and the grill will give it a satisfying char.
Pineapple Heat
Add diced pineapple to the skewers for a tropical twist. The fruit’s natural sweetness balances the lemon, while the grill caramelizes the sugars for a caramelized glaze.
Storing and Bringing It Back to Life
Fridge Storage
Store leftover skewers in an airtight container in the refrigerator for up to 3 days. Keep the lemon wedges separate to prevent moisture from affecting the chicken’s texture. When ready to serve, reheat in a preheated oven at 350°F for 5 minutes.
Freezer Friendly
Wrap the cooked skewers tightly in plastic wrap, then place them in a freezer bag. They’ll keep for up to 2 months. Thaw overnight in the refrigerator before reheating.
Best Reheating Method
Add a splash of water or chicken broth to the pan before reheating to create steam, keeping the chicken moist. Heat on low for 5–7 minutes, stirring occasionally. Finish with a quick sear on the grill or in a skillet to restore that charred exterior.