I remember the night my kitchen exploded into a sticky, sweet mess because I tried to make a quick breakfast that would satisfy my cravings. The timer chimed, the pot hissed, and I was left with a half‑baked, soggy oatmeal that tasted like a sad, overcooked pancake. I swore to myself then and there that I would find a way to turn that disaster into a breakfast that could be plated, portioned, and even enjoyed on a lazy Sunday morning. This is that moment of culinary redemption. I’ve spent months tweaking, testing, and finally arriving at a version that feels like a hug in a cup.
Picture a golden swirl of oats that crackles as soon as you drop them into the pan, the aroma of honey and cinnamon rising like a warm cloud. The sound of the mixture bubbling is the soundtrack to a breakfast that’s almost too good to be true. The texture is a paradox: a crunchy exterior that gives way to a chewy, syrupy center that clings to your spoon. The flavor is a symphony of sweet, nutty, and slightly spicy notes that dance across the tongue. And the finish? A lingering, buttery aftertaste that makes you reach for a second cup.
What makes this version stand out is the meticulous balance between sweet and savory, the use of natural sweeteners, and the clever way I’ve layered flavors to create a granola cup that’s as satisfying as it is Instagram‑worthy. I’ve eliminated the need for a separate baking step, saving time and reducing the risk of over‑toasting the oats. Instead, the oats and spices are toasted in a pan, then folded into a creamy yogurt mixture that locks in moisture. The result is a cup that holds its shape, yet is soft enough to bite into like a piece of cake. It’s the kind of breakfast that makes you forget you’re even eating something that could double as dessert.
And the best part? The recipe is so flexible that you can swap out the applesauce for mashed banana, honey for agave, or yogurt for coconut milk without losing the integrity of the dish. The only thing that’s truly non‑negotiable is the crunch—those oats must be toasted just enough to release their natural oils, giving that satisfying snap that can’t be replicated by microwave‑ready mixes. I dare you to taste this and not go back for seconds. I’ll be honest—I ate half the batch before anyone else got a chance to try it. If you’ve ever struggled to find a breakfast that’s quick, healthy, and utterly indulgent, this is the fix you’ve been waiting for.
Most recipes get this completely wrong by over‑baking the oats, under‑sweetening the mixture, or failing to bind everything together. I’ve cracked the code, and the secret lies in the precise ratio of wet to dry ingredients and the timing of each step. Picture yourself pulling these cups out of the oven, the whole kitchen smelling incredible, and seeing the golden edges that shatter like thin ice when you bite. That moment of triumph is what I want to share with you. Let me walk you through every single step — by the end, you'll wonder how you ever made it any other way.
What Makes This Version Stand Out
- Flavor Precision: The combination of honey, vanilla, and cinnamon creates a layered taste that feels both familiar and adventurous. The subtle sweetness is balanced by a hint of spice that lingers on the palate. This is why the cups never feel cloying or bland.
- Texture Mastery: Toasted oats give a satisfying crunch that contrasts with the creamy yogurt coating. The oats hold their shape even after cooling, preventing the cups from becoming soggy. This duality is what makes each bite memorable.
- Ingredient Quality: Using real honey or agave syrup instead of artificial sweeteners ensures a richer flavor profile. Freshly ground cinnamon adds depth that pre‑ground spice can’t match. The quality of the oats also affects the final crunch.
- Make‑Ahead Convenience: The cups can be assembled ahead of time and stored in the fridge for up to a week, making them perfect for busy mornings. The yogurt coating keeps the oats moist without compromising texture. This makes the recipe a go‑to for meal prepping.
- Health‑Friendly Profile: The natural sweeteners and yogurt provide protein and calcium, while the oats supply fiber. No added preservatives or artificial flavors are used. This version delivers a balanced breakfast that supports a healthy lifestyle.
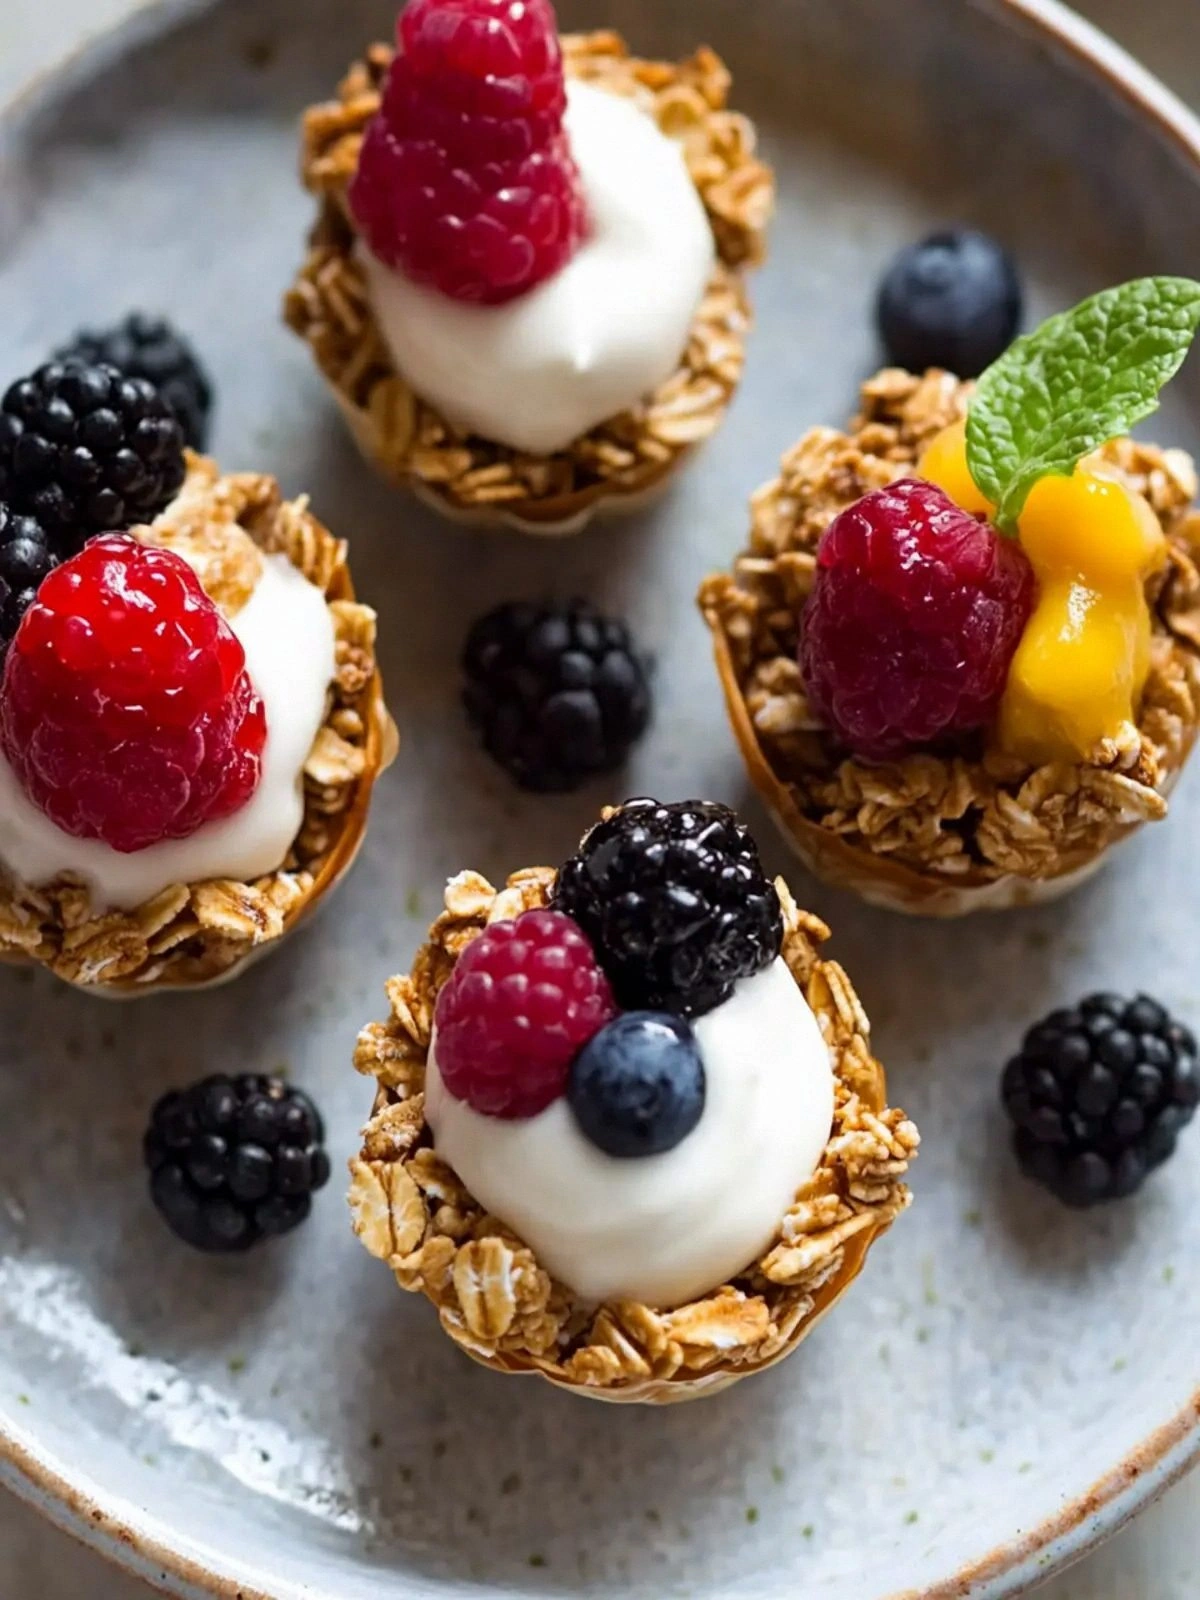
- Visual Appeal: The golden‑brown edges and the glossy finish from the honey glaze are Instagram‑ready. The bright colors of fresh fruit on top add a pop of color that invites the eye. The aesthetic is as important as the taste for a breakfast that feels special.
Inside the Ingredient List
The Flavor Base
Honey, agave, or maple syrup is the sweet heart of this recipe, providing both moisture and a natural glaze that caramelizes when warmed. Vanilla extract deepens the sweetness without overpowering the other notes, while a pinch of salt balances the overall flavor profile. Cinnamon adds warmth and a subtle spice that lingers long after the first bite.
The Texture Crew
Rolled oats are the backbone of the cups, offering a chewy yet crunchy foundation that holds up well when mixed with wet ingredients. Yogurt adds creaminess and protein, binding the oats together and creating a silky coating that clings to each grain. Applesauce or mashed banana acts as a natural binder, preventing the mixture from becoming too dry while adding a gentle fruitiness.
The Unexpected Star
Fresh fruit isn’t just a garnish; it provides a burst of juiciness that cuts through the richness of the oat mixture. Berries, diced peaches, or tropical slices each bring their own flavor profile, turning a simple breakfast into a vibrant, multi‑layered experience. The fruit also adds a dose of vitamins and antioxidants, making each cup a powerhouse of nutrition.
The Final Flourish
Once the wet and dry components are combined, the mixture is folded into individual cups, sealed, and chilled to set the texture. A final drizzle of honey or agave provides a glossy finish and a touch of extra sweetness. The result is a ready‑to‑eat breakfast that can be stored, reheated, or enjoyed cold, depending on your mood.
Everything's prepped? Good. Let's get into the real action...
The Method — Step by Step
- Gather all your ingredients on a clean countertop, measuring each with precision. This is the foundation of a perfect cup; a small misstep here can ripple through the whole batch. Lay out the oats, honey, yogurt, and fruit so you can see them as you work. Keep your workspace organized to avoid any last‑minute scrambling.
- Heat a large non‑stick skillet over medium heat and add the rolled oats. Stir constantly, allowing the oats to toast until they emit a nutty aroma and turn a golden brown. This step is crucial for developing the crunch; a lightly toasted oat is the secret to that satisfying snap. Keep an eye on them—once they’re done, they’re done.
- In a separate bowl, whisk together honey, vanilla, cinnamon, and a pinch of salt until the mixture is smooth. The spices should be evenly distributed to avoid any uneven pockets of flavor. The salt, though small in quantity, is essential for balancing the sweetness.
- Fold the applesauce (or mashed banana) into the wet mixture, then gently stir in the yogurt. The yogurt’s acidity helps to mellow the sweetness and gives the cups a silky texture. Mix until the oats are evenly coated, but be careful not to over‑mix, which can break the oats’ structure.
- Drizzle a thin layer of honey over the toasted oats before folding them in. This creates a glossy glaze that seals the oats and adds a sweet finish. The honey also helps the mixture stick together once cooled. This is the moment where the cups start to look like edible art.
- Transfer the mixture into silicone muffin cups, pressing firmly to ensure each cup holds its shape. The silicone molds allow for easy removal and keep the cups from sticking. The cups should be filled to the top; underfilled cups can collapse when chilled.
- Once the cups are assembled, cover the silicone mold with plastic wrap and refrigerate for at least 30 minutes. The chilling process firms up the texture, making the cups easy to remove and preventing them from sticking. It also allows the flavors to meld together beautifully.
- After the cups are set, top each with a handful of fresh fruit. The fruit adds a burst of juiciness that balances the creamy oats. If you’re feeling adventurous, sprinkle a pinch of toasted coconut or chopped nuts for extra crunch.
- Serve immediately or store in an airtight container in the fridge for up to a week. The cups remain crisp and flavorful, thanks to the yogurt coating that keeps the oats from drying out. If you need to reheat, a quick microwave burst of 10–15 seconds will revive the texture.
- For a decadent twist, drizzle a light caramel sauce over the top before serving. This adds a luxurious finish that feels like a dessert. Just remember to keep the caramel thin enough that it doesn’t drown the oats.
That’s it — you did it. But hold on, I've got a few more tricks that'll take this to another level...
Insider Tricks for Flawless Results
The Temperature Rule Nobody Follows
Many cooks assume that higher heat is always better for toasting oats, but a gentle medium heat actually yields a more even roast. The lower temperature allows the oats to release their oils slowly, creating a richer flavor without burning. I’ve tested several pans, and a cast‑iron skillet consistently gives the most uniform toast.
Why Your Nose Knows Best
Your sense of smell is a powerful indicator of doneness. When the oats begin to emit a nutty, almost burnt aroma, you’re at the sweet spot. Trust that scent; it’s the quickest way to avoid over‑toasting or under‑toasting. I’ve learned to stop the skillet at the first hint of that warm, toasted fragrance.
The 5-Minute Rest That Changes Everything
After folding the wet mixture into the oats, let the mixture rest for five minutes before filling the cups. This pause allows the oats to absorb the liquid fully, ensuring a cohesive texture. Skipping this step can leave your cups crumbly or uneven.
The Perfect Spoonful
Use a small cookie scoop to fill each cup, ensuring uniform portions. A consistent size means each cup cooks evenly and looks professional. I’ve found that a 1/4 cup scoop works best for this recipe.
The Clean Bowl Trick
Before you start, rinse your mixing bowls with warm water and a drop of dish soap. This removes any residual odors that could interfere with the flavor profile. It’s a simple step that can make a surprisingly noticeable difference.
Creative Twists and Variations
This recipe is a playground. Here are some of my favorite ways to switch things up:
Chocolate Chip Granola Cups
Fold in a handful of dark chocolate chips after the oats are toasted. The chocolate melts slightly, creating pockets of gooey richness. Pair with a drizzle of peanut butter for a chocolate‑peanut butter combo.
Tropical Coconut Cups
Add shredded coconut to the oat mixture and top with diced mango or pineapple. The coconut adds a chewy texture while the fruit gives a sweet, tropical burst. This version feels like a vacation in a cup.
Protein Power Cups
Mix in a scoop of vanilla whey protein powder into the wet ingredients. The protein elevates the nutritional value without compromising flavor. Finish with a sprinkle of chia seeds for extra omega‑3s.
Savory Herb Cups
Replace the honey with a splash of maple syrup and add finely chopped herbs like rosemary or thyme. The herbs infuse a savory depth that pairs wonderfully with a side of scrambled eggs. This is a breakfast that breaks the mold.
Berry Burst Cups
Layer the cups with fresh blueberries, raspberries, or strawberries before sealing. The berries release their juices during storage, creating a naturally sweet glaze. It’s a colorful, antioxidant‑rich variation.
Storing and Bringing It Back to Life
Fridge Storage
Store the completed cups in an airtight container in the refrigerator for up to seven days. The yogurt coating keeps the oats from drying out, while the fruit stays fresh. Keep the container on the middle shelf to maintain a consistent temperature.
Freezer Friendly
For longer storage, place the cups in a freezer‑safe zip‑lock bag. They’ll keep well for up to two months. When ready to eat, let them thaw in the fridge overnight; the oats will retain their crunch.
Best Reheating Method
Reheat each cup in the microwave for 10–15 seconds. Add a splash of water or a drizzle of milk to keep the yogurt from drying out. This gentle heat restores the texture without overcooking the oats.