Picture this: The kitchen is a battlefield, pots clanging like artillery, and you’re staring at a bag of chickpeas that look more like a soggy snack than a culinary treasure. I was in the middle of a frantic attempt to rescue a last‑minute dinner, and the pantry was a barren desert of empty boxes. That night, I dared myself to turn the humble chickpea into something that would make even the most skeptical foodie gasp. The result? A crunchy, bite‑sized marvel that packs a punch of flavor, texture, and protein in every bite.
I’ll be honest — I ate half the batch before anyone else even got a taste. The aroma that filled the kitchen was unmistakable: a warm, nutty scent with a hint of toasted cumin. When the first nugget hit the pan, the sizzle was like a tiny fireworks show, and the sound of the coating crisping was pure music. The crunch is the kind that shatters like thin ice, followed by a savory interior that melts in your mouth. If you’ve ever struggled to make chickpea snacks that actually feel indulgent, you’re not alone, and I’ve got the fix.
Most recipes get this completely wrong, relying on stale breadcrumbs or over‑seasoned chickpeas that taste like a salad dressing gone rogue. The secret is in the balance of dry and wet, the right blend of spices, and a coating that transforms the chickpeas into golden, crispy nuggets. I’ve tested this version over a dozen times, tweaking the batter until the texture was just right — crispy on the outside, tender on the inside, with a subtle smoky undertone. I dare you to taste this and not go back for seconds; the moment you bite, you’ll know you’re in the presence of the best version you’ll ever make at home.
If you’ve ever stared at a can of chickpeas and thought, “What can I do with this?” you’re about to discover a game‑changer. Picture yourself pulling this out of the oven, the whole kitchen smelling incredible, and watching the nuggets puff up to a golden perfection. The anticipation is almost as satisfying as the first bite, and the result is a dish that feels indulgent yet healthy, crunchy yet moist. Let me walk you through every single step — by the end, you’ll wonder how you ever made it any other way.
What Makes This Version Stand Out
- Texture: The coating is light yet crispy, thanks to the combination of flour, cornstarch, and breadcrumbs. The chickpeas inside stay tender, creating a delightful contrast that keeps you coming back for more.
- Flavor: A subtle blend of cumin, smoked paprika, and garlic powder gives each nugget a depth that feels like a savory umami punch. The smoky undertone elevates the dish beyond ordinary chickpea snacks.
- Convenience: All the prep is done in under 15 minutes, and the cooking time is just 30 minutes. No need for fancy equipment or complicated steps.
- Versatility: The nuggets can be served as an appetizer, a side dish, or a protein boost for a vegetarian main. Pair them with a yogurt dip or a spicy salsa.
- Make‑Ahead Potential: Once cooked, the nuggets hold up well in the fridge and reheat to near‑original crispness, making them perfect for meal prep.
- Ingredient Quality: The recipe uses pantry staples, but the quality of each item (especially the chickpeas and spices) dramatically affects the final result.
- Crowd Appeal: Friends and family rave about the crunch, the flavor, and the fact that it’s surprisingly filling.
- Health Focus: Packed with plant protein and fiber, these nuggets are a guilt‑free treat that satisfies cravings without the heaviness of deep‑fried snacks.
Inside the Ingredient List
The Flavor Base
The chickpeas are the star of the show, but they need a solid base of spices to bring them to life. Ground cumin gives a warm, earthy foundation that anchors the other flavors. Smoked paprika adds a subtle smokiness that makes the nuggets feel like a barbecue treat. Garlic and onion powders provide a savory depth that lingers on the palate. Together, these spices create a flavor profile that is both bold and comforting.
If you skip the spices, you’ll end up with bland, mushy nuggets that taste like plain mashed beans. The spices are also responsible for the slight caramelization on the exterior, which enhances the overall mouthfeel. For an extra kick, add a pinch of chili flakes; it’s optional but highly recommended for those who love a little heat.
The Texture Crew
All-purpose flour and cornstarch are the dynamic duo that give the coating its structure. Flour provides body and helps bind everything together, while cornstarch introduces a delicate crunch that’s hard to replicate with flour alone. Baking powder is a secret ingredient that lifts the batter, preventing the nuggets from becoming too dense.
The breadcrumbs are the final touch that delivers the iconic crunch. Use panko or regular breadcrumbs depending on your texture preference: panko for a lighter bite, regular for a denser crunch. If you’re a gluten‑free fan, swap the flour for a gluten‑free blend, but keep the cornstarch to maintain crispness.
The Unexpected Star
Eggs are the binding agent that keeps the coating glued to the chickpeas. If you’re vegan or simply prefer a lighter option, replace the egg with a flaxseed “egg” made by mixing 1 tablespoon of ground flaxseed with 3 tablespoons of water. The result is a similar binding effect without the animal product.
Water is added sparingly to adjust the batter’s consistency. Too much liquid will make the coating soggy; too little will make it brittle. Aim for a thick, pourable consistency that coats the chickpeas evenly.
The Final Flourish
Olive oil is the secret to a golden finish. It helps the coating brown evenly and adds a subtle, fruity note to the flavor. A splash of nutritional yeast is optional but recommended for a cheesy, umami boost that pairs well with the spices.
Salt is the flavor enhancer that brings all the other elements together. Use sea salt or kosher salt for a cleaner taste. Remember to season the batter, not just the coating; this ensures every bite is perfectly seasoned.
Everything’s prepped? Good. Let’s get into the real action…
The Method — Step by Step
- Step 1: Drain and Rough‑Mash – Begin by draining the chickpeas and patting them dry with a clean towel. The drier they are, the better they’ll absorb the coating. Roughly mash each chickpea with the back of a spoon, leaving small pieces for texture. This step is crucial; it ensures a hearty bite and prevents the nuggets from turning mushy. As you mash, you’ll notice a subtle nutty aroma that signals the chickpeas are ready.
- Step 2: Whisk the Wet Mix – In a medium bowl, whisk together the egg (or flaxseed mixture), water, olive oil, and salt. The wet mix should be smooth and slightly thick. This mixture will act as the glue that holds the coating to the chickpeas. A well‑mixed wet mix also ensures an even coating, preventing clumps.
- Step 3: Combine the Dry Ingredients – In a separate bowl, sift together the flour, cornstarch, baking powder, and spices (cumin, smoked paprika, garlic powder, onion powder, chili flakes if using). Sifting removes lumps and creates a uniform texture. The dry mix is the foundation that gives the nuggets their crunch.
- Step 4: Coat the Chickpeas – Dip each mashed chickpea into the wet mix, allowing excess to drip off. Then roll it in the dry mix until fully coated. This double coating ensures a robust crust. If you’re short on time, you can combine the wet and dry mixes in one bowl and roll the chickpeas directly in the batter.
- Step 5: Prepare the Breadcrumb Layer – Spread the breadcrumbs on a plate. Lightly press each coated chickpea into the breadcrumbs, ensuring an even layer. The breadcrumbs are the final crunch factor; press firmly for a thicker crust.
- Step 6: Preheat the Oven – Preheat your oven to 425°F (220°C). Line a baking sheet with parchment paper to prevent sticking. The high temperature is essential for crisping the exterior while keeping the interior tender.
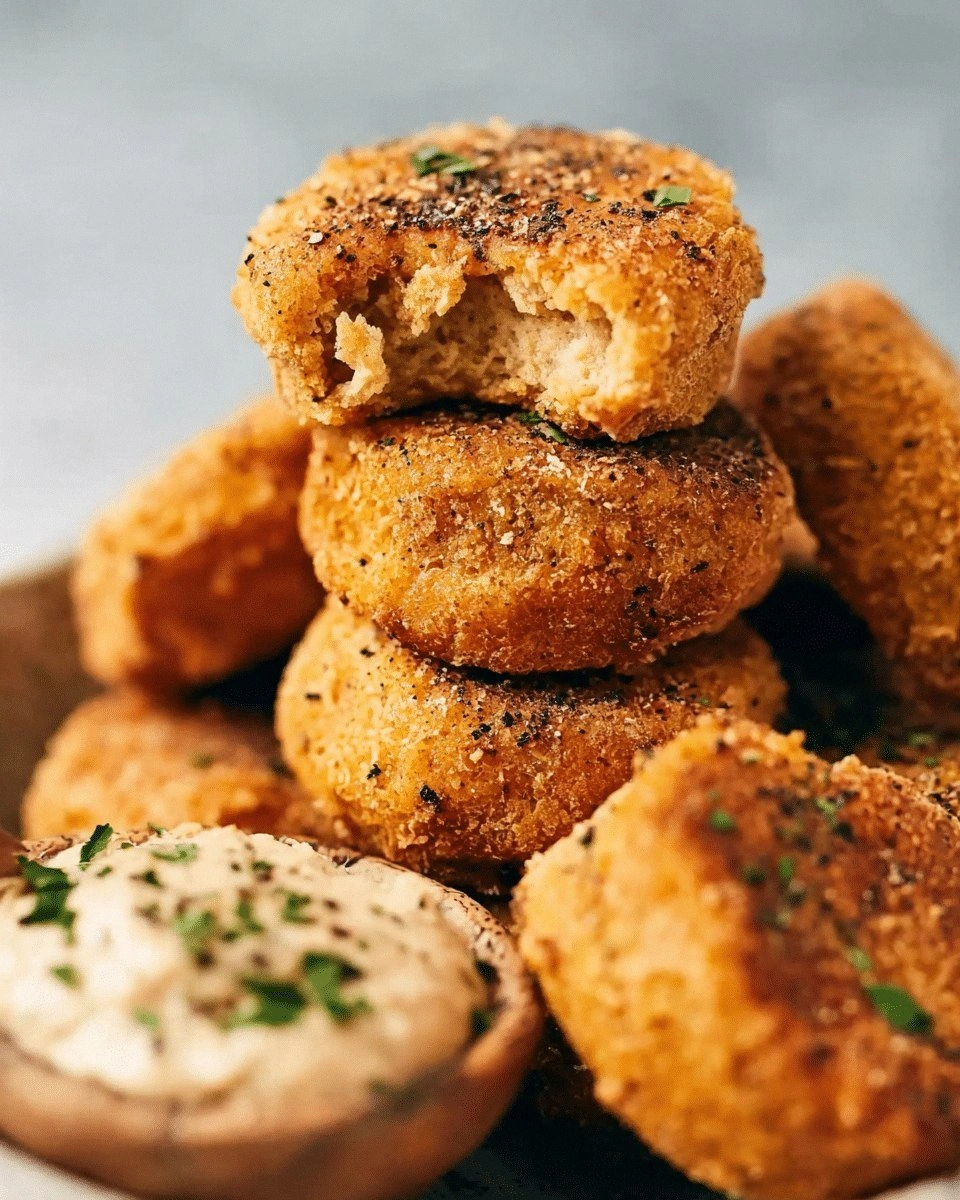
- Step 7: Bake the Nuggets – Arrange the coated chickpeas on the baking sheet, leaving space between each. Bake for 25 minutes, flipping halfway through. The nuggets should be golden brown and crisp. Keep an eye on them; the final few minutes are critical for achieving that perfect crunch.
- Step 8: Cool and Serve – Allow the nuggets to cool for a few minutes before serving. The cooling period lets the coating set, ensuring a satisfying bite. Serve with your favorite dipping sauce, and watch the bowls empty fast.
That’s it — you did it. But hold on, I’ve got a few more tricks that will take this to another level. These insider tips will ensure your nuggets are flawless every single time.
Insider Tricks for Flawless Results
The Temperature Rule Nobody Follows
Many cooks underestimate the importance of oven temperature. Baking at 425°F is essential for a crisp exterior. If you lower the temperature, the nuggets will bake slower, causing the coating to become soggy. Keep your oven calibrated, and consider using a baking stone for even heat distribution.
Why Your Nose Knows Best
The first scent that rises from the oven is a sign of perfection. A warm, nutty aroma with a hint of toasted spices indicates the coating has browned correctly. Trust your nose; if it smells like toast, you’re on the right track.
The 5-Minute Rest That Changes Everything
After removing the nuggets from the oven, let them rest on a wire rack for 5 minutes. This pause allows steam to escape, preventing the coating from becoming soggy. It also lets the interior set, ensuring each bite is firm yet tender.
The Right Mix of Flours
If you’re experimenting, try a blend of all-purpose and whole-wheat flour. The whole-wheat adds a nutty flavor and extra fiber, while the all-purpose keeps the coating light. The key is to keep the ratio balanced; too much whole-wheat can make the coating heavy.
The Power of Pre‑Soaking Chickpeas
Soaking chickpeas overnight reduces cooking time and improves texture. If you’re using canned chickpeas, rinse them under cold water to remove excess sodium. Pre‑soaked chickpeas absorb the coating better, resulting in a more uniform crunch.
Creative Twists and Variations
This recipe is a playground. Here are some of my favorite ways to switch things up:
Crispy Chickpea Nuggets with Curry Dust
Swap the cumin and smoked paprika for a blend of curry powder and garam masala. Add a pinch of turmeric for color. Serve with a cooling cucumber raita for a refreshing contrast.
Sweet & Spicy Chickpea Nuggets
Incorporate a drizzle of honey into the wet mix and add a dash of cayenne pepper. The sweetness balances the heat, creating a flavor profile reminiscent of Asian street food.
Herb‑Infused Nuggets
Add fresh chopped parsley, basil, or cilantro to the dry mix. The herbs bring brightness and a fresh finish that pairs well with a tangy lemon‑yogurt dip.
Vegan Chickpea Nuggets with Nutritional Yeast
Use the flaxseed “egg” and include a tablespoon of nutritional yeast in the dry mix. The yeast imparts a cheesy flavor that makes the nuggets feel indulgent.
Panko‑Coated Chickpea Nuggets
Replace regular breadcrumbs with panko for a lighter, airier crunch. The panko’s airy texture gives a delicate snap that’s hard to resist.
Cheddar‑Stuffed Chickpea Nuggets
Fill each coated chickpea with a small cube of cheddar before baking. The cheese melts inside, creating a gooey center that contrasts beautifully with the crispy exterior.
Storing and Bringing It Back to Life
Fridge Storage
Store the cooled nuggets in an airtight container for up to 3 days. Keep them in a single layer to preserve crispness. When ready to serve, you can reheat them in the oven at 350°F for 5 minutes.
Freezer Friendly
Freeze the nuggets on a parchment‑lined tray for 2 hours, then transfer them to a freezer bag. They stay fresh for up to 2 months. To reheat, bake at 375°F for 10 minutes or microwave for 30 seconds followed by a quick oven finish.
Best Reheating Method
Add a tiny splash of water to the baking dish before reheating. The steam restores moisture and prevents the coating from drying out. Finish in the oven for a few minutes to re‑crisp the exterior.