I burned my first three batches of chocolate chip cookies in a single afternoon. Smoke alarms blaring, neighbors knocking, and me standing in a cloud of flour dust like I'd just lost a baking battle. That catastrophic Saturday should have ended my cookie dreams forever, but instead it birthed the most outrageously chewy, candy-stuffed chocolate chip cookies you'll ever sink your teeth into. Picture this: a cookie so soft in the center it bends like warm caramel, edges that shatter delicately under pressure, and hidden pockets of molten hazelnut spread that ooze out like liquid gold. This isn't just another recipe — it's the result of my obsessive quest to create the ultimate cookie experience that would make grown adults fight over the last one.
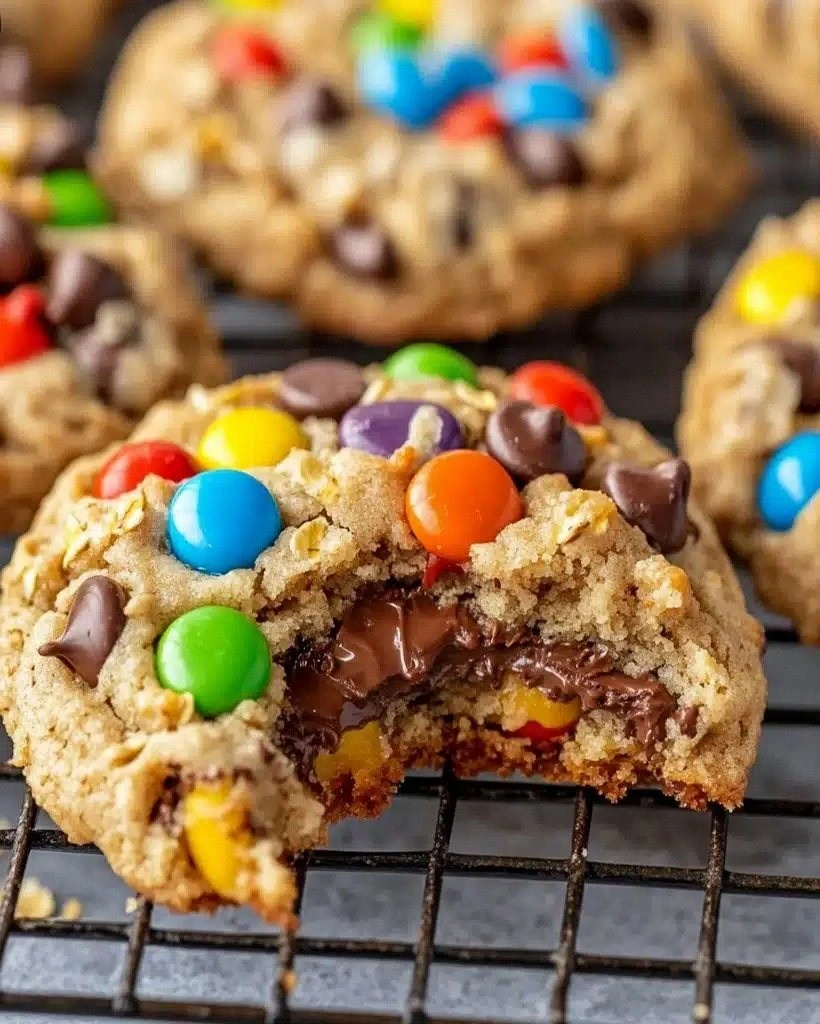
The secret weapon? A scandalous amount of chocolate hazelnut spread stuffed right into the center of each dough ball. Most recipes drizzle it on top or swirl it half-heartedly, but we're going full volcano here. When you break these cookies open, that glossy river of hazelnut chocolate flows out like a dessert lava lamp. I tested seventeen different versions before landing on this perfect balance — not too sweet, not too cakey, with just enough oats to give you that satisfying chew without turning into granola bars. My taste-testing crew (aka my very patient coworkers) started hiding cookies in their desk drawers because these disappeared faster than free concert tickets.
What makes these truly special is the candy-coated chocolate pieces scattered throughout like edible confetti. They don't just add color — they create little craters of crunch that contrast beautifully with the soft, yielding cookie base. The first time I pulled these from the oven, my kitchen smelled like Willy Wonka's factory had a baby with a French patisserie. That intoxicating blend of melting chocolate, toasted oats, and caramelizing sugars will have you hovering by the oven door like a dessert-deprived vulture. Trust me, I know from experience.
Let me walk you through every single step — by the end, you'll wonder how you ever made it any other way.
What Makes This Version Stand Out
Center-Filled Surprise: Unlike traditional chocolate chip cookies, these beauties hide a molten core of chocolate hazelnut spread that stays liquid even after cooling. It's like finding treasure in every bite, creating that Instagram-worthy pull-apart shot that'll make your followers drool on their phones.
Triple Chocolate Threat: We're not playing around with just one type of chocolate. Semi-sweet chips provide the classic flavor, candy-coated pieces add crunch and color, and the hazelnut spread brings a sophisticated depth that makes regular cookies taste one-dimensional in comparison.
Oatmeal's Secret Power: The rolled oats aren't just for texture — they act like tiny flavor sponges, absorbing all the butter and vanilla goodness while keeping the cookies impossibly moist for days. Skip them and you'll end up with flat, sad discs that taste like every other basic cookie.
Room Temperature Revolution: Every ingredient starts at room temperature, creating a dough that comes together like silk. Cold butter leads to chunky, broken cookies that spread like amoebas. Take the extra thirty minutes to let everything warm up — your future self will thank you.
The 24-Hour Rule: While you can bake these immediately, letting the dough rest overnight develops flavors that'll make you weep with joy. The sugars break down, the flour hydrates fully, and suddenly you've got bakery-quality cookies that taste like they cost six bucks each.
Crowd-Pleasing Flexibility: Whether you're feeding picky kids or sophisticated foodies, these cookies hit every mark. They're familiar enough to comfort, exciting enough to impress, and addictive enough that you'll become the designated cookie person for every gathering.
Make-Ahead Magic: The dough freezes beautifully for up to three months, meaning fresh-baked cookies are always twelve minutes away. Shape the dough balls, freeze them on a sheet, then store in bags. When cravings hit, bake from frozen — just add two extra minutes.
Alright, let's break down exactly what goes into this masterpiece...
Inside the Ingredient List
The Flavor Base
Butter isn't just a fat here — it's the flavor foundation that carries every other ingredient. I use European-style butter with 82% fat because those extra two percentage points make your cookies taste like they came from a French bakery. When creamed properly with the sugars, it traps air that creates lift and tenderness. Don't even think about substituting margarine unless you want cookies that taste like birthday candles melted on cardboard.
Brown sugar is your chewy texture insurance policy. The molasses content adds moisture that keeps these cookies soft for days, plus that gorgeous caramel flavor that makes people close their eyes when they take the first bite. Pack it firmly into your measuring cup like you're pressing down memories of bad dates — firmly but not aggressively. Dark brown sugar works too, giving you deeper, more complex notes.
Vanilla extract might seem basic, but it's the aromatic backbone that makes chocolate taste more chocolatey. Skip the imitation stuff — you need real vanilla here because there are so few ingredients that each one needs to pull its weight. The alcohol cooks off, leaving behind those floral, almost smoky notes that make people ask "what's your secret?"
The Texture Crew
All-purpose flour forms the structure, but don't just dump it in. I spoon and level mine because packed flour equals cakey cookies that taste like you're eating sweet bread. The protein content (usually 10-12%) gives just enough gluten development to hold everything together without turning tough. If you live in a humid climate, you might need an extra tablespoon to compensate for atmospheric moisture.
Rolled oats are the unsung heroes here — not quick oats, not steel-cut, but old-fashioned rolled oats. They create little pockets of chewiness that make each bite interesting, plus they absorb some of the butter and turn into tiny flavor bombs. Toast them lightly in a dry pan for five minutes before adding to the dough, and you'll unlock nutty flavors you never knew existed.
Baking soda does more than just leaven — it raises the pH of the dough, which helps with browning and gives you those gorgeous golden edges. Make sure yours is fresh (replace every six months) because old baking soda makes cookies that taste like refrigerator.
The Unexpected Star
Chocolate hazelnut spread isn't just for breakfast toast anymore. When frozen into little discs and hidden in the cookie center, it creates a molten core that stays liquid even after the cookies cool. I use the full-fat, full-sugar version because we're not making diet food here — we're making memories. Warm it slightly before freezing into portions so it spreads easily without breaking your spoon.
Candy-coated chocolates bring the party. They don't melt completely, so you get these little bursts of color and crunch that make the cookies look like confetti cake. The candy shell also prevents the chocolate inside from scorching, so you get perfect little gems scattered throughout. I like using mini versions because they distribute more evenly, but regular size works if that's what you have.
The Final Flourish
Walnuts are optional but highly recommended. They add a sophisticated bitterness that balances all the sweetness, plus they toast beautifully in the oven, releasing oils that perfume the entire cookie. Chop them yourself — pre-chopped nuts are often rancid and taste like pencil shavings. If someone has nut allergies, substitute with toasted pumpkin seeds for similar crunch without the emergency room visit.
Eggs should be large, room temperature, and free-range if possible. The yolks add richness and help emulsify the dough, while the whites provide structure. Cold eggs can cause the butter to seize, creating broken, greasy cookies that spread like oil spills. Drop them in warm water for five minutes if you forgot to take them out ahead of time.
Everything's prepped? Good. Let's get into the real action...
The Method — Step by Step
- Start by browning the butter for next-level flavor. Melt it in a light-colored pan over medium heat, swirling constantly. It'll foam, then the milk solids will turn golden brown and smell like toasted hazelnuts. This takes about 5-7 minutes — don't walk away or you'll have black butter that tastes like burnt popcorn. Pour into a heat-proof bowl and let cool until it's no longer hot to the touch, about 20 minutes.
- While the butter cools, prep your chocolate hazelnut spread. Line a small baking sheet with parchment and drop teaspoon-sized mounds of spread, spacing them apart. Freeze for at least 30 minutes — this is crucial because room temperature spread will dissolve into the dough and disappear. You should have about 24 little chocolate discs when you're done.
- Cream the cooled brown butter with both sugars for exactly 3 minutes on medium-high speed. Set a timer — under-creaming leaves you with dense cookies, over-creaming incorporates too much air and makes them cakey. The mixture should look like wet sand and smell like caramel corn. Scrape the bowl twice during creaming to ensure everything gets evenly incorporated.
- Add eggs one at a time, beating for 30 seconds between each addition. The first egg might look curdled — that's normal and will smooth out. Add vanilla and beat just until combined. Over-mixing here can make cookies tough because you're developing gluten in the flour when you add it.
- In a separate bowl, whisk together flour, baking soda, and salt for 30 seconds. This distributes the leavening evenly so you don't get one cookie that looks like a balloon and another that's flat as a pancake. Add oats and whisk again — this prevents clumps of flour in your finished cookies.
- Add dry ingredients to wet in three additions, mixing on low just until the flour disappears. The dough will look shaggy at first but will come together. Stop when you still see a few streaks of flour — they'll disappear as you add mix-ins. Over-mixed dough makes cookies that could double as hockey pucks.
- Fold in chocolate chips, candy pieces, and walnuts (if using) with a rubber spatula. The dough will be thick and studded with goodies. Give it a final check for any flour pockets hiding at the bottom of the bowl — these will bake into unpleasant dry spots.
- Scoop dough into 2-tablespoon portions using a cookie scoop or spoon. Flatten each ball slightly and place a frozen chocolate hazelnut disc in the center. Fold dough around it completely, rolling between your palms to seal. Place on parchment-lined baking sheets, spacing 2 inches apart — these spread more than you'd expect.
- Bake at 350°F for 12-14 minutes, rotating pans halfway through. The edges should be golden brown but the centers will look slightly underbaked — that's perfect. They'll continue cooking on the hot pan for 5 minutes after you pull them out. Cool on the pan for 5 minutes before transferring to a wire rack, or the centers will collapse when you try to move them.
That's it — you did it. But hold on, I've got a few more tricks that'll take this to another level...
Insider Tricks for Flawless Results
The Temperature Rule Nobody Follows
Your oven thermometer is lying to you. Most home ovens run 25 degrees hot or cold, which means your cookies could burn or stay pale and doughy. Buy an oven thermometer for under ten bucks and adjust accordingly. I bake these at exactly 345°F because my oven runs 5 degrees hot, and the difference is night and day. Also, let your oven preheat for a full 20 minutes — most ovens beep ready when they're still 50 degrees below target.
Why Your Nose Knows Best
Ignore the timer and trust your nose. When these cookies are perfectly baked, your kitchen will smell like a chocolate factory had a baby with a caramel shop. If you smell even a hint of burning, you've gone too far. The edges should be golden, not brown, and the centers should look like they're thinking about setting but haven't committed yet. This visual cue is more reliable than any timer.
The 5-Minute Rest That Changes Everything
After baking, let cookies rest on the hot pan for exactly 5 minutes — no more, no less. Too short and they'll fall apart when you move them. Too long and they'll overbake from residual heat, losing that gooey center. Set a timer and hover like a helicopter parent. During this time, they'll finish setting while staying soft in the middle.
Freezer Strategy for Instant Gratification
Shape all your dough balls, stuff them with frozen hazelnut spread, then freeze on a sheet pan. Once solid, transfer to freezer bags. When cookie cravings hit (and they will), bake from frozen at 325°F for 14-16 minutes. The result is actually better than fresh — the longer freeze time develops flavors like aging wine. I always keep a bag hidden behind the frozen peas for emergencies.
The Salt Sprinkle That Makes Magic
Right when they come out of the oven, sprinkle the tiniest pinch of flaky salt on each cookie. Not table salt — something with crunch like Maldon or fleur de sel. The salt wakes up all the flavors, makes the chocolate taste more chocolatey, and cuts through the sweetness. It's like turning up the contrast on a photo — everything becomes more vivid.
Creative Twists and Variations
This recipe is a playground. Here are some of my favorite ways to switch things up:
Peanut Butter Lover's Dream
Swap the chocolate hazelnut spread for peanut butter mixed with a tablespoon of honey. The honey keeps it from seizing up when frozen, and the peanut butter creates a Reese's cup effect. Add peanut butter chips instead of some chocolate chips, and use chopped peanuts instead of walnuts. Your house will smell like a peanut butter factory in the best way possible.
S'mores Explosion
Replace the hazelnut spread with marshmallow fluff mixed with crushed graham crackers. Fold in milk chocolate chips and mini marshmallows instead of the candy pieces. The marshmallows caramelize on top, creating that campfire flavor without the smoke. Pro tip: Broil for the last 30 seconds to toast the marshmallows, but watch like a hawk — they burn faster than your ex's new relationship.
Salted Caramel Indulgence
Use dulce de leche instead of chocolate hazelnut spread, and add a teaspoon of coarse salt to the dough. The caramel stays liquid when warm but sets into a chewy center when cool. Mix in butterscotch chips and top with a drizzle of caramel after baking. These taste like fall in cookie form, even in the middle of summer.
Mint Chocolate Madness
Add 1/4 teaspoon peppermint extract to the dough and use chocolate mint spread (yes, it exists, and yes, it's life-changing). Replace candy pieces with crushed mint candies or Andes mints. The cooling mint against warm chocolate creates a sensation that makes people do double-takes. Perfect for holiday cookie exchanges when you want to stand out from the crowd.
Triple Coconut Paradise
Substitute coconut oil for half the butter, use coconut extract instead of vanilla, and fold in toasted coconut flakes. Stuff with coconut cream mixed with white chocolate. The coconut oil makes the edges incredibly crispy while keeping centers chewy. Even coconut haters convert after trying these — they're that good.
Espresso Awakening
Dissolve 2 teaspoons instant espresso powder in the vanilla before adding to the dough. The coffee enhances the chocolate flavor without making them taste like coffee. Stuff with espresso-flavored chocolate spread and add chocolate-covered espresso beans instead of walnuts. Perfect for dinner parties when you want dessert and coffee in one bite.
Storing and Bringing It Back to Life
Fridge Storage
Store completely cooled cookies in an airtight container with a slice of bread. The bread acts like a humidity regulator, keeping cookies soft for up to 5 days. Change the bread when it gets stale — usually every other day. Layer cookies between parchment paper if stacking, because they'll stick together and you'll end up with cookie puzzles when you try to separate them.
Freezer Friendly
Wrap individual cookies tightly in plastic wrap, then store in freezer bags for up to 3 months. Thaw at room temperature for 30 minutes, or microwave for 15 seconds for that fresh-baked experience. The hazelnut center might firm up, but 10 seconds in the microwave brings back the molten magic. I actually prefer them slightly frozen — the texture becomes like cookie dough ice cream.
Best Reheating Method
To revive day-old cookies, wrap in damp paper towel and microwave for 8-10 seconds. The steam rehydrates them, making them taste freshly baked. For multiple cookies, place on a sheet and warm in a 300°F oven for 5 minutes. Never reheat longer or you'll have cookie crisps that could break teeth. The goal is warm and soft, not hot and hard.