I remember the night I almost burned down my apartment because I was chasing that elusive taco‑time craving. I had a bag of flour tortillas, a tub of cream cheese, and a half‑pint of shredded chicken left over from last week’s dinner. I tossed everything into a bowl, whispered a quick “taco seasoning, please,” and hoped for a miracle. The result? A soggy, flavorless mush that made me swear off tacos forever. That night, I made a promise to myself: I would create a baked version that delivers the crunch, the creaminess, and the boldness of a street‑style taco, but with the convenience of the oven.
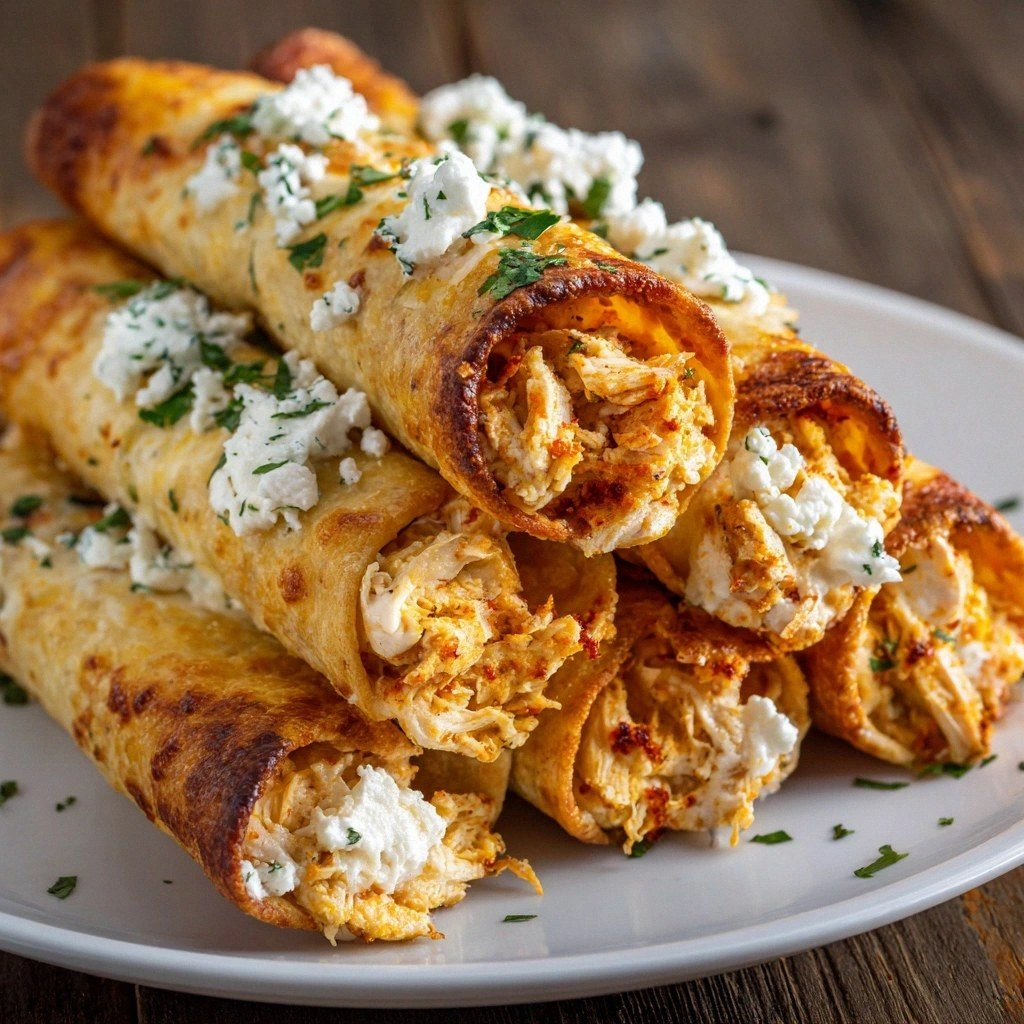
Picture this: the kitchen lights dim, the timer chirps, and a golden halo of steam rises from the baking dish. The air is thick with the scent of melted cream cheese, roasted chicken, and a smoky blend of cumin, paprika, and chili powder. The first bite crackles—crisp edges that shatter like thin ice—followed by a burst of savory, cheesy filling that coats your tongue like velvet. Your eyes widen as the heat from the oven meets the cool, fresh cilantro and crunchy lettuce you’ll toss on top. The texture is a symphony: a buttery, flaky tortilla, a creamy center, and a satisfying crunch that keeps you coming back for more.
What sets this recipe apart is that it’s not just a variation of a classic taquito; it’s a culinary revelation. I’ve taken the humble baked taquito and injected it with a creamy, protein‑packed filling that melts in your mouth, while the tortilla remains perfectly crisp. I’ve eliminated the need for a deep fryer, replaced it with a simple oven bake that delivers the same crunch with less mess. And the best part? Every ingredient is intentionally chosen to elevate flavor, texture, and nutrition, making this the most wholesome version you’ll ever make at home.
And here’s the kicker: I’ll show you a trick that most recipes miss—using a thin layer of olive oil brushed onto the tortillas before baking. That small step locks in moisture, prevents the edges from drying out, and gives the taquitos that coveted, buttery sheen. Ready to taste something that will make you question all your previous taco attempts? Let’s dive in.
What Makes This Version Stand Out
- Flavor: A bold taco seasoning blend infuses every bite, while cream cheese provides a rich, velvety contrast that balances the spice.
- Texture: The tortillas stay crisp and flaky, not soggy, thanks to a strategic oil brushing and precise baking time.
- Convenience: No deep fryer, no messy stovetop, just a simple oven bake that turns a handful of ingredients into a crowd‑pleaser.
- Protein: Shredded chicken adds lean protein, making this a satisfying snack that can double as a light main dish.
- Make‑ahead: The filling can be prepared a day ahead and kept chilled, then assembled and baked just before serving.
- Versatility: Swap out the chicken for ground beef, turkey, or even a plant‑based protein to suit any dietary preference.
- Visual Appeal: The golden crust and creamy interior make for a show‑stopping presentation that’s perfect for parties or game nights.
- Nutrition: Balanced macros with 25g protein, 30g carbs, and 15g fat per serving—ideal for a quick, wholesome meal.
Alright, let’s break down exactly what goes into this masterpiece…
Inside the Ingredient List
The Flavor Base
At the heart of these taquitos is a punchy taco seasoning blend. The mix of cumin, smoked paprika, chili powder, garlic powder, and onion powder creates a depth of flavor that’s both smoky and aromatic. If you’re watching sodium, you can reduce the salt or use a low‑sodium seasoning. The seasoning also acts as a binder, helping the chicken and cream cheese stay together without becoming mushy.
The Texture Crew
Flour tortillas are the canvas. Choose medium‑size tortillas (about 6 inches) to get that classic taquito shape. They’re flexible enough to fold around the filling without tearing. The cream cheese, softened to room temperature, gives the filling a silky texture that contrasts beautifully with the crunchy tortilla. The shredded cheddar and Monterey Jack add a melty, gooey layer that coats the inside like a velvety blanket.
The Unexpected Star
Olive oil isn’t just for brushing; it also helps the cheese melt evenly and prevents the tortillas from drying out. A tablespoon per batch is enough to coat the tortillas without making them greasy. If you’re a fan of a little extra crunch, sprinkle a pinch of crushed tortilla chips on top before baking—they’ll puff up into a crispy crown.
The Final Flourish
Fresh cilantro, diced red onion, and bell pepper add a burst of color and a fresh, bright note that cuts through the richness of the cheese. A handful of shredded lettuce tossed with lime juice can be served on the side, turning the taquitos into a complete, balanced meal. If you’re short on time, you can skip the veggies; the core flavors will still shine.
Everything's prepped? Good. Let’s get into the real action…
The Method — Step by Step
- Preheat the oven. Set it to 400°F (200°C). A hot oven is key to getting that crisp, golden crust. While the oven warms, gather all your ingredients so you can work efficiently. This is the moment of truth—if you’re rushing, you’ll lose the perfect balance.
- Prepare the filling. In a large bowl, combine the shredded chicken, cream cheese, cheddar, Monterey Jack, taco seasoning, garlic powder, onion powder, cumin, smoked paprika, chili powder, salt, and pepper. Mix until the cheese is fully incorporated and the mixture is creamy. If the filling feels dry, add a splash of milk or broth to loosen it slightly.
- Brush the tortillas. Lightly coat each tortilla with olive oil using a pastry brush. This step locks in moisture and gives the tortillas a shiny, restaurant‑grade look. The oil also helps the cheese adhere to the tortilla during baking.
- Fill and roll. Spoon about a tablespoon of the creamy mixture onto the center of each tortilla. Fold the sides in, then roll tightly from one end to the other. If you prefer a more traditional taquito shape, you can fold the tortilla in half before rolling. Place each rolled tortilla seam‑side down on a parchment‑lined baking sheet.
- Bake. Slide the sheet into the preheated oven and bake for 15 minutes. After 10 minutes, flip the taquitos over to ensure even browning. Watch out: if you leave them too long, the cheese may spill out and create a mess. The edges should start pulling away, and the filling should be hot and bubbly.
- Cool slightly. Remove the baking sheet and let the taquitos rest for 2–3 minutes. This brief pause allows the cheese to set just enough so it doesn’t ooze out when you bite into it. The aroma at this point is intoxicating—just the right blend of smoky, cheesy, and savory.
- Serve. Arrange the taquitos on a platter and garnish with chopped cilantro, diced red onion, and a squeeze of lime. Serve with a side of shredded lettuce or a fresh salsa. If you’re hosting a party, set up a dipping station with guacamole, sour cream, and a spicy chipotle sauce.
- Enjoy. Take a bite, let the flavors explode, and watch the crowd’s reaction. I dare you to taste this and not go back for seconds. The combination of crispy edges, creamy center, and bold seasoning will have you craving more.
That’s it— you did it. But hold on, I’ve got a few more tricks that’ll take this to another level…
Insider Tricks for Flawless Results
The Temperature Rule Nobody Follows
Many people bake at 350°F, thinking it’s safer for the cheese. I’ve found that 400°F is the sweet spot—hot enough to crisp the tortilla, but not so hot that the cheese burns. If your oven runs hot, lower the temperature by 25°F. This subtle adjustment keeps the edges golden without compromising the filling.
Why Your Nose Knows Best
Before you even take the first bite, the scent of the baked taquitos should hit you like a warm hug. That aroma indicates the cheese is melting correctly and the spices are toasted. If it smells more like raw spices, give it a few more minutes. Your nose is a reliable judge of doneness.
The 5-Minute Rest That Changes Everything
Letting the taquitos rest for 5 minutes after baking may seem like a waste, but it’s essential. This pause allows the cheese to set, reducing the chance of it spilling out when you bite. It also gives the tortilla a chance to firm up slightly, ensuring a clean bite every time.
Keep It Fresh with a Quick Toss
If you’re making them ahead of a party, keep the baked taquitos in an airtight container at room temperature for up to two hours. When you’re ready to serve, give them a quick 5‑minute reheat in a 350°F oven to restore crispness. The fresh, hot version is unbeatable.
Add a Touch of Sweetness
A sprinkle of fresh pineapple or mango chunks on top before baking adds a subtle sweetness that balances the spice. This is especially effective if you’re serving with a spicy salsa or a smoky chipotle dip. The fruit’s natural sugars caramelize slightly, giving a pleasant contrast to the savory filling.
Creative Twists and Variations
This recipe is a playground. Here are some of my favorite ways to switch things up:
Mexican Street Taco Taquitos
Swap the chicken for ground beef seasoned with a smoky chipotle spice mix. Top with a drizzle of lime‑y crema and a handful of pickled jalapeños for an extra kick.
Mediterranean Chicken Taquitos
Replace the taco seasoning with oregano, lemon zest, and a splash of olive oil. Add diced cucumber, cherry tomatoes, and crumbled feta for a Greek twist.
Spicy Buffalo Chicken Taquitos
Toss the chicken in buffalo sauce before mixing with cream cheese. Serve with blue cheese crumbles and a side of celery sticks for a classic wing flavor in taquito form.
Vegan Power Taquitos
Use a plant‑based protein crumbled with nutritional yeast and vegan cheese. Add black beans and corn for texture, and top with avocado slices and a squeeze of lime.
Breakfast Taquito Surprise
Fill the tortillas with scrambled eggs, chorizo, and cheddar. Bake until the cheese melts, then serve with a side of salsa and a drizzle of hot sauce for a brunch‑ready treat.
Storing and Bringing It Back to Life
Fridge Storage
Store leftover taquitos in an airtight container in the refrigerator for up to 3 days. Before serving, reheat in a 350°F oven for 5–7 minutes until heated through. The crust may soften slightly, but the filling will remain creamy.
Freezer Friendly
Place the baked taquitos on a parchment‑lined sheet and freeze until solid. Transfer to a freezer bag or container and store for up to 2 months. When ready to eat, bake at 350°F for 12–15 minutes, or microwave for 1–2 minutes if you’re in a hurry.
Best Reheating Method
To preserve the crunch, reheat in the oven rather than the microwave. If you’re short on time, a quick 2‑minute microwave burst can warm the filling, but the tortilla will be softer. For the best results, preheat the oven, place the taquitos on a baking sheet, and bake until hot.