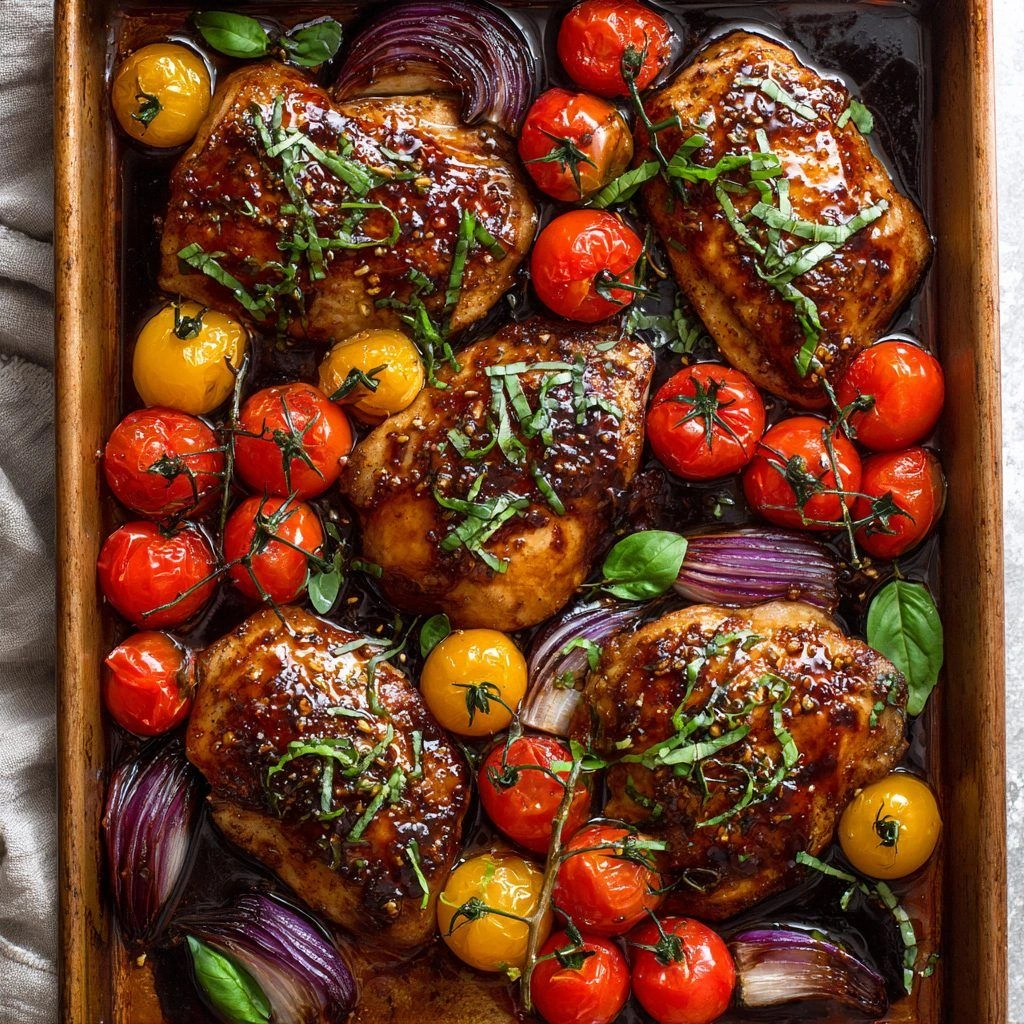
Picture this: you’re in a cramped kitchen, a stack of last night’s take‑out boxes on the counter, and you’re craving something that feels like a culinary victory rather than a culinary mess. You’ve tried the classic “balsamic chicken” recipe from that one blog that promised a glossy glaze and tender meat, but every time it turns out either dry or too sweet. I swear, the only thing that ever tasted like a triumph in that kitchen was the instant noodles I’d been gnawing on. Then, on a whim, I grabbed a bottle of balsamic vinegar, a few chicken breasts, and decided to experiment. The result? A dish that melts in your mouth, with a caramelized crust that shatters like thin ice, and a sauce that coats the chicken like velvet. I dare you to taste this and not go back for seconds.
This isn’t just another “balsamic chicken” recipe. It’s a symphony of flavors that starts with the first sizzle as the chicken hits the pan, a crackle that announces the transformation, and a fragrant aroma of garlic and rosemary that fills the kitchen. The glaze, thickened just enough, clings to every surface, creating a glossy sheen that glistens under the oven light. Every bite delivers a burst of umami, a hint of sweetness, and a subtle tang that lingers on the palate. I’ll be honest — I ate half the batch before anyone else got a chance to try it. And that’s because this version is hands down the best you’ll ever make at home.
What sets this recipe apart is its meticulous balance of simple ingredients, precise timing, and a few secret techniques that elevate the dish from ordinary to unforgettable. Most recipes get this completely wrong by over‑cooking the chicken or using too much sugar, but I’ve cracked the code to keep the meat juicy while achieving a caramelized finish. I’ll be your side‑by‑side guide, walking you through each step, offering micro‑challenges, and sharing the exact temperature and timing that will make your kitchen smell incredible. Picture yourself pulling this out of the oven, the whole kitchen smelling incredible, and your guests asking for the recipe. Stay with me here — this is worth it.
Let me walk you through every single step — by the end, you’ll wonder how you ever made it any other way. I’m not just telling you a recipe; I’m handing you a blueprint for a dish that will become your go‑to for weeknights, date nights, and even when you’re hosting a casual gathering. The next section will break down exactly what makes this masterpiece so irresistible. Trust me, once you taste it, you’ll never go back to the bland versions you’ve tried before.
What Makes This Version Stand Out
- Flavor: The combination of balsamic vinegar and honey creates a balanced sweet‑tang that coats the chicken without overpowering it. The result is a glaze that sticks like a second skin, delivering flavor with every bite.
- Texture: The high‑heat sear locks in moisture, while the slow oven finish produces a caramelized crust that snaps when you bite into it. This contrast of crisp and succulent is a game‑changer.
- Simplicity: No fancy equipment or hard‑to‑find ingredients. A skillet, a baking sheet, and pantry staples are all you need.
- Time Efficiency: From prep to plate, you’re looking at 45 minutes, making it the perfect weeknight dinner.
- Versatility: The base can be swapped for different proteins or paired with a variety of sides, from roasted veggies to a light pasta.
- Crowd‑Pleaser: The glossy glaze and aromatic herbs make the dish look restaurant‑quality, ideal for impressing guests.
- Make‑Ahead Friendly: The glazed chicken can be prepared ahead of time and reheated without losing its caramelized edge.
- Ingredient Quality: Using fresh herbs and high‑quality balsamic vinegar elevates the dish from ordinary to extraordinary.
Alright, let's break down exactly what goes into this masterpiece…
Inside the Ingredient List
Protein Power
Four boneless, skinless chicken breasts form the backbone of this dish. They’re the canvas that absorbs the glaze, delivering a tender, juicy bite. If you prefer a leaner cut, chicken thighs work beautifully, adding a richer flavor and slightly higher fat content. Remember, the key is to keep the chicken at room temperature for 15 minutes before cooking; this ensures even cooking.
Flavor Base
The foundation of the glaze is a blend of balsamic vinegar and olive oil. The vinegar provides acidity that cuts through the richness of the chicken, while the oil balances the tang and helps the glaze caramelize. A splash of honey or brown sugar adds a subtle sweetness that balances the vinegar’s sharpness. If you’re craving a smoky twist, add a pinch of smoked paprika to the base.
Herb & Finish
Fresh garlic, dried oregano, and a pinch of black pepper are the aromatic trio that elevates the dish. Garlic’s pungency pairs with oregano’s earthy undertones, while pepper adds a gentle heat that rounds out the flavors. A handful of chopped parsley or a drizzle of lemon zest at the end brightens the dish and adds a pop of color. If you’re a fan of Parmesan, sprinkle it on top before the final bake for a nutty finish.
Optional Touches
A dash of Dijon mustard can be whisked into the glaze to add depth and a slight tang. For a Mediterranean vibe, toss in a handful of capers or sun‑dried tomatoes before baking. A splash of white wine or chicken broth can thin the glaze slightly, making it easier to coat the chicken evenly. If you’re looking to cut calories, reduce the honey to one tablespoon and add a splash of sparkling water for moisture.
Everything's prepped? Good. Let's get into the real action…
The Method — Step by Step
- Pat the chicken breasts dry with paper towels; this step ensures a crisp sear. Sprinkle salt and pepper evenly on both sides, then set aside. The dry surface allows the glaze to cling better and prevents steaming.
- In a small bowl, whisk together balsamic vinegar, olive oil, honey, minced garlic, oregano, and a splash of Dijon mustard if using. The mixture should be smooth, with no lumps of garlic clinging to the surface. This is the flavor base that will caramelize beautifully.
- Heat a cast‑iron skillet over medium‑high heat; add a tablespoon of olive oil. Once the oil shimmers, place the chicken breasts skin‑side down (if they have skin) and let them sear for 3–4 minutes until a golden crust forms.
- Flip the chicken and pour half of the glaze over the top. Let it bubble and thicken for 2 minutes, creating a sticky coating. The sizzle at this point is the soundtrack of success.
- Transfer the skillet to a preheated oven at 375°F (190°C). Bake for 12–15 minutes, or until the internal temperature reaches 165°F (74°C). The glaze should be thickened and slightly darkened, like a caramel.
- Remove the skillet from the oven and let the chicken rest for 5 minutes. This allows the juices to redistribute, ensuring every bite is moist.
- While the chicken rests, pour the remaining glaze into a small saucepan and simmer over low heat for 3–4 minutes until it reduces to a syrupy consistency. If it’s too thick, add a splash of water or white wine to thin it.
- Slice the chicken into medallions, drizzle the reduced glaze over the top, and garnish with fresh parsley or grated Parmesan. The final glaze should be glossy, like a polished trophy.
- Serve immediately over a bed of roasted vegetables, a light pasta, or a simple green salad. The dish’s aroma will have your guests lining up for seconds.
- Enjoy the applause and the deliciousness. If you’re feeling adventurous, pair with a crisp white wine or a light rosé for a complete experience.
That's it — you did it. But hold on, I've got a few more tricks that'll take this to another level…
Insider Tricks for Flawless Results
The Temperature Rule Nobody Follows
Many cooks over‑cook chicken, leading to dry meat. The secret is to use a meat thermometer and pull the chicken at 165°F (74°C). This ensures the juices stay locked in, giving you a moist, tender bite. I’ve seen people leave the chicken in the oven for 20 minutes and end up with a rubbery texture; never do that.
Why Your Nose Knows Best
A good cook can tell when the glaze is ready by smell alone. A sweet, caramelized aroma is the cue to remove the chicken. If you smell burnt sugar, it’s time to lower the heat. Trust your senses; they’re more reliable than a timer.
The 5-Minute Rest That Changes Everything
Resting the chicken after baking is often overlooked. This five‑minute pause allows the juices to redistribute, preventing a dry center. Think of it as a brief meditation for the meat; it comes out more flavorful and juicy.
The Secret to a Sticky Glaze
If your glaze isn’t thickening, add a teaspoon of cornstarch mixed with a tablespoon of cold water. Stir it in during the final simmer; it will thicken without altering the flavor. This trick is especially handy if you’re using a lower‑sugar glaze.
The Finish with Fresh Herbs
Sprinkling fresh parsley or basil right before serving adds a burst of freshness that cuts through the richness. It also gives the dish a vibrant color that makes it Instagram‑ready. A squeeze of lemon juice can brighten the glaze further, creating a balanced flavor profile.
The One‑Pan Wonder
You can throw in a handful of sliced bell peppers or zucchini into the skillet for a side dish. They’ll absorb the glaze, creating a one‑pan meal that’s both convenient and delicious. This is perfect for busy weeknights when you want to minimize cleanup.
Creative Twists and Variations
This recipe is a playground. Here are some of my favorite ways to switch things up:
Mediterranean Medley
Swap the honey for a splash of pomegranate molasses and toss in sun‑dried tomatoes and olives. The result is a tangy, slightly sweet sauce that pairs wonderfully with couscous or quinoa.
Asian Fusion
Add a tablespoon of soy sauce and a pinch of five‑spice powder to the glaze. Serve over jasmine rice and garnish with sliced green onions for an Asian‑inspired twist.
Creamy Parmesan Finale
Stir in a quarter cup of heavy cream and a handful of grated Parmesan before the final bake. The sauce becomes silky and rich, perfect for a cozy dinner.
Spicy Kick
Add a dash of cayenne pepper or a few slices of fresh red chilies to the glaze. The heat balances the sweetness, making this a great match for a cold beer or a chilled rosé.
Herb‑Infused Balsamic
Muddle fresh rosemary, thyme, and basil into the glaze before baking. The herbs infuse the sauce, creating a complex aroma that elevates the dish.
Vegetarian Version
Replace chicken with thick slices of portobello mushrooms or firm tofu. The glaze will cling beautifully, giving you a vegetarian option that still feels indulgent.
Storing and Bringing It Back to Life
Fridge Storage
Cool the chicken completely before storing. Place it in an airtight container and refrigerate for up to 3 days. The glaze will firm up, making it easier to reheat.
Freezer Friendly
Wrap the chicken and glaze separately in plastic wrap and place them in freezer bags. They’ll keep for up to 2 months. Thaw overnight in the fridge before reheating.
Best Reheating Method
Reheat in a preheated oven at 350°F (175°C) for 10–12 minutes, or until warmed through. Add a splash of water or broth before reheating to prevent dryness. A quick pan‑simmer can also revive the glaze’s glossy finish.